


When you hear the term 'high-res' thrown about with such abandon when it comes to images for web use, have you ever stopped to think just how big or how high quality and image meant for the web needs to be?

When you hear the term 'high-res' thrown about with such abandon when it comes to images for web use, have you ever stopped to think just how big or how high quality and image meant for the web needs to be?
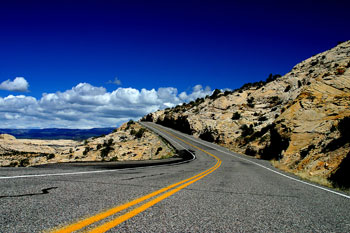
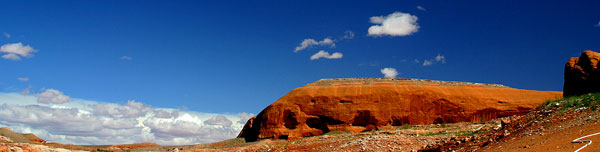
There's an assumption that high-contrast images are more dynamic, more compelling, more inviting. Have a go at some low-contrast photography. You might surprise yourself with the results.
Balance doesn't mean symmetry; it means an internal consistency and tension within your photos. And it's a vital element of composition.
Great photos might be down to a little bit of luck, but most of that 'luck' you make yourself. Don't believe us? Read on...
For all that our cameras are capable of rendering the world in glorious Technicolor, their light meters are remarkably simple: they can only 'see' in shades of grey. When a light meter attempts to judge the correct exposure for a scene, it does so under the assumption that the scene's average brightness is middle grey (18% grey), which is exactly half-way between absolute black and bright white.
You are into taking photos, obviously – so what do you do with them? Many of you probably make online galleries, or you create prints to hang on your walls – or perhaps you even sell prints to others. Eventually, as photography progresses from a mild interest via passionate hobby and into the realms of what could be seen as a professional career, you are going to have to create a portfolio of your images, to show to prospective clients.
Heck, even if you have no clients, you will still want to make a portfolio. Imagine how great it’ll be to show the grandkids!
So, you are a photographer, and you want to make a portfolio. I have had to do this a few times, and I have fucked up a few times, so I learned all of this the harshest way possible. Ah well – on with the show
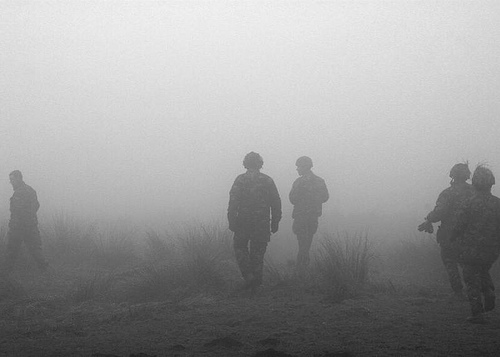 Into the Mist (Territorial Army III) by Photocritic.org, on Flickr
If you want to show your pictures in a gallery, you will need to make a selection of images around a theme of some sort. If you just run around and snap pictures, you will have to scrutinize them, to find out what they really are about. If there is no connection whatsoever between them, you might want to consider not making a portfolio, and rather concentrate on taking more pictures.
Why is a theme important? Well, although single pictures can be interesting, galleries tend to be interested in offering its visitors with a journey. Pick an emotion, and explore it visually, or perhaps a situation or a place. As long as there is some kind of “red thread” tying your images into a whole, you’ll be all right.
Make sure that the images are in a logical order – either cronological, or through mood development. Be prepared that you will probably have to talk the person you are presenting your portfolio to through all the pictures, so if you have some kind of story prepared, all the better. If you decide to mix colour prints and black and white prints, you’d better have a very good explanation as to why.
A good selection of images is 10-20. If you have several themes, make different portfolios, and present them separately.
This type of portfolio is the photographic equivalent of a “Best Of…” album.
Image libraries are the other extreme – here, it is okay to have a large batch of single, non-interconnected images, as this is not what the target audience is looking for. What they are looking for, however, is genericicity and perfection. The more generic the image is, the bigger the chance somebody will use it, as it is adaptable for many different situations.
If your image has a flaw, ditch it. If your image is only slightly out of focus, ditch it. If your image has brand names or visible logos in it, chances are it is worthless in connection with image libraries. If you do not have model releases for the people in your images, get rid of the pictures.
In short: Make sure you only show your very best images. It is better to pitch 3 perfect pictures than 15 good ones, but that don’t stand out from the mass. You should aim for 7-15 great pictures, however.
 Strongly emotive photos can help your portfolio shine
If you are making a commercial portfolio, be prepared to make it focussed. You might need to change your portfolio around depending on who you are pitching it to. If you are pitching fashion work, make sure you have 5-6 pictures from each series you have done, to show that you can consistently take good pictures. If you are doing product photography, make sure that you do the same: Same product from various angles etc.
If you try to pitch your general skills as a photographer, make sure that you make several portfolios. One for portraiture, one for nature, one for product photography, etc. That way, the person reviewing your portfolio can mentally prepare for something else. Also, it allows you to show only the portfolios that are relevant for the job you are doing.
If you have gotten pictures in print (especially viable if you are planning to do freelance news photography), include both prints and newspaper clippings – side by side on adjecent pages is good.
This is what people ask about most: How do you present your portfolio?
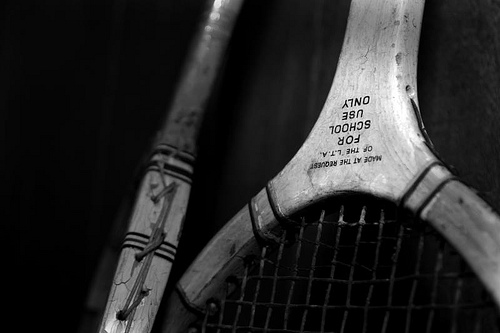 For School Use Only by Photocritic.org, on Flickr
First of all, make sure that your prints are of the best quality possible. This means that they should be of a decent size (approximate A4 / letter size is an ideal tradeoff between presentability and portability)
As for the actual presentation of the portfolio, the answer is difficult to offer. Although a nice leather folder with high-quality plastic inlays to keep your images in offers a good initial impact, it may not be ideal, as the plastic may introduce sheen and / or reflections on the images, making them difficult to see.
In the past, I have seen portfolios that are presented as pictures mounted on cardboard, even loose pictures in a rolodex-style folder. You could consider getting a mini- easel that you can place the images on individually. That allows you and the reviewer to take a few steps away from the images – an especially good bonus if that is how the images are meant to be seen.
Creativity is a big bonus – if you manage to come up with a good way to present your portfolio effectively, it probably means you are doing the right thing. Don’t fall for the temptation to show your images on a computer screen or data projector, however, unless this is how they are meant to be presented. If you only have slides, there is no way around showing it on a slide projector, but if there is any way you won’t have to bring and / or arrange a projector, it is better.
Oh, and it is all in the attitude. Go in there, be sure of yourself, talk, talk, talk, and don’t for a second let up that you had even slightly considered the possibility of them not liking your images. You’d be amazed what difference it makes.
Good luck!
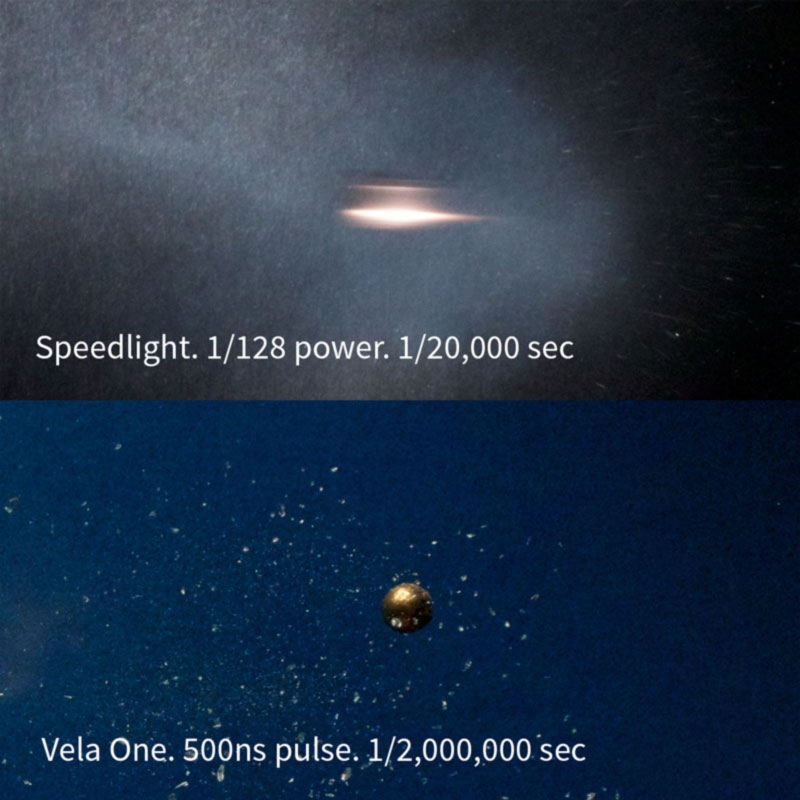
If you're up to date on your photography history, you'll be aware that some of the stuff we used to have to do to get artificial light was basically the same as setting off fireworks next to your camera to capture the photos. Quaint as that feels, this is still the reality for high-speed photographers... If you want a swift way to kill yourself with photography equipment, the high-voltage flashes used to stop fast-moving objects is an easy way to go.
Let me explain. When we're talking about 'high speed' photography, we're not talking about the time it takes to trigger a flash. With a good high-speed flash trigger, you can go from trigger event (say, a laser beam being broken, or a loud enough sound) to strobe flash in a matter of microseconds.
The challenge lies elsewhere: If you're trying to take a photo of something that moves very quickly indeed—say, a bullet—you need a very short burst of light. Now, what photographers traditionally think of as a very short burst of light—like the strobe from your studio flash—is actually a very long burst.
The problem is this: A standard .22 bullet has a muzzle velocity of 340 metres per second. So, if your very high-end camera with a shutter speed of 1/8000 second were to try and capture this bullet in flight, you'd be out of luck. Even at 1/8000 second, your bullet will travel 4.2 cm / 1.6 inches. That means you get a tremendous amount of blur in your photo — you certainly couldn't stop it.
So, what is a poor photographer to do? Well, a flash has a much shorter duration. A PC Buff Einstein (known to have a very short flash duration) will be about 1/13,000 second—but, when translated to our flying bullet, we're left with a blur again—2.6 cm / 1 inch is still a streak of blur. That's no way to stop a bullet, photographicaly speaking.
Even really short-duration strobes—like a Nikon SB-80DX at its lowest power output—has a duration of 1/22,000 second. Impressive, but no match for our trusty bullet — 1.54 cm / 0.6 inches. That's more like it, but still results in a rather blurry image.
So, what's a poor high-speed photographer to do? Well, Harold Edgerton, who was the father of high-speed photography, used an 'air gap flash'. If that sounds fancy, trust me—it really isn't. Imagine an electrode and a cathode, with a spark jumping between the two. In essence, you've got lightning—yes, real lightning—happening in your photography. It isn't difficult—anyone with a basic knowledge of electronics can build one—but it's incredibly dangerous. As in, could-very-well-kill-you-type-dangerous. We're talking at least 20,000 volts to create a spark that's bright enough to use for photography.
There are some slightly-less-likely-to-kill-you solutions out there, but they cost the earth: Upwards of $2,000 for basic short-duration strobes. Interesting, yes, but you'd really have to love high-speed photography to lay down that sort of money to embrace your hobby.
The solution, it seems, might be in technology. The clever lot over at Vela Labs have come up with a device they call the Vela One. It's not available to buy yet, but a Kickstarter campaign is aiming to rectify that situation.
To solve the 'this thing might kill you' and the price-tag issue, they're using LEDs designed for architectural use (i.e. mega-bright LED bulbs), and then they blink them very, very briefly.

By dumping a ton of power (in fact, 2000 times what they are designed for) into the LEDs for a brief period of time, they're able to get a lot of light out of the LEDs, for a very brief burst. How brief? Well, guys at Vela Labs claim it can be done in 1/2,000,000 of a second—which translates to 0.017 cm—or about twice the width of a human hair. To a photographer, this means pin-sharp photos, even of objects of moving at high speed.
Of course, this doesn't come for free: The cost of super-brief flashes of light is brightness. That is true for an air-gap flash, but also for the Vela One; but it looks as if the One offers a pretty good trade-off between flash duration and brightness. The photos speak for themselves.
At £550, it's not cheap, but it's a lot more affordable than some of the other high-speed options out there (although there's a VIP Early Bird offer of £400, but you need to be quick with only ten available)... And at least it's unlikely to kill you as you use it, which I find is always a feature I look for in most of my photographic kit.
The results? Well, let's take a look:

If you want the Vela One to exist, you'll have to head over to Kickstarter, and be quick about it, too. The campaign ends in only 22 days, so get a wriggle on!
Whenever I'm asked for quick tips for better smartphone photos, I usually proffer the same advice that I give to any other type of photographer: get closer and tuck your elbows into your body. But with smartphones (or indeed with some point-and-shoots) that first pointer in augmented with an admonishment to avoid digital zoom. So that's do get closer, but don't get closer using the capability that manufacturers have baked into their devices to accomplish it. Get closer, but nix the digi-zoom.
The truth is, digital zoom sucks. One day it might not, but right now it does. It sucks because digital zoom is nothing more than a glorified cropping tool. Whereas optical zoom relies on the physics of lenses to ensure that what you see appears larger or closer, digital zoom simply crops away the extraneous pixels and enlarges those remaining in the picture. While this might get you closer to your subject—and that's rule number one—it has an unfortunate effect on your images.
By enlarging the pixels that are on display, you've degraded your picture quality. You're spreading your information more thinly over the same surface area. It's the technological equivalent of spreading one teaspoon of jam over a slice of toast rather than two. Even if the processor is clever enough to use interpolation to enlarge the image, there's probably still some degradation.
Don't believe me? Have a look at these examples and tell me which is superior. I'll bet you a friendly pound that you prefer the image where I've got closer to my subject using my hands and my feet rather than the slider on my iPhone.
The first step in the art of getting closer is to do so physically: walk in, reach in, lean in. Getting optically closer is your next step. And if you're still not close enough, take the photo with what you've got and crop in after the fact. You'll still be spreading those pixels more thinly, but at least you'll have better control over the final image.

And if you want to get really close, try an Easy-Macro band. It's $15 well spent.
When setting your shutter speed, have you ever wound the adjustment wheel so far into long exposure that you've gone past seconds and found 'B' or 'Bulb' on your screen? Or maybe you've noticed that you have a 'B' option on your mode wheel, somewhere between Manual and Custom settings? This is bulb mode, and it allows you to control the duration of the exposure for precisely as long as you would like. It's perfect for exposures in excess of the 30 seconds that most cameras have as their longest shutter speed, or for when you need to be in control, for example if you're practising high-speed photography. First, a quick word on why it's known as 'bulb' mode. Haje has a much more thorough explanation here, but it doesn't have anything to do with light bulbs. It's from back in the day when you could control your shutter speed using an air bulb connected to your camera.
When your camera is in bulb mode, you open the shutter by depressing the shutter release button; as soon as you raise your finger off of the button, the shutter will close. Seeing as it isn't terribly convenient to stand with your finger on your shutter release button for minutes or even hours on end—and it's not fabulous for camera-shake, either—most people use bulb mode in conjunction with a remote shutter release. And a tripod, but that's probably quite obvious.
Plenty of remote shutter releases come with a locking mechanism, so that you don't need to hold your finger down there, either. However, if you go for something such as our much-beloved Triggertrap, you can select from a variety of different modes to control your super-long exposure, including a timed release that lets you set the duration of your exposure down to fractions of a second, a star-trails setting, and even a bulb-ramping option to fine-tune exposure during very long time-lapse recordings.
Even if you're shooting at night, your camera's sensor will be able to detect far more light than you think it can, especially with a very long exposure. Consequently, using a small aperture is recommended. If you're photographing during the day, you might benefit from a neutral density filter to prevent unavoidably over-exposing your images, too.
It is worth bearing in mind that using bulb mode can drain your battery enormously. Don't set off to capture star trails with a less-than-fully-charged battery. Take a spare if you have one, too. It's a complete waste to maroon yourself in the middle of nowhere with limited light pollution only for your camera to keel over halfway into the exposure.
Now that you know what bulb is, what can you do with it? Perhaps you'd like to try some long exposures of landscapes? Or maybe capture some smooth, milky-looking water tumbling from a fall. You might want to try your hand at a star trail, or have a go at light painting. You could even grab a flash adapter and have a crack at some high-speed photography and burst some water balloons. So many options presented to you with so much time from bulb mode!
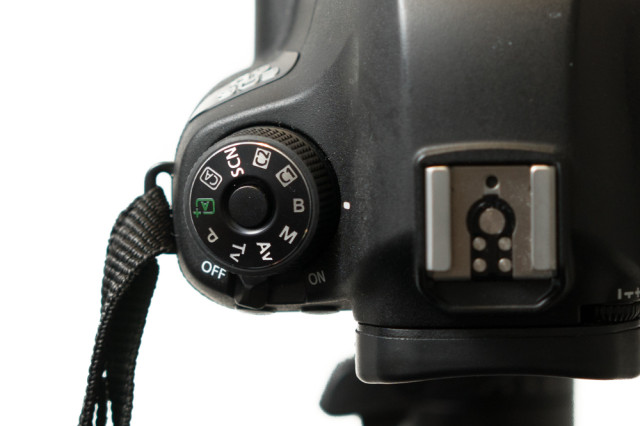
If you look at the top of your SLR camera, you’ll probably find a little round dial, which has a whole load of different settings on them. Some of them are automatic settings (like the green square), some of them are ‘creative automatic’ settings (like the little runner), and others are the modes that let you do the heavy lifting yourself (P, Tv, Av and M).

This little dial is called your mode wheel, and it’s your mortal enemy, the destroyer of creativity, and the root of all evil in the world including, but not limited to, wars, swine flu, and stepping in chewing gum with a new pair of shoes.
In this article, I’m going to show you the error of your ways (if you’ve been using it), or I’ll show you what each of the settings means, what it does, and how to recreate the effect by using the manual shooting modes instead.
Good question. The creative automatic modes make me angry because they take important decisions out of your hands, but that’s not the worst of it: People who are using the creative automatic modes might, in the short term, be able to take photographs of a technical quality beyond what they would normally be able to, but if you resign yourself to letting your camera do the work and make the creative decisions for you, the problem is that you don’t understand the underlying theory behind what you are doing, and despite getting better results, you’re not becoming a better photographer.
Imagine, say, that you had an oven that would automatically detect what you put in the oven, then calculate how big it is, what you’re trying to do with it, and select the right temperature and time, before beeping at you when your Sunday roast / cake is finished or your socks are dry. (What? You don’t dry your socks in the oven? Hmm, just me, then.) Either way, the result would be perfect every time, but where’s the satisfaction in not knowing what your oven did to bake this cake? And more importantly, what if you want to take creative liberties – say, you might prefer your cookies a little bit American-style; gooey inside – or you might want to make them crispier, for example…
The purpose of this article, then, is to ensure that if you want gooey or crispy photographs, you know how much heat you need to turn on, for how long, and if your cookie tray needs to go in the top or the bottom of the oven.

Right, in the picture above, starting from the top, going counter-clockwise, the modes are:

Why this is even a mode to itself I have no idea – depending on why you want to shoot without a flash, the easiest thing to do is to use Program mode (but also see Tv and Av, below), which means that the flash will only come on if you tell it to.
If you’re in a low-light situation, pick a higher ISO speed – this will create a bit more digital noise in your photo, but it means that you reduce the need for using a flash. If possible, select a bigger aperture so your shutter speed becomes lower.
Remember the general rule that you can hand-hold a camera at a shutter speed which is the same as the focal length of your lens: So if you’re shooting at 300mm, you should use 1/300 second shutter time or faster. If you’re using a sexy little 50mm prime lens, you can hand-hold at 1/50th of a second. Zooms are the same: if you’re using a 17-35mm zoom, you can hand-hold at about 1/10th of a second at full wide angle, and about 1/30th of a second at full zoom.
Of course, it’s possible to bend these rules, but if you adjust your ISO speed and shutter time to stick with them, you generally get a good, blur-free exposure without having to resort to using your flash gun.

Night-time portraiture is the only of these settings which actually has any merit, in my opinion – not because it’s that difficult to do, but until someone has explained to you how you can get good night-time portraits, it can be a little bit counter-intuitive.
Imagine you’re in Paris with a loved one, and you want to take a photo of them, at night, with the Eiffel Tower in the background. You take a photo with a flash, and you can’t see the tower. You take a photo without a flash, and you can see the tower just fine, but your friend, who naturally is unable to stand still for more than a microsecond at the time, is all blurry and hazy. What to do?
Actually, Av is your friend: In Programme and Tv modes, the flash and shutter time will combine to try to expose your foreground correctly. In Aperture-priority, however, your camera will measure the light that is available to you, and then fire the flash to ‘fill in’ the foreground.
What, in effect, is happening, is that your camera is taking a ‘normal’ photo – exposed for the background – but then also uses the flash to expose the foreground correctly.
For further control (you might decide, for example, that the full 3-second exposure to get the ‘right’ exposure for the background isn’t necessary, and that the background looks OK after only a second, or fraction of a second), you can use full manual mode. On most D-SLR cameras and some external flashguns, you can also set the flash output manually, or adjusting it up or down. This differs from camera to camera (on the Canon, you’re looking for Flash Exposure Compensation, or F-EV), so check in your manual.
Top Tip: For creative effect, try to take a photo in AV mode, but move the camera or use the zoom while you’re taking the photo. Because of the flash your foreground will be static, but you get a hugely dramatic and awesome swirling, moving streaks effect because of the lights in the background.

Sports mode is a complete fraud: Use Tv mode, set to a fast shutter time (‘fast’ in this case depends on the sport you’re trying to capture. For snooker, fast isn’t very fast, and 1/60 of a second should do, but for horse racing, you need a much faster shutter time), and see what your camera comes up with.
If the pictures are too dark, it’s because your camera needs to use an aperture which is bigger than your lens can do (say, it’s using ƒ/5.6 but needs ƒ/2.8 to do the correct exposure). This is signified by a blinking aperture in your viewfinder, and can be solved by either using a lens with a larger maximum aperture, setting a higher ISO speed, or using a flash gun (although, say, darts players don’t really like it when flashes are going off in their face when they’re trying to throw A HUNNNNDRED AND EEEEEIGHTYYYYYYYY).

I know a couple of things about macro photography, and I genuinely can’t see a single good reason for that Macro mode being on a SLR camera. For a compact camera, sure: It puts the lens into a ‘focus close to the camera instead of in the far distance’ mode, which means that it’s not wasting its time trying to focus far away. On a SLR, if you’re savvy enough to have bought a macro lens, you probably will be fine with Programme mode, and if you haven’t got a macro lens, then you’re basically out of luck (unless you build your own, of course, but that’s a different article altogether).
To replicate this mode in the real world, use programme or Manual mode, use a macro lens, and snap away.

Landscapes, glorious landscapes. Set your lens to manual focus, and turn it to the little ∞ (infinity) symbol. Note that it IS possible to focus past infinity – that’s because when you’re working with infrared photography, the light is refracted slightly differently, and you may actually need to focus past what is ‘infinity’ for daylight.
Anyway, your lens at infinity, set your mode dial to Av, and select a large-ish aperture. f/8 or f/11 is a good starting point.
Select as low an ISO mode you can get away with (bearing in mind the rule about hand-holding your camera, above, or just go ahead and use a tripod), and bob’s your uncle.
If you want to get advanced, and you need a very deep depth of field – say, for example – you want a person in the foreground, but you also want the background in focus – read up on ‘Hyperfocal distance’ and prepare to be amazed.

I can’t believe they created a separate thing for portraiture – do a search on Flickr for portraiture, and see what comes up. How can they possibly assume that one single mode fits all styles of portraiture?
Anywhoo – for getting good portraits, start with a reasonably long lens (130mm or so is perfect), stand back a little, use a large-ish aperture (ƒ/4 or so) to throw the background out of focus, and start from there.
This mode will select whether you use a flash or not, your ISO speed, your shutter speed and your aperture for you. It reduces your nice, expensive dSLR camera to nothing more than a big point-and-shoot. If I ever catch you (yes, you, I’m looking at you) with your camera set to the fully automatic mode, I’m afraid I’m going to have to ban you from visiting this site ever again.
Go on, live a little, flick your mode dial one notch, and enter the world of Program mode. The camera still does most of the thinking for you, but at least you are controlling it, rather than the other way around.
Is one step up from automatic mode – and I confess to using it on occasion: The photographer selects everything except the aperture and shutter time, which the camera calculates for you. If it comes up with a combination of the two you don’t like, use your index finger wheel to change them – turn one way and you’ll see the aperture get smaller and the shutter speeds get faster – and vice-versa for turning it the other way, obviously. Use EV compensation to over- or under-expose your images a little, etc.
Program mode is great if you just want to get the right exposure, and you’re concentrating on just getting the photo, without worrying too much about depth of field etc. I know quite a few news photographers (!) who decided that manual mode was too finicky for them, and are shooting in programme mode most of the time. If it’s good enough for the national press, it’s good enough for me.
In Tv-mode, you dial in a shutter speed (say, 1/200 second), and the camera will attempt to get the ‘correct’ exposure by using the aperture to compensate for varying lighting situations.
… Interestingly, I very rarely use Tv mode, but that’s mostly because if I find myself in a situation where I want to actually control the shutter speed directly, I’m already shooting in fully manual.
One situation where it might be handy is if you’re shooting sports – say, rally racing – where you know you want a fast shutter speed, but the light can change quickly. The other situation I can think of is if you’re panning (i.e. a bicyclist comes flying past you, and you want to get them in focus while the background is out of focus), and you need a slightly slower shutter speed.
One thing to be aware of is that most lenses have a far more limited aperture range than your camera has a shutter time range. Think about it: your camera can do from several minute exposures to a fraction of a second, while your lens will only usefully span a much lower range. If you’re shooting in Tv, keep an eye on which apertures your camera is selecting for you, because if it’s getting too big, some of your photos might come out over-exposed
Av mode is the opposite of Tv mode, above: You select the aperture, and the camera calculates the right shutter time. Generally, I shoot either in Av or in fully manual, because for most of my photography, the depth of field (i.e. how much of the photo is in focus) is more important to me than whether the motion is frozen or not.
You get a deep depth of field by selecting a small aperture (ƒ/22, ƒ/32), or a shallow depth of field by selecting a big aperture (ƒ/1.8, ƒ/2.8).
When shooting in Av mode, still keep an eye on your shutter times – if they are very fast without you needing them to be, you may be able to use a slower ISO (switching from ISO 400 to ISO 200), which gives images with less noise. If they’re very slow, your photos might be coming out blurry, and you may want to ramp up the ISO or use a slightly larger aperture.
Go on. Try it for a week. You’ll love it. This is photography at its most control-freakishly delicious.
...Is just plain weird. The idea is that you focus on the point that is furthest away, then on the point that is closest to you, and the camera will then focus and select the aperture you need for you. Basically, it’s using the Hyperfocal Distance (mentioned above, under landscapes), but in an automatic way which is actually more complicated to wrap your head around than just doing it yourself in the first place.
I think I can honestly say that I’ve never, ever used A-DEP before in my life, and that I don’t think I ever will. Give me manual exposure and a bit of guesswork any day of the week :-)
So, in summary, what I would love for you to do is to reduce your photography to only four of the modes above: P, Tv, Av, M. if you’re feeling particularly hardcore, limit yourself to Av and M only.
And if you are a truly epic photographer with skillz beyond my wildest dreams, set your camera to M and pry the button off altogether. Chuck it away. You’ve graduated. Nothing’s gonna stop you now!
Originally published back in the mists of August 2012, but it bears repeating.
Fujifilm tried it with the X-Pro1 at the beginning of 2012 and carried on with the X-E1 in autumn 2012 and the X20 early 2013. Nikon's D800E had a go, too. Pentax did it with its K-5 II s in 2012 and recently its K-3. The Olympus OM-D E-M1 went without, and so did the Ricoh GR, Sony's RX1R, and the newly announced Sony A7R and Nikon D5300. What sort of fire have these manufacturers been playing with? They have all omitted the optical low-pass filter, or anti-aliasing filter, from their cameras.
But what was an optical low-pass filter, why did we used to need them, and why can our cameras suddenly cope without them?
A low-pass filter comprises several layers of optical quartz that have been cemented together and placed in front of a camera's sensor. They were put there to help prevent the appearance of moiré in images, or that odd effect when anything with a close pattern, for example ties or denim, would appear to be swirling and fuzzing, almost like the screen of an untuned television set or an animated gif. Moiré can be hugely distracting.

If you're familar with the concept of temporal aliasing in video, when spinnning wheels sometimes look as if they're going backwards, moiré isn't too far removed from that.
The pixels in a camera's sensor are arranged, somewhat logically, in a grid. If you were to photograph a subject that also has a close-knit grid-like pattern there's a significant chance that the pixel-grid and the pattern-grid won't align perfectly, leading to a jumpy, swirly clash of lines of pixels and lines of pattern. Imagine one patterned transparency placed over another, but with the patterns mis-aligned. It's called aliasing.
To prevent this from happening, camera manufacturers placed optical low-pass filters—or anti-aliasing filters—before their sensors. These filters worked by softening and blurring the image a touch, reducing the effect of the moiré. If you shot in JPEG you might not have noticed this added softening because the camera would compensate for it, but for anyone who favoured Raw, you would notice the need the sharpen your images. It also ate into the detail that your sensor could record, too.
To a degree increased pixel density has helped to create a situation where moiré doesn't happen anymore, or at least it happens less frequently. The more pixels there are on the sensor, the less likely they are to form a grid of a size that will clash with a subject's patterning.
Add editing software that is more capable of dealing with moire to moiré's less frequent appearances, and the filters become less desirable, especially when they eat into an image's resolution and sharpness.
Finally, manufacturers such as Fujifilm are moving away from sensors with rigidly aligned pixels to slightly more randomly distributed pixels, as you'd find on film. This negates the propensity for grids and lines to clash.
... it should improve colour rendition, sharpness, and detail in your photos.
It wasn't quite as simple as removing the filter. The filters needed to be replaced because they performed other functions, too, for example acting as infrared filters. New technology isn't always cheap. Sony's kept with the 'One-with, one-without' option for its new full-frame mirror-less camera, the A7 and A7R, but Nikon's D5300 is low-pass filter-free and so is the Ricoh Pentax K-3. It seems this is way of things to come.
This week's Photography Fundamentals column answers a question that came to me as an anguished plea in my Twitter feed from a relative newcomer to photography. In short: How can a lens have a speed? Whilst he knew that speed equated to aperture and that a 'fast' lens was one with a large aperture, the terminology felt far from intuitive. How could an opening behind a lens be described in terms of 'fast' or 'slow'?
I'm guessing that if he were perplexed by the use of the the word 'speed' in conjunction with 'lens', there are a few other people out there who find the concept that lenses can be 'fast' puzzling, too. Or illogical. Or something that's accepted terminology. Or something that made sense many years ago but has since become obsolete. This might help.
It's not actually as illogical as it sounds to refer to lens speed. It's more a case of joining the dots.
We know that large apertures are referred to as 'fast'. A lens with a large maximum aperture, let's say ƒ/1.8 for the sake of an example, is described as a 'fast' lens. We know that the larger the aperture, the more light is able to reach the sensor (or film, if you're old school). We know that by the virtue of the exposure triangle, the more light that is able to hit the sensor, the shorter the time the sensor needs to be exposed to capture the image and the faster the shutter speed we can use. The shorter exposure time is a direct result of the larger aperture. The larger aperture allowed for a faster image capture, hence a large aperture is a fast aperture.
If you were wondering, yes, it's for this reason that higher ISOs are referred to as fast ISOs: increased sensitivity allows for faster capture.
A lens can have a 'speed' then, because it refers to how fast it can allow you to capture your images, which I hope isn't nearly as illogical as it first seemed.
Rule of thirds << Photography Fundamentals >> Time-lapse
I've been doing a lot of talking about Bulb Mode with people recently - as this is relevant to how the Triggertrap Mobile App does stuff like HDR and Star Trail photography modes - but it only recently occurred to me that not a lot of people know what 'Bulb' mode on your camera means. Contrary to popular belief, 'Bulb' mode has nothing to do with light bulbs; it is a remnant from something that most photographers today haven't even heard of: An Air Bulb Remote. If you have an old (or retro-styled) camera, you may have spotted a small hole with a screw thread in your shutter button. It's possible to screw in a mechanical remote control here, which physically 'presses the button' on your camera when it is activated.

There are two ways these remote controls work: They either have a cable running inside a sleeve (much like the brake system on your bicycle), or a system working on pneumatic pressure. In the case of the latter, you'll have a air hose with a small piston at the end. When the pressure is increased in the air hose, the piston extends, and the shutter button is pressed.
Traditionally, the pneumatic systems had a small 'bulb' at the end, so when you squeeze the bulb, the piston extends, and the picture is taken. This is the bulb that camera manufacturers refer to when they say 'Bulb' mode.
So now you know! What's your favourite depreciated bit of photography jargon?
If you ask any photographer whether they would be willing to take photos with a fixed focal length lens, many would say 'yes'. Prime lenses are as old as photography itself, and there are many excellent reasons to embrace them. Ask the same photographer if they'd be happen to work with a fixed-aperture lens, however, and you wouldn't get many good responses.
And yet, this is the reality of taking photos with an iPhone 4: It doesn't matter how bright or dark your scene is, you're stuck with a f/2.8 aperture lens. This is a problem if you want to use the iPhone with an external flash (not that you could anyway - here is why) - but how does the iPhone cope with extremely bright situations?
As you (probably) know, an exposure is controlled by 3 factors: ISO, Aperture and shutter speed. If aperture is fixed, you have to deal with any lighting situations with the other two. In low light, the iPhone will ramp up the ISO.
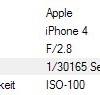
In fact, if I press my iPhone against a dark surface and take a photo, the camera reveals its limits:

This incredibly boring photo reveals the limits of the iPhone's camera: It won't use slower shutter speeds than 1/15th of a second, and it won't go beyond ISO 1,000:
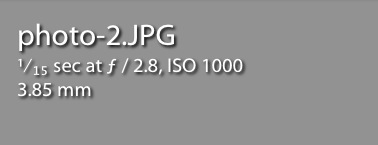
Similarly, it's easy to test the iPhone's upper limits, by pointing the camera at a ridiculously bright light source. The sun will do. This photo:
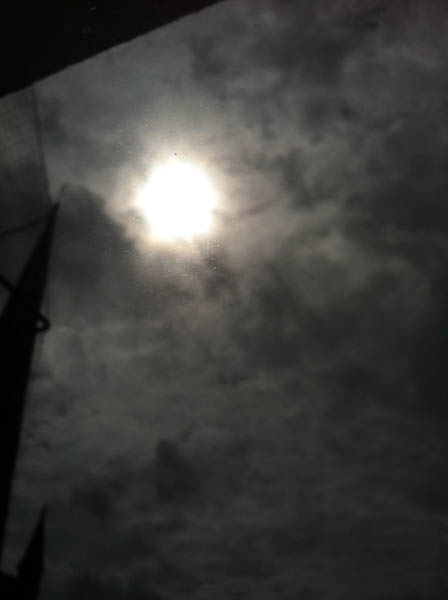
... Reveals the other set of extremes:
... Which is that whilst the iPhone is still stuck at f/2.8, the maximum shutter speed is an incredible 1/30,000th of a second.
Putting these two figures together (about 4 EV steps of ISO and another 11 EV steps of shutter speed) reveals the exposure range available to an iPhone photographer: an impressive 15 stops of difference from the lowest light to the brightest lighting situations.
Of course, this is nothing compared to the extreme shutter speed, aperture, and ISO ranges of modern SLR cameras, but hey - it's not bad for a device you keep in your pocket at all times!
There's no doubt that HDR is a popular form of photography (I did a bit of a how-to, if you're not familiar with it), but mostly, I can't help but thinking that it's a bit of a specialist field.
Until, that is, I started using it on my iPhone. Most of the time, I don't need it; but the other day, I wanted to take a photo of a piece of graffiti. If I were photographing this properly, I'd have brought a SLR, and waited for the sun to go away so I could get even lighting across the whole image, but in this case, it was only going to be a quick snapshot.
I did my usual thing when I take photos with my iPhone:

So, as you can see, it's a graffiti piece of God on a Sea-Doo. I thought it was pretty funny (those Porteños - that's people from Buenos Aires - really have a quirky sense of humour), but part of the image was missing.
The problem was that the direct sunlight was washing out the highlights on the far right, but the foreground was correctly exposed.I also tried exposing for the highlights (by pressing my iPhone's screen on the far right side, on the sphinx), but no avail: doing that plunged my right-hand side into deep darkness.
This is a great example of how limited dynamic range can make a photograph impossible: It is either too light, or too dark, and there's nothing you can do about it: You've hit the limits of the imaging sensor.
Or have you?
So, by using HDR processing, the iPhone takes two photos quickly after each other, and uses a HDR algorithm to use the dark bits from the light image, and the light bits from the dark image, to ensure you get an even exposure. In effect, you're cramming in a load of extra information - much more than the sensor is really able to capture in one exposure - into a single frame.
The result is nothing short of pure magic.
For the sake of comparison, let me post them both underneath each other here:

Astonishing, eh? Now, we have detail both in the highlights AND in the shadows. Of course, it still isn't a masterpiece - it's still, unmistakably, a snapshot - but it's a technically much better snapshot than the first one.
And that's worth celebrating, I think.
I was taking photos at Angkor Wat in Cambodia yesterday with my Olympus E-P1, and noticed something about my pattern of taking photos: Most of the time, I'm taking pictures either fully zoomed in, or fully zoomed out. It was annoying me, because I figured that showed a weakness in the lens: Basically, it was never wide - or long - enough for the photos I really wanted to take.
Then I continued thinking, and I was wondering - isn't that true whenever I take photos with a zoom lens? So I thought up a little test - by going through my Lightroom library and doing a spot of statistical analysis.

When I analysed my images, I realised that my compact camera images, especially, were prone to shooting at full zoom. 75% of my photos are shot fully zoomed out - which makes sense, and is probably a conscious choice: All my compact cameras have variable aperture lenses, so they are brighter when it's at full wide angle. I didn't realise quite how often I shoot at fully wide, however, and a full three-quarters of my images were a surprise to me.
I guess a corollary of the above explains how only a measly 6% of my compact camera images are taken at full zoom.

The difference for SLR images was slightly less than that for my compact images. 44% of the photos are taken fully zoomed out, 18% are shot at full zoom, and a more reasonable 38% are taken somewhere in between.
Of course, I make no secret of my love for prime lenses - and a huge amount of the images in my library are taken with primes. I decided to exclude them from the statistical data, but if they were included, obviously the results would have been skewed significantly towards 'at the end of the zoom range'.

The idea I had is that whenever I shoot at one of the extremes of my zoom lens, it means that I brought the wrong lens. If I was shooting with a 28-135mm lens, and 'perfect' exposure was at 44mm, I would shoot at 44mm, right? Similarly, if I shoot at 30mm or 130mm, I'm still inside the zoom range, so I chose to shoot at that particular focal lengths. When I end up taking pictures at the extremes of the zoom lens, it probably means that I didn't choose the focal length: it was made for me, by the focal length limitations of the lens.
I have no idea if I'm a typical photographer or not, so I don't know if my finding is universally applicable, or if it's just a quirk in my photo style, but none the less...
It dawned on me then, that I'm often more frustrated when I use a zoom lens than when I'm shooting with a prime. Perhaps the main difference is that when I'm taking photos with a prime lens, I've grown used to the limitation - it takes the challenge of zooming out of the equation, and if the 'perfect' focal lengths is outside the very limited 'range' of my prime, I am happy with the fact that I made this choice. Whereas when I'm taking photos with a zoom lens, the limitations are my own dumb fault, for picking the wrong zoom range.
Just goes to show, I suppose, that sometimes you can feel more free with greater limitations than with greater freedom...
In my library of more than 15,000 photos, a lot of them were taken with my Canon Powershot S95 in an underwater housing. Because the underwater housing doesn't have any zoom settings, they were per definition taken at fully zoomed out, so that discounted nearly 1,000 photos from this data. In addition, a lot of my photos are taken with prime lenses - 50mm or 100mm primes, mostly - so I took them out as well (although some might argue that a prime lens is per definition 'fully zoomed out', and could be counted). I then wrote a little script that checks whether each photo is taken within 1mm of the extremes of the zoom range of each lens. (so, for a 70-200mm lens, it checked for photos taken at wider than 71mm and narrower than 199mm).
The resulting data, I dumped into a spreadsheet for analysis. The sample size is 4,913 images, taken with 10 different zoom lenses. 71% of the images were taken with SLR cameras, and the remaining images were taken with a series of different compact cameras.
produce wholly or in part without a license. More info.
Do you enjoy a smattering of random photography links? Well, squire, I welcome thee to join me on Twitter - Follow @Photocritic
© Kamps Consulting Ltd. This article is licenced for use on Pixiq only. Please do not reproduce wholly or in part without a license. More info.
If the Evil Bunny gets hold of your Facebook, all hope is lost.
We live in the digital millennium, in a world where your passwords are protecting so much information, that it's probably wise to start thinking about how safe your data really is.
As a photographer trying to carve out a niche for yourself, your digital reputation is extremely important: If my Twitter stream suddenly started being filled with a lot of spam, for example, you'd unsubscribe pretty quickly, wouldn't you? Of course you would.
When you think about it, if someone could look inside your brain and get access to all your passwords, many of us would be worse off than if they stole our house keys.
Stop and think for a moment: What would happen if someone had all your passwords? Could they get into your calendar? Could the hackers see your address book and phone numbers? Could they read your e-mails? Could they access your internet bank and transfer money out of your account? Could they post embarrassing things as you on your website, blog, or social networking sites?
I realised a long time ago that a lot of my reputation and financial stability hinges on my passwords being safe.
So, what can you do to stay safe?
It's no good to pick passwords that people can easily guess; that much is obvious. There's no point in using "Meke" as my password, because anybody who knows me would know that's my sister's name.
Same thing with other obvious pieces of information; It's not hard to find out somebody's birthday (it's often a piece of public information on Facebook) or their mother's maiden name (in these times where marriages sadly often don't last, your mother's maiden name is as likely as not to be her current name). In the case of my own mother; she was remarkably progressive, and never took my father's last name. Whenever my bank asks me for my mother's maiden name as a security question, I sigh and give up. "It has been her name for over 60 years. How is this going to help your security"?
Of course, in the name of security, I made up a new mother for myself, whose name is nothing like my own mother's. (Mum, if you're reading this - I'm proud of you and your name, but you just ain't secure enough for me!)
Anyway; Passwords. Don't use words that are in the dictionary, don't use foreign-language words, and don't use obvious substitutions. "P3SSWORD" is marginally better than "P4SSWORD", for example, because the hackers have figured out that 4 is often used for an "A", etc.
Personally, all my passwords look a little bit like "6MT#2o,UGrI^eBY", "A1_U3YiqR'&guybc" or "3Fs-wOhT/n5MG". Spot a pattern there? No, well that's sort of the point. Use a mixture of upper and lower case letters, use numbers and symbols, and pick something utterly unpronounceable.
Now that we've learned to use secure passwords, what's next? Well, it doesn't help how secure your password is, if you use the same password for everything.
Why? Well, imagine your password is "asdqwe123", and you have been using it for absolutely everything since the dawn of the internet. You will have hundreds of logins by now, and you will have told each of these sites your password.
Do you really trust all of these sites with all the information you have stored on all other sites? Because that's essentially the compromise you are making.
Don't think that your passwords are safe, neither: A recent case worth keeping in mind was the Gawker network. Last weekend, Gawker had a security breach, where 1.2 million logins and (encrypted) passwords were stolen. In other words: If you are one of the 1.2 million people who ever made an user account to make a comment on Gizmodo, Lifehacker, Jalopnik, or any of their other sites, your password is potentially compromised.
Worse; it seems as if the passwords have already been cracked: Thousands of people were suddenly tweeting about Acai berries, seemingly in connection with the above breach, because people had been using the same passwords on Twitter as on one of the Gawker site.
Password theft is not a one-off, either. The enormous social media site Reddit had a security breach where media containing their backups was stolen, potentially leaking usernames and passwords to criminals.
The list goes on: People have stolen passwords from the government, open source movements and social networks. On top of all this theft, there are a lot of dastardly attempts out there where cybercriminals try to trick you into giving them your details - a practice known as "Phishing".
So, What is a poor social media debutante to do?
I realise this is pretty tricky: As I am writing this, I have no fewer than 576 passwords and logins for various sites. If I were to have a different password for each of those - and especially if my passwords are all resembling "/MZYIougB2)4q" or "3'z1tNgk>Wyq!EjY!" - I would have locked myself out of each account.
Nonetheless, the only thing you can do, is to try to find a way to never use the same password twice. That way, if your password to Lifehacker's commenting engine was stolen, at least the thieves can't post embarrassing stories as you on Facebook.
Personally, I use a piece of software called 1Password, from Agile Web Solutions. It can generate safe passwords, and it keeps track of your passwords for you. The trick is to use a single, extremely high quality password to protect all your other passwords. I only use that password for 1Password, and nowhere else; Of course, I now have to trust 1Password to not break or lose my passwords, but I'm happier to trust a heavily encrypted file of my 576 passwords, than any other way of doing things.
1Password has a couple of bonuses in addition to taking care of your passwords for you: It stores your bank and credit card details, completely encrypted of course, and supports 'secure notes', where you can basically store anything you like, and whenever you quit the software, it'll be securely encrypted.
The added benefit of using something like 1Password instead of the password saving functionality built into your browser, is that if someone were to steal your computer, they still can't get access to your passwords and sites.
Of course, the two above steps are great containment strategies: You are making it difficult for someone to break into one of your accounts, and if they do somehow manage to break in, they can't get access to any other accounts.
The final step is to regularly change your passwords for high-risk logins.
So, what do I mean by a high-risk login? Let me give you an example: I'm particularly paranoid about my mail e-mail account: All the other sites I use tend to have "Password Recovery" features: You click a button that reads "I forgot my password", and they send you a new one by email. That's great, but what happens if the thieves are controlling your e-mail account? All the hard work you have done to protect your passwords is wasted; they can get at them from the source.
So: Protect your e-mail password as if it was your most valuable possession. It may very well be true. Change it once per month - no exceptions.
The other important passwords worth changing frequently are your internet bank, your PayPal password (because your money is on the line) and your FaceBook password.
The latter is important because you can log into other site using FaceBook Connect; if you lose your FaceBook account, you are effectively losing a lot of passwords at once (That's the case with any OpenID or Single Sign On solution, by the way). In addition, if you lose your FaceBook account details, you may be opening yourself to various forms of blackmail or embarrassment. I'm sure you can think of a few things you wouldn't want your mum to read, thinking it came from you, for example.
So: A quick summary: Pick a secure password. Only use each password for one site. Change them regularly. Take extra care of your money and e-mail.
Many of us trust our autofocus implicitly – because it’s just one less thing to worry about, really. But what when the lens starts to do weird stuff? My mate Chris over at DSLR Blog has the skinny…
If you auto-focus on an object the camera will attempt to fix the focus at the correct distance between the camera and the object.
Front focusing is when this calculation goes wrong and it focuses before the object, back focusing is where it incorrectly focuses behind the object. Either way what you achieve is a photograph where the focus is in the wrong place making your object blurred or soft.
Manually focusing still works but in effect something is wrong with either the lens or the camera.
Some more info, along with tips as to how you can test for these problems, in the Front and Back Focussing Explained article.
I’m all for camera phones – for a photography nut such as myself, there’s nothing quite as awesome as always having a camera in my pocket – but things are getting a little bit silly now. Earlier this month, Sony Ericsson showed off a prototype of a 12 megapixel camera phone, and apparently the Swedes are planning to have 20 mpx crammed into phones in time for the 2012 olympic games.
So why am I being whiney? Well, just like horsepower isn’t everything on a car (a Mazda MX-5 would trash a 1000 horsepower drag racing car on a twisty race track) and clock frequency isn’t everything on computer processors (a 2 Ghz current-generation processor wipes the floor with a 4Ghz Pentium 4), Megapixels by themselves mean absolutely nothing.
The first prosumer-grade dSLR – the Canon EOS D30 – only has 3.1 megapixels, but the photos it was capable of taking is a world of difference from even the best current camera phones.
“Three megapixels”, I hear you cry, “That is laughable in a world where you are buried in a deluge of 5- and 6 megapixel chattersticks the second you step into a Carphone For You!”. And you’d be right. Nonetheless, the fact that the D30 takes high-quality glass means that the photos it delivers is sharper than any camera phone (and most compact cameras, for that matter).
What happened to the Old One? by Photocritic.org on Flickr
The point is that even though it’s possible to take some fantastic photos with a simple camera phone (I recently wrote about the amazing stuff people are doing with the comparatively inferior iPhone camera, for example), the phone manufacturers need to get their priorities straight: Megapixels only affect the size you can show (or print) a photograph. Most of us post our photos on Facebook, Flickr or send them to our mates, so size clearly doesn’t matter – but quality does.
Most photographers would much rather have a 2-megapixel camera with a good lens than a 20 megapixel camera with poor glass at the front.
So Sony Ericsson, LG, Apple, Nokia and the rest of the gang; if you are reading this: give us proper auto-focus, faster and higher-quality lenses, flashes, proper shutters, and the possibility to manually override the automatic exposure.
This article was originally published on FiveFWD.
Do you enjoy a smattering of random photography links? Well, squire, I welcome thee to join me on Twitter - Follow @Photocritic
© Kamps Consulting Ltd. This article is licenced for use on Pixiq only. Please do not reproduce wholly or in part without a license. More info.
Shutter speeds? Yaaawn. ISO speeds? Oh-god-not-again. Megapixels? Oh puh-bloody-lease, that’s so 2003. The newest frontier of digital photography is dynamic range – and it’s arguably the most exciting (r)evolution that’s happened in dSLR-world so far.
Interestingly, most manufacturers are continually improving the dynamic range of their cameras, but somehow seem to forget to tell us about it – which means that we’re witnessing – or should I say not witnessing – a quiet revolution.
It seems as if ‘dynamic range’ gets forgotten in PR world, where a bigger screen, better battery life or Live View is an easier way of getting regular consumers exited. The real technological leaps have been happening under the bonnet, though, and the result of the ongoing improvements will mean that your next camera will be significantly better than your current one – but you wouldn’t be able to tell from just reading its specification sheet.
So, why, exactly does this make a difference to us as photographers? All will be revealed…
Well, we’re still talking about ‘Dynamic Range’, and higher-dynamic-range-than-before at that, but when people are usually talking about ‘HDR’, they mean multi-shot HDR photography, which we covered thoroughly a few weeks back.
Multi-shot HDR is very exciting stuff, and it’s a taste of what is to come, but this time around, we’re talking about single-shot HDR photography and how cameras have been steadily improving over the years.
The improvements have happened so slowly, it seems, that nobody has really noticed – but grab a 5 year old dSLR and compare it to a current-day snapper, and the biggest difference in picture comes from the dynamic range.
 The human senses have an absolutely incredible dynamic range – think about it: when you’re inside a concert venue at a rock gig, you can hear every note and enjoy every instrument.
When you’re in a quiet room, you can hear water flowing through your radiator heater, and the extremely faint buzzing of the phone charger is loud enough to notice. More incredibly still, you can keep a conversation going with someone in the next seat while the jet you are sitting in is taking off, which is a testament to the width of dynamic range which is possible – although that particular example has more to do with psycho-acoustics than your ears themselves.
If you thought your hearing was amazing, well, your eyes are even more incredible. On a bright day, you can see perfectly, but you can also see things by moon- and starlight on a clear night. Not impressed? Try taking a photograph or do some filming by starlight without using a tripod…
Now, these examples of your eyes’ dynamic range come with a caveat – you cannot stand in a dark room and look out into a sunny landscape and see both perfectly – you’ll either be able to see the indoors, or the outside, with the other being over- or under- exposed, respectively. For photography purposes, the important thing is how much dynamic range you can see simultaneously.
Allow me to illustrate: Take a landscape photo where the clouds are nearly over-exposed. The dynamic range of the particular imaging-chip you’ve got, decides how much details you get in the darker parties of the image. The higher dynamic range, the more shadow-details you can expect.
A theoretical camera with perfect dynamic range wouldn’t need shutter speeds – you would select an aperture to get your depth of field, and you could select any shutter speed you need. The sun would have texture, and the deepest, darkest shadow parties of your image would still have detail in them, too. Of course, perfect dynamic range is impossible (for now…) but that doesn’t mean that increasing dynamic range isn’t a great thing…
Back when I first started taking digital photographs in the mid-1990s (I know, we still listened to The Cardigans, Tracey Bonham, Marcy Playground and Tonic…) and I did some playing about with shooting in RAW format, comparing it to just using the JPEGs straight out of the camera. Back then, I decided that RAW was a complete waste of expensive memory stick space, because it was nigh-on impossible to spot the difference. I didn’t know why that was the case back then, but I think the answer is pretty clear right now: The dynamic range of 8-bit JPEG photographs was, in fact, pretty similar to that of the imaging sensor inside the camera.
 A couple of years ago, I believe when I got the then-brand-new-on-the-market Canon EOS 20D, I decided to switch to RAW. I spotted that the quality was better than with JPEG, and I stuck with it. Mostly, I did it because I could never quite get the white balance right, and with RAW, you defer the decision until you’re at your computer, which always suited me quite well.
More recently, I upgraded again, this time to a Canon EOS 450D, and the difference is quite noticeable – right from the start, I felt that the 450D was taking better photos than my old 30D, but I was struggling to figure out why. Ignoring the resolution (the 30D delivers 8.2mpx files, whereas the 450D has a slightly smaller imaging chip, but saves 12.2 mpx files to the memory card), the 30D is a better camera in all possible ways: Better top ISO, faster top shutter speed, better autofocus, quicker continuous drive, magnesium body, and so on and so forth. Nonetheless, I swear I was getting better photos with the 450D than with the 30D, on quite a consistent basis.
Then, finally, a few days ago, the penny dropped. I did some test shots on my 450D, setting it to shoot JPEGs, and then some more shooting RAW. The difference was vast – by using Photoshop’s built-in RAW editing tool, I was able to pull incredible amounts of extra information out of the RAW images from the 450D, compared to the ones from my 30D.
Now, add to that the fact that the Canon EOS 450D is Canon’s entry-level digital SLR, and that Canon’s R&D department haven’t been twiddling their thumbs in the meantime either – but as always, they save the best goodies for the people who cough up serious cash for the more hard-core semi-pro and professional lines of cameras.
I haven’t had a chance to have a go myself yet, but it’s rumoured from various fora that the Canon EOS 5D mk2′s RAW files (in addition to being full-frame and significantly higher resolution) have a 15-bit dynamic range which is completely out of this world.
Much in the same way as how tastefully done multi-shot HDR photographs can look realistic and fantastic at the same time, single-shot HDR photographs can do a lot of good for you as a photographer.
Already, photographers all over are shooting in RAW instead of JPEG, because they’ve noticed that it’s a Better Thing – but only rarely do people stop to think why that might be. The reasons are above: you simply gain a lot more flexibility by having a higher dynamic range to play with, than if you limit yourself to the 8-bit limit of JPEG.
This extra flexibility isn’t just camera geekery either: It’s extra raw data in your photograph which you can genuinely use to deliver better final photographs. When I’m out taking photos in difficult lighting situations (such as dancing, concert photography or similar), I now routinely dial back the exposure by a full stop.
Yes, I know that it means that I lose some data in the top end, but because I’m shooting in RAW, I get away with it: The software will save me, and, more importantly, I can get a full stop faster shutter speed. When you’re out taking photos at a concert, the difference between 1/60th of a second and 1/100th are significant.
It isn’t just in poor light that the benefits are obvious, however – In fact, I can’t think of a single genre of photography where extra flexibility isn’t a good thing.
Look at it this way: If you go on holiday and bring two sweaters, you can always choose to wear the thick one or the thin one; when you’re shooting in RAW, you can always decide to go with the suggested automatic choices, and at worst you’ll have lost a few megabytes of storage space for a few hours (or days, or weeks, depending on how long you keep your photos on your camera), but seeing how cheap memory cards are these days, that’s hardly a huge problem – the extra flexibility is there when you need it, and it’s better to throw away data when you don’t need it, than to wish you had more when you don’t.
So, how can you gain from all this extra goodness already? Easy – just set your camera to RAW. Stop reading right now, and set your camera to RAW. Yes, you. Yes, now. Then experiment. See how much your photos allow themselves to be tweaked without losing significant quality in the process.
Frankly, I think digital SLR cameras can only go in one direction.
We already have higher resolutions than we know what to do with (I stick to my opinion that we never needed more than 6 megapixels, although it’s nice to be able to crop your images when needed without quality loss), and the top professional cameras are currently better, both in terms of dynamic range and resolution, than the top film-based SLR cameras ever were (and are rapidly closing in on medium format film cameras), and there are DSLR cameras that can film in full 1080p high definition video.
The way forward, is that dSLRs drop further in price, as the components that go into them get cheaper, and people get bored of the megapixel race. Canon, Nikon, if you’re listening, start selling a $200 8-megapixel sub-entry-level, and you’ll make enough money on the licensing of your lens mounts to make up for the loss in body sales; much like the way printer manufacturers (including Canon, interestingly), sell cheap printers with expensive ink refills.
The other boundary that needs to be pushed is dynamic range – I want a camera with completely ridiculous dynamic range, please, and I don’t mind if I have to sacrifice a bit of resolution or ISO speed to get there either. 20 bits worth would be nice. 24 bits if I can get it, so the dynamic range of my camera matches that of my screen.
Having such a camera means that I can become sloppy, but I can still rescue any photo unless I really balls it up. More importantly, however, it’ll allow me to do stunning HDR photos in a single click of the shutter. And, finally, it’ll be the last nail in the celluloid for those poor sods who still hang on to their film with a desperation which is inversely proportional to their dignity – and directly proportional to the grin on my face.
But seriously – start using RAW now, you might be amazed at how good your camera really is.
Curves is one of the most powerful tools a photographer has in his or her arsenal. You can do a lot more with curves than you can do with the Levels tool. In fact, most photographers who embrace curves stop using the Levels tool altogether – although until you fully understand what Levels is, what it does, and how to use it, you’ll never be able to get the full potential out of the Curves tool either.
So I figured it was time that we had a very close look at Curves, what they do, and how to use them. Just when I started researching the topic, I discovered that my new friend Matt Greer has an amazing write-up on curves over on his web-site, creatively titled Photoshop Adjustment Layers – Curves.
In fact, his whole blog is worth reading, because he has a series of good Photoshop tips, tricks, and in-depth tutorials that – without being a patronizing git – gives you a gentle introduction along with more in-depth power tips.
Do you enjoy a smattering of random photography links? Well, squire, I welcome thee to join me on Twitter - Follow @Photocritic
© Kamps Consulting Ltd. This article is licenced for use on Pixiq only. Please do not reproduce wholly or in part without a license. More info.
