film camera

Photographing Fireworks: How to get the perfect firework photos

Oh my, it’s nearly That Time Of Year again: burning effigies, sparklers, terrified dogs, and jacket potatoes with charred skins and raw middles. Guy Fawkes' Night is 5 November, so perhaps it’s a good idea to brush up on the ol' fireworks skills in preparation for displays this weekend and next, yes? Indeed…

Rock on… 

Many a budding shutterbug has attempted unsuccessfully to photograph fireworks by merely pointing their film camera to the sky and shooting, resulting dark useless prints. With the advent of digital photography, photographing fireworks has become easy, just by following some basic steps…

fworks2.jpg

  1. Find a location away from the crowd and power lines. An elevated location on a hillside works well. You might want to scout out your perch beforehand: Especially on big fireworks nights (such as July 4th in the US, November 5th in the UK, and new year's eve in most of the world), a lot of the prime photography spots will be taken hours before the fireworks, so plan ahead!
  2. Set the shutter speed to 1 second or longer. Don’t be afraid of underexposing your photos, though. You won’t.
  3. Use a low ISO - you want as little digital noise as possible.
  4. Use a tripod. If you can’t find a tripod use a nice steady base.
  5. Turn off the flash. This might seem like common sense, but remember you are photographing lights, so you don’t need to add more light yourself.
  6. Shoot in RAW. You need as much exposure latitude as you can get, in order to be able to do any adjustments you need to do in post-production.

Point your camera toward the sky and shoot. A key to getting a good shot is anticipating when the firework will explode. Initially you will have many hit and miss shots. As the show goes along, you will be able to perfect your timing, and getting better shots as you're learning!

Case study

screen_shot_2011_11_04_at_123826.jpg

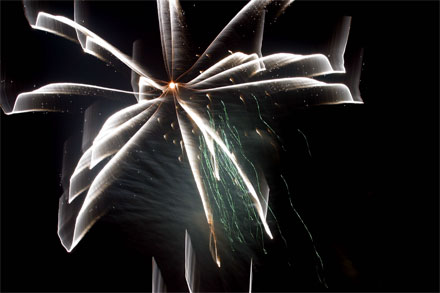
This fantastic photo is called Fireworks over Zürich, and is (cc) Tambako the Jaguar on Flickr

To get a shot like this, you'll need to use all the above tips, and you'll probably need to shoot in fully manual (although, interestingly, this shot was taken in Aperture priority).

Take a load of test exposures to see what works best; expose for the fireworks (so, use your histogram to determine how your exposures are working out) where possible, and adjust your shooting as you go along. The above photo was taken with an f/3.2 exposure, using a 1/4th of a second shutter speed, and ISO 400, with a -1/3 EV exposure bias. The results are gorgeous, but a slightly longer shutter speed might have made the water look more 'flowing', and could have increased the 'streaks' of the photographs just that little bit extra. Switching the camera to ISO 100 and 1 second shutter speed would have achieved both of these things.

The most important thing to keep in mind is that there aren't any hard-and-fast rules for how to get the best fireworks shots - Experiment and see what works best for your particular lighting scene!

Even more fireworks photography!

Can’t get enough? Well, try the guides, tutorials and tips from Better Photo.com, Garry Black, about.com, calphoto, DPchallenge, and Smithsonian institute!

March Photo Winner Chitty-Chat

Joe's winning entry

As I’m sure you all know, loyal readers, April’s photo competition is well and truly under way. In an effort to inspire you, the Small Aperture team caught up with March’s photo competition winner Joe Russo, for a bit of a prattle and to give you a mini-insight into the person behind the photo. Here’s what our Joe (as I’m calling him now) had to say for himself.

  • Small Aperture: So Joe, tell us a little about yourself
  • Joe Russo: My name is Joe Russo, and I am an amateur photographer from Baltimore, Maryland. I started shooting about seven years ago, when an uncle gave me an old 35mm camera, and later a 35mm SLR.
  • SA: Who / where / what (when?) do you shoot? Any current projects?
  • JR: I am primarily a landscape/cityscape photographer and in the last year or so I have been working on my technique in panoramic images. Most of my photography takes place in and around the Baltimore area, with some travel photography mixed in here and there. For a long time, I’ve wanted to photograph the architecture in Europe, and this summer my wife and I are fortunate enough to be able to take a trip that will give me the opportunity to do that.

Joe's winning entry

  • SA: Onto the winning photo itself, then. Tell us how this shot came about.
  • JR: It was taken a few years ago in Clearwater Beach, Florida with an Olympus 35mm film camera. There was a pirate ship cruise that took tourists out on the Gulf and fired cannons, attracting a lot of attention. I was on the beach taking pictures of the sunset, and saw this as a great opportunity for a silhouette.
  • SA: Well we think it’s a beautiful shot. Thanks for chatting with us Joe.
  • JR: Thanks again for selecting my picture, it means a lot to me. Winning a photography contest is very motivating.

Remember, April’s competition is open for submissions now, so if you want to be as chuffed as our Joe here (and win one of your own pictures printed on glass, courtesy of Fracture) then check out this month’s theme and rules here. Good luck!

Cameras for kiddies

Starting early

Here at Small Aperture, we like to get them hooked on photography when they’re young. That’s hardly surprising given that I’ve been in love with photography since I was about five, when my father taught me how to use an Olympus Trip. Soon afterwards, I was given my own 118 film camera, and in fact, I still have the photos I took with it.

But entry-level cameras today are a touch different from those twenty-five years ago. So where would you start if you wanted to buy something for a photographically inclined little one? Well whaddya know? I’ve done some research, I’ve trawled the High Street, I’ve asked lots of questions, and I think that I have some answers. (Yes, just in time for Christmas.)

Now, first things first. I’m no more inclined to suggest that you buy a ‘children’s camera’ for a small person than I am likely to endorse feeding her or him reconstituted meat shaped into dinosaurs and covered with breadcrumbs. Some things in life are worth doing properly from the get-go, and food and photography are two of those. This also means I don’t think that there needs to be a lower age limit on when to give a little one a camera; if your nephew is showing photographic talent at six, let him run with it – using a proper camera.

All the same, a dSLR might not be exactly what he needs. So I based my cameras-for-kiddies selection on five criteria.

The Criteria

Price

There are plenty of decent point-and-shoot cameras out there for under £100, but none for under £50. Spending somewhere between the two seems reasonable, so that was my budget.

Build

If you give something to a kid, it needs to be able to withstand a few bumps and knocks. Even if she or he does treat it with respect, accidents can still happen. Hell, I managed to fling my iPhone across the pavement last week. I was looking for a camera that felt sturdy, durable, and would be comfortable in little hands.

Design

The layout needs to be simple, the controls can’t be fiddly, and it has to look shiny. I want my camera to be relatively easy to use; the same goes for a camera used by young ‘un. And if I can carry a metallic red point-and-shoot in my handbag, then my imaginary seven year old niece can have one, too.

Toys and features

Of course it needs toys. And video. Duh!

Image quality

If we’re encouraging kids to take photos, to enjoy the process, and to be proud of what they produce, the image quality needs to be decent. Eight megapixels is plenty and if we’re lucky enough to lay our grubby mitts on some image stabilisation or anti-blur technology, then so much the better.

So to which cameras did these criteria lead me?

The Yeses

I saw a couple of cameras that I’d be prepared to buy for my imaginary niece. Despite its complete mouthful of a name, the Sony Cyber-shot DSC-W310S is shiny (in silver, black, or red), it has an easy-to-use interface, the layout is clear, it has image stabilisation goodness, and it has a film mode. It costs somewhere around £90.

The Fujifilm JX200 hit all the buttons with a swish, sleek metal body, easy interface, 12 megapixel sensor, low-light sensitivity, 5x optical zoom, film mode, and image stabilisation prowess. What made it stand out from the crowd was its panorama mode. Stitched-together-pictures-R-Us! All for around £80.

There was one camera that I kept going back to, though. Admittedly it might have been because it was purple, but it might have been because of the groovy on-off mechanism. Sliding down the front panel reveals the lens and powers up the Fujifilm Z70. And no, I wasn’t overlooking any of the other criteria because I was captivated by its shiny purple slidiness. It makes films, it has auto-focus tracking, it has a 12 megapixel sensor, there’s image stabilisation, the layout was clear, and the screen was large. All for around £90. (And it comes in four colours other than purple.)

The Nos

There are heaps of cameras that didn’t make the cut, for various reasons. You’d be very bored if I listed them all. Still, two deserve a special mention, so that you can steer well clear of them.

The Vivitar X225. I was convinced that just by picking it up, I might break it. At around £50, it is cheap, but I can only conceive this as a false economy.

The Samsung ES25. The zoom button on this irritated me. I can’t think that a seven year old would be any less irritated, either.

The Maybes

The Canon Powershot A495 is a great camera, but I wasn’t convinced that its plastic build was sturdy enough, even if it is excellent value at around £70. If you really want a Canon and their range of intriguing colours, the Ixus 105 is coming in at just over £100. Shop around and you might be able to get a deal.

Not to be outdone by Canon, Nikon also have some impressively specced entry-level cameras. On paper, the Nikon L21 and L22 offer just about everything, and at around £70 they don’t cost the earth. However, I wasn’t convinced they’d be durable enough. And I wasn’t convinced by the colours, either, but that’s me.

The conclusion

There are a lot of cameras out there for under £100 that would be ideal to give to give to a young one to let her or him explore photography. There are some shockers, too. But I’m still loving the slidable on-off function on the Fujifilm Finepix Z70. That’d be my first option. Then you just wonder how long it’ll be before she or he is asking for an SLR.

With very many thanks to John Lewis on Oxford Street, and especially Andy in the Audio-visual department. With significantly fewer thanks to various other camera purveyors on Oxford Street who were far from helpful. (Yes, I braved Oxford Street for this. No wonder I’ve spent the weekend at the Small Aperture country retreat, recuperating.)

Photography History: Before Film


A few weeks ago, I had a long and interesting discussion about the History of Photography with a friend of mine, and I discovered that while photography is incredibly close to my heart, I didn’t really know all that much about everything that has happened in the past.

Obviously, that had to change – I give you the first in a 3-part series entitled, without a shred of originality, History of Photography. This time around, we’re having a look at what happened before they went ahead and invented film… 

The Camera Obscura

The primary grounding principle of photography was already know as early as the fifth century B.C.E. It was the Chinese philosopher Mo-Ti who remarked at this time that when a small hole is opened up on one side of a darkened room, light diffuses through this hole onto the opposite wall in the form of an upside-down projection of the outside scene, a phenomenon almost identical to what happens on the inside of a modern film camera.

In the eleventh century the Islamic scientist Ibn al-Haytham elaborated this principle further by conducting experiments which made use of a lantern placed strategically in front of a similar setup in order to create this effect artificially. He was also the first to document this phenomenon in detail by creating diagrams which give a hypothetical account of the trajectory of light as it passes through the dark room hole. Al-Haytham is to this day widely respected for this important contribution. (His face is printed on the Iraqi 10,000 Dinar note.)

During the Renaissance period in Europe many other scientists including Leonardo Da Vinci invented further improvements to this device, including modifications that allowed for the use of a small box for projection instead of a large room and a lens instead of a simple hole. This allowed for a much clearer projection of the image. Using mirrors, the image could then be projected onto a piece of paper which artists would use as a tracing image. However, it was not until 17th century that the German scientist Johannes Kepler gave the device its name: the camera obscura, Latin for “Dark Room.”

Several room size camera obscuras still exist today including a very large one in San Francisco, California which, built in the shape of a modern 35mm film camera!

For more information on camera obscuras, Bright Bytes and Wikipedia have loads of interesting info

Nicéphore Niépce

Photography developed out of the principle of the camera obscura when the French inventor Nicéphore Niépce created the first permanent photograph in 1825. Now, instead of projecting the image onto a blank screen, it was projected onto a pewter plate which was coated with a light-sensitive petroleum derivative. This chemical then reacted to the light by creating a colored imprint of the projected image. However, because of the nature of the chemical, it took eight full hours for the picture to become exposed. Niépce’s first photograph using this process is also the earliest known photograph which is still in existence. It can be seen here along with further information about its creation and preservation.

Later Niépce began experimenting with a new silver-based compound which allowed for a shorter fifteen minute exposure time. This was still arguably too long for practical photographic portraiture. However, one of Niépce’s photographs from this period did accidentally become the first photograph of a human being. He had set his equipment up at the end of a street and intended to capture the landscape of the town. Most of the traffic on the street is invisible to the camera since it is moving to fast for the fifteen minute exposure to capture. However, there just happened to be a single man stopping to have his shoe shined on the corner for a period which was just long enough for his image to be imprinted on the photograph. This picture can be seen here.

Louis Daguerre

After the death of Nicéphore Niépce, his assistant Louis Daguerre continued his work and made improvements to the photographic process. Most importantly he invented what is known as the “Daguerrotype Process.” The process further reduced total exposure time and thereby made photographic portraiture a commercial reality. At the same time that Daguerre was perfecting his process a Brazilian inventor named Hercules Florence was developing an almost identical process. It was he who gave this process the name “Photographie.”

More about Daguerre? It’s fascinating stuff – check out wwar.com and Wikipedia’s entry on the Daguerrotype

William Fox Talbot

Meanwhile in England, another inventor was also working on a similar photographic process. This man was William Fox Talbot, the first photographer to employ a “negative” in his process. This would allow him to create a single negative image during exposure which would then be used to print an unlimited number of positive copies. This became the model for most photographic processes which would follow during the next 100 years and beyond. In addition to his achievements as a photographic inventor, Talbot was himself a groundbreaking photographer, with work ranging from portraiture to images of Paris and London.

Today there is an entire museum dedicated to Talbot, his inventions, and his photographs – for more, check out The Correspondence of William Fox Talbot and ‘Talbot’ vs. ‘Fox Talbot’

John Herschel and Anna Atkins

John Herschel was a mathematician and astronomer who made several improvements on and experimented with Talbot’s model. Among these improvements, was a process called “cyanotype” which produces a blue colored print. In addition, it was Herschel who supplied Talbot with the terms “negative” and “positive.” Another photographer named Anna Atkins later used Herschel’s cyanotype process to produce a series of books on plant life illustrated with blue-tinted photographs. For this work, she is known as the first female photographer.

For more on John Herschel try the following links on seds.org and wikipedia; For more on Anna Atkins and her beautiful cyanotype prints try
Getty

Frederick Scott Archer

By the 1850′s the interest in and demand for photographs was growing at an steady rate. Unfortunately, both of the dominant photographic procedures were still terribly flawed. The Daguerrotype could produce a very fine picture, but it required a still relatively long sitting time for portrait customers. On the other hand, Talbot’s process, although it was more efficient, produced an image with weak contrast and poor definition.

As a solution to the problem, Archer invented his own process named the collodion process. In an act of photography history sainthood, Archer decided not to patent his invention, but instead, to allow its use by one and all alike, without fee. Partially as a result of this failure to protect his own interests, Archer never attained financial success. When he died in 1857 he was poor and relatively unknown.

However, Archer’s developments and those of his predecessors led to the immanent invention of film which was to revolutionize the world of photography once again…

Haje’s History of Photography

The History of Photography part 1 - Before Film
The History of Photography part 2 - The Firm Era
The History of Photography part 3 - The Digital Era


Do you enjoy a smattering of random photography links? Well, squire, I welcome thee to join me on Twitter -

© Kamps Consulting Ltd. This article is licenced for use on Pixiq only. Please do not reproduce wholly or in part without a license. More info.