clarity

What is the clarity slider? And why might you want to use it?

Your photography has been progressing and you've made the leap from shooting in JPEG to Raw. Along with this, you've plunged headlong into Lightroom and all of the editing marvels that it affords you. Plenty of the controls are familiar, after all you've been adjusting the white balance in your iPhone photos since you realised you could stop people looking corpse-blue with a simple slide to the right in Snapseed. A few of the others need a bit more thinking about, but they're essentially the same. And then there's the clarity slider. Clarity? What the blinking heck is that all about?

Defining clarity

Before we wade headlong into the ocean of clarity, we need to take a step back and have a quick re-cap of contrast. Contrast is the difference between light and dark in an image. Increase contrast and an image will seem bolder; decrease contrast and it'll have a more muted feel. Adjust the contrast and it has an effect across the entirety of the photo: highlights, shadows, and mid-tones. This is where clarity comes in.

Clarity's influence over contrast happens in the mid-tones of an image; by increasing clarity, you sharpen the edge detail and definition among these tones, leading to a punchier, sharper looking image. Conversely, decrease the clarity value and you'll soften edge detail and lose definition.

Ramping up the examples

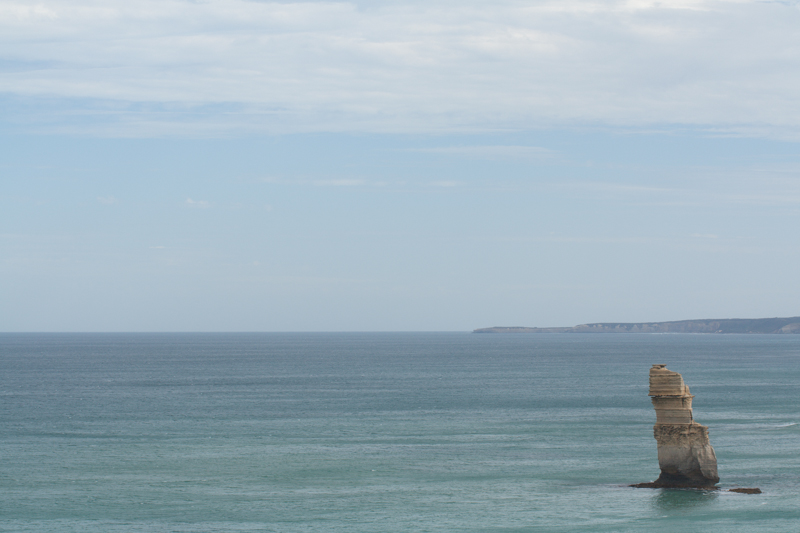
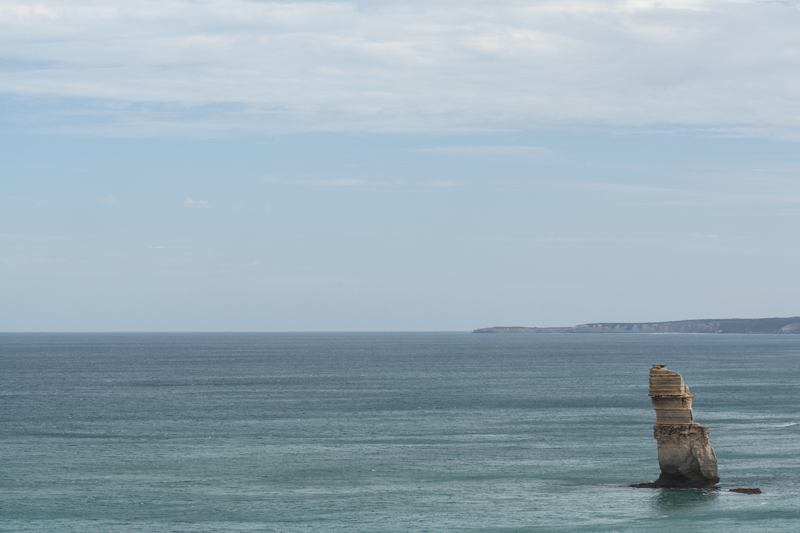
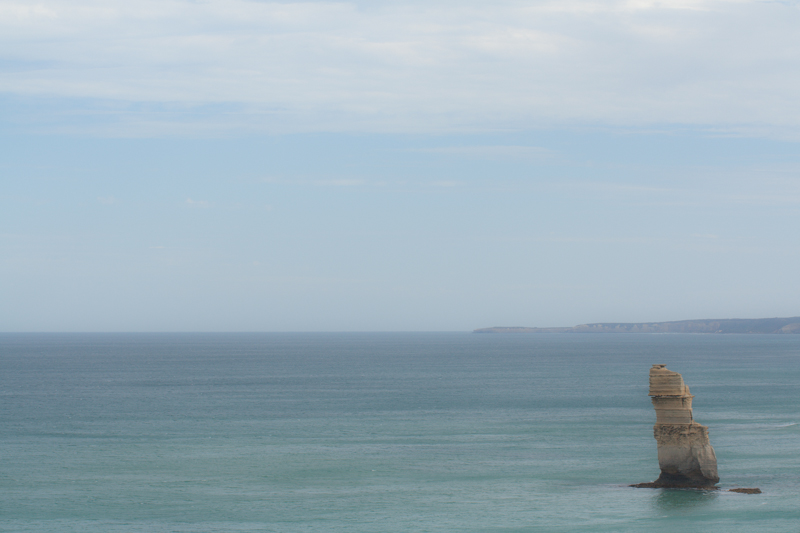
The effect that the clarity slider has on your photos is likely as clear as mud until you see it in action. I have, therefore, reproduced the same image but with different clarity adjustments, to see how it looks.

My original photo of a lonely Apostle off of the Victorian coast. It's been adjusted for crop and white balance.

Same image but with the clarity slider pushed to +50. Note how much more defined the waves are, and how the strata in the Apostle are clear?

With the clarity slider moved to -50, everything becomes much softer.

Why, then, would you want to adjust the clarity in your photos? For a start, I've exaggerated the adjustments in my examples to show you precisely the impact it can have. With more subtlety, it can add definition to landscapes, or emphasise a misty, dreamy feel, and give portraits a gentler feel.

Subtler examples

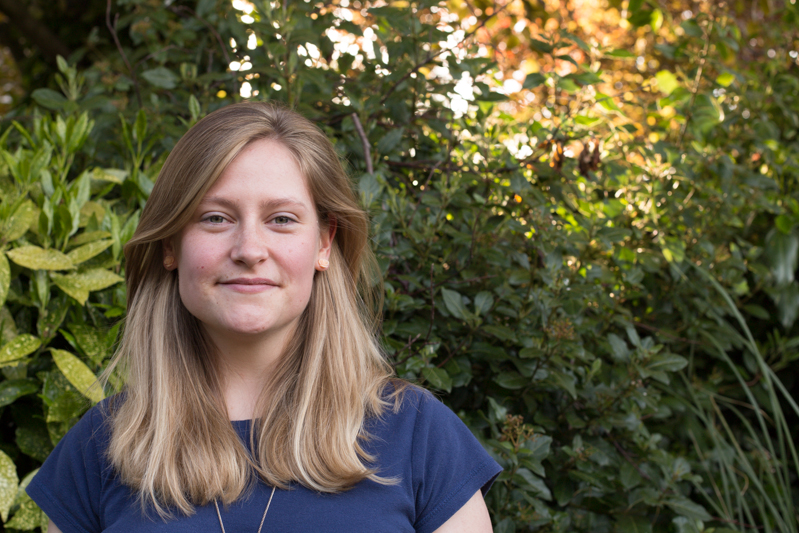
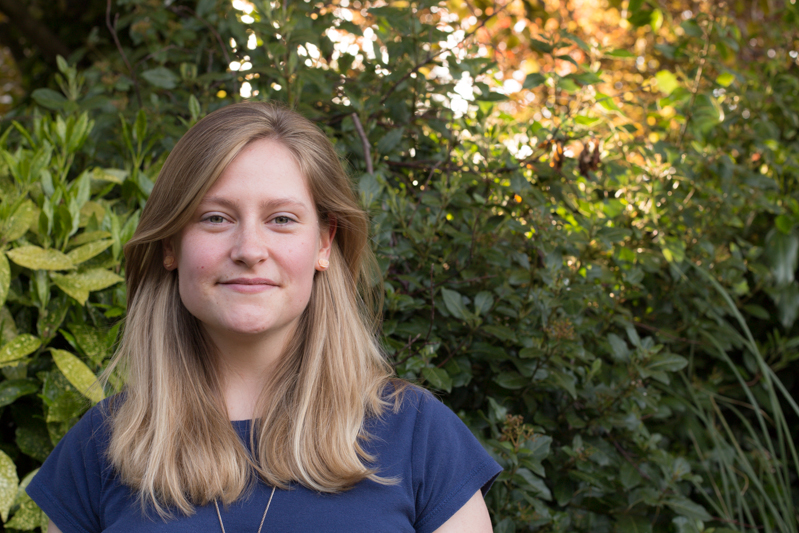
These aren't especially thrilling portraits of my cousin, Emma, but they serve the purpose of exploring the clarity slider perfectly.

Nothing terrible (or exciting, either, to be fair) about the original here

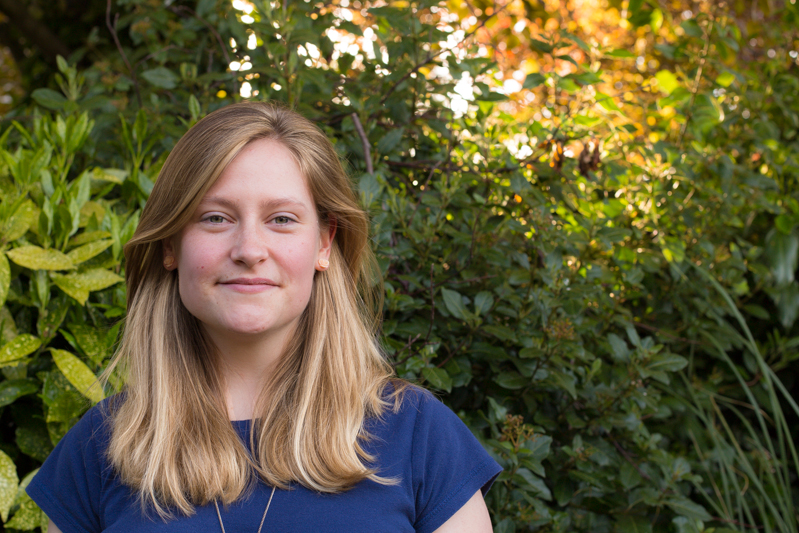
There's nothing at all wrong with the original image (it's been cropped and white balanced); but look at how Emma's skin appears softer and more even with a -15 point adjustment to clarity. The background hasn't been affected too much, but she looks better for it.

But a slight adjustment to the clarity slider (-15), softens Emma's skin a touch.

If you'd like to get even more advanced, you can use Lightroom's adjustment brush to paint softer and more even skin with a negative nudge, but bring definition to a portrait subject's hair by selecting that and giving it a positive clarity adjustment. That's what I've done here.

Here, I've softened Emma's skin with negative clarity, but brought out the definition in her hair with a positive clarity brush.

A cautionary conclusion

As with most things, subtlety is the key to clarity. Too much of it in either direction can leave your photos looking more like cartoons or watercolours than you otherwise might want. And you're not going to want to fiddle with the clarity slider on every photo, either. But at least you can have a bit more confidence about what it does and how you can make it work for you now.

Visualising studio lighting

Once you feel you’ve started to get the knack of pointing your camera at things and clicking the button, it’s time to start taking control of all the lighting in the scene. But, as it turns out, that’s bloody tricky.

I keep having to explain how to ‘visualise’ different types of lighting to people, and it turns out that it’s rather difficult – not because what I’m doing is particularly advanced, but because sometimes, it’s just tricky to make the connection between what is happening in a photo, lighting-wise, and how the lights are set up.

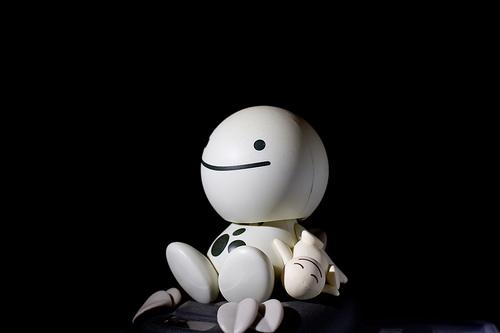
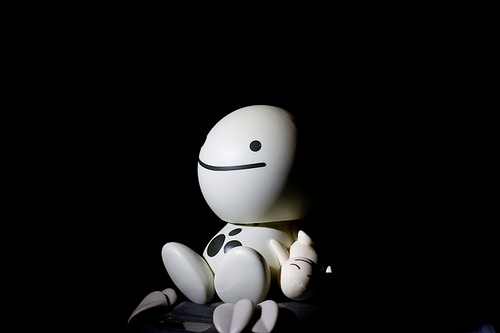
I’ve put together a collection of examples which I hope will help. For these photos, I’ve used a figurine with a nearly round head – this will be very useful to determine where the light is coming from; but remember that all of this is as valid with more complicated shapes, including people.

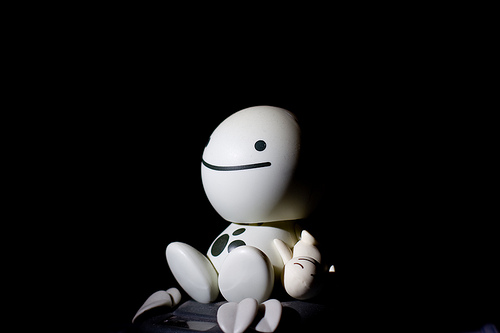
This picture of HappyHead is part of a series of photos designed to explain some basics of studio lighting.

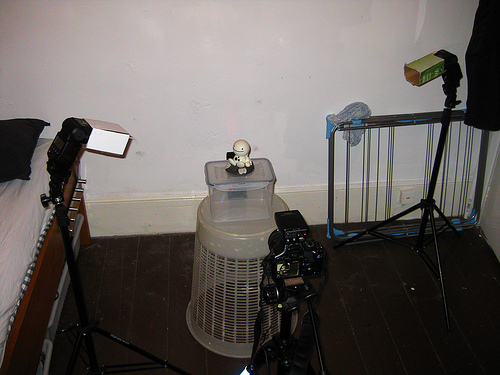
If you’re curious, this is the equipment I’m using throughout this post (and when I’m taking photos in general, for that matter).

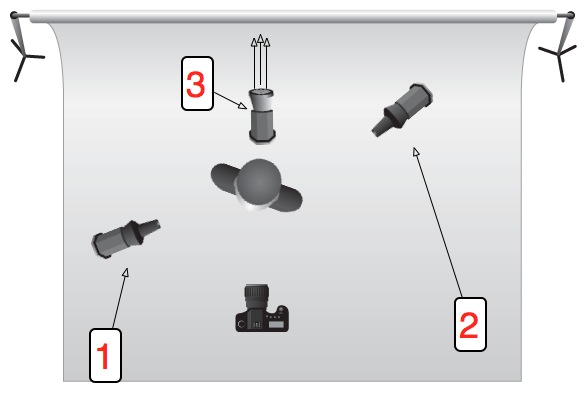
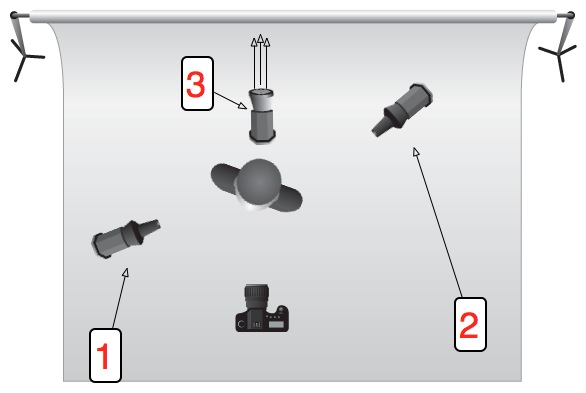
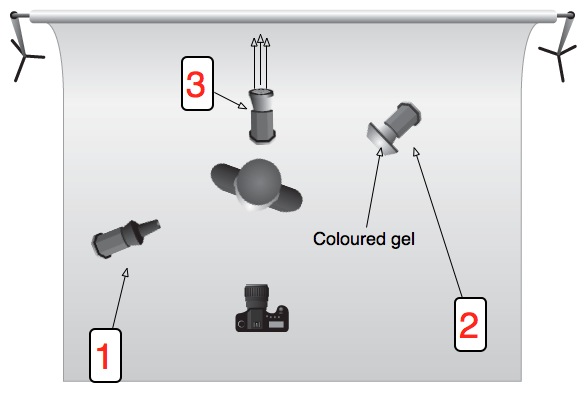
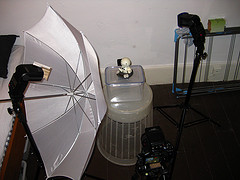
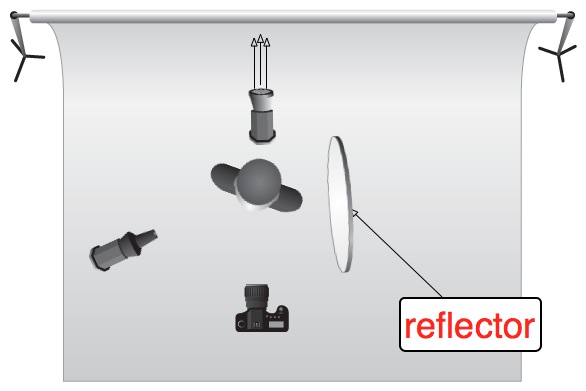
For most of the photos, the lighting set-up is like this:

Lighting setup, ItL

Check out the Flickr page for a detailed breakdown of everything you see in this photo.

Or, for additional clarity:

illu_lighting_setup.jpg

A couple of basics

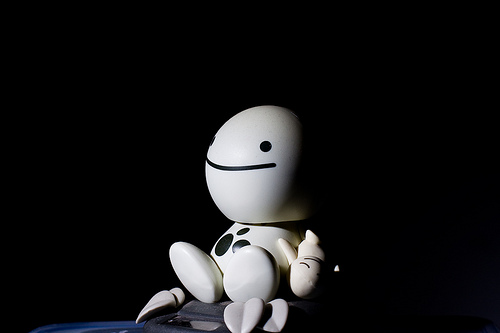
Introduction to Lighting - 1 Picture 1 – Lit by a single 580EX II flash from top left (flash 1 on the schematic) at 1/32 power output.

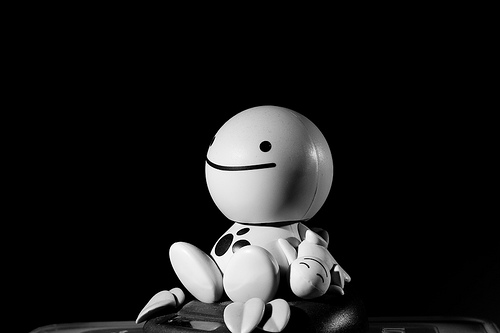
Introduction to Lighting - 2 Picture 2 – Same as Picture 1, but with an additional flash from the right (flash 2 on the schematic), slightly behind HappyHead, at 1/64 power, to lift the shadow a little.

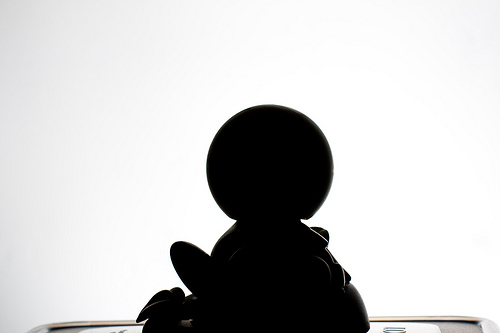
Introduction to Lighting - 3 Picture 3 – Same as Picture 2, but with an additional flash at full blast on the background (flash 3 on the schematic). Note the light fall-off to the right, due to the flash being too close to the wall, and not aimed correctly.

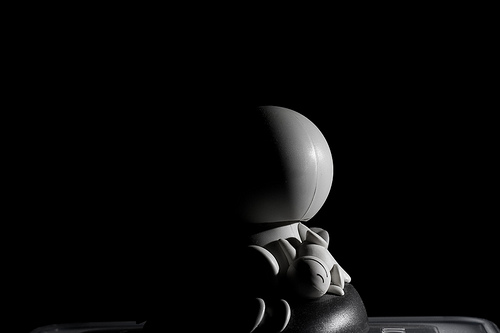
Introduction to Lighting - 4 Picture 4 – Shows just the flash to the right (flash 2 on the schematic), slightly behind HappyHead.

Introduction to Lighting - 5 Picture 5 – Shows just the flash behind HappyHead (flash 3 on the schematic), used to blast the background.

Troubleshooting lighting.

The observant among you will have figured out that Picture 1 + Picture 4 + Picture 5 = Picture 3. As a general rule, you can often just switch on one flash at a time to figure out which flash gives what kind of light – but only when they are in manual mode, obviously: In E-TTL mode, the flashes will attempt to compensate for the missing flashes.

So what is all of this good for?

istock_000006420114small.jpg

When you’ve perfected this lighting setup with a figurine, it’s time to replace the doll with a real, live person. Take a close look at this photo – the lighting setup is exactly the same as that we used for HappyHead!

Gels add a touch of colour

gel.jpg

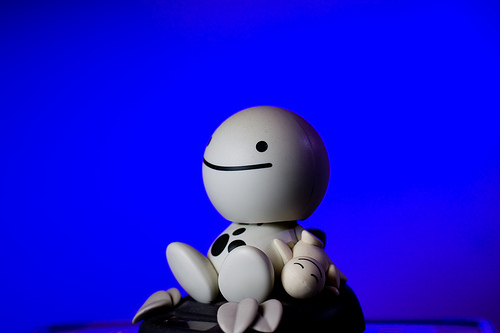
Introduction to Lighting - 6 Picture 6 – introduces the use of coloured gels. This is basically Picture 1 plus the same set-up as picture 2. However, the gelled flash has a much higher power output (1/32) to help overcome the light loss from the blue gels

Umbrellas or softboxes make the light softer

brolly.jpg

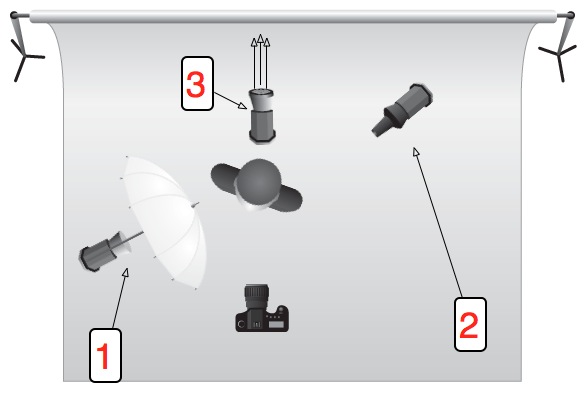
Introduction to Lighting - 7 Picture 7 – This uses the same flash setup as we’ve had so far, but with an umbrella on the left-hand flash to make the light softer. Notice how much gentler the light fall-off (i.e. how much less harsh the shadow is) is in this photo compared to the ones before in this series

Preventing spill-light

Introduction to Lighting - 8 Picture 8 – Same as picture 7, but I have turned the right-side flash to the background, with the blue gels on it. Note how the blue in the background looks quite washed out. This is because the umbrella is great at spreading the light, but it also throws a lot of light onto the background, which causes the blue light to be ‘contaminated’ with white light

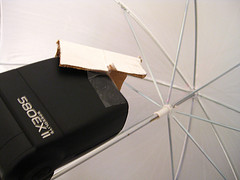
Introduction to Lighting - 9 Picture 9 – Same as picture 8, but here, I have added a piece of cardboard to the flash on the left, to ensure less of the light hits the left side of the umbrella:

Lighting setup, ItL w/ umbrella A simple barndoor

That, in turn, that means that less light is diffused onto the background, so now the blue flash can do its job better. Note that the flash output in Pic 8 and Pic 9 is identical – the only thing that changes is a tiny bit of cardboard. Incredible, eh?

Don’t forget about reflectors

Introduction to Lighting - 10 Picture 10 – Okay, back to the original (this is a different picture than pic 1, but uses essentially the same settings, so should look very similar). See how dark the right side of HappyFace’s head is? In Picture 2, I fixed it by adding a flash, but you can be more economical with your flashes

reflector.jpg

Introduction to Lighting - 11 Picture 11 – is exactly the same photo as Picture 10, except I’m holding a reflector (that’s a posh word for ‘a piece of A4 paper’) just out of the frame on the right side of the image. The light from the flash is reflected off the paper and back onto HappyFace, causing it to look much less dramatic.

From night to day with the flick of a switch

Introduction to Lighting - 12 Picture 12 – is quite similar to Picture 1, but has been set up to contrast with picture 13… Also note how the light has been moved further towards the camera (i.e. further to the front of HappyFace). This is so you can tell the edge of the head better – instead of getting the effect like in picture 7, where you can barely tell where the side of his head ends and the wall begins, here you get a clearer definition of his head.

Introduction to Lighting - 13 Picture 13 – The only difference between picture 12 and 13 is that in Picture 13, I have turned the flash lighting up the background off. Two completely different looks at the flick of a switch. It’s bloody magic, I’m telling you

Time to show off

Introduction to Lighting - 14 Picture 14 – is just showing off, really, and combines a whole series of lessons: The background is beautifully lit with a 420EX, the right side of HappyHead’s face is lit with the familar strobe, but with a red gel on it.

Iin retrospect, I wish I had umbrella’ed that strobe, because it’d have gotten rid of that bright red specular highlight just at the edge of HappyHead’s mouth.

Good luck!

This is only a very quick’n'dirty introduction to lighting, but it seems as if most people who e-mail me are actually struggling at this level – I’ll pick up with a more advanced lesson in a couple of months, I think.


Originally posted on 26 May 2011, but definitely worth dusting off and dragging out of the archives.

Make over your portfolio


When I first started to use Lightroom to post-process my images, I described its non-destructive capability as being able to go back to your teacher and ask for a new sheet of drawing paper when you'd messed up your finger-painting by adding a few too many red splodges. When you're editing your work first time around, this is marvellous, wondrous, and often absolutely heaven-sent. But what about second time around? Third time around? A few years down the road? You change, you learn more, fashions change, and suites are upgraded. You can still go back, dig out that original Raw file, and edit it all over again. Gareth is here to tell precisely why you should be doing this.

Today, we're going to look at some photos with horrible processing and make fun of them. You might think that is harsh, cruel, or even downright bad form, but I don't care: I'm here to kick the ever-loving shingles out of these images because they're bad. Compositionally and conceptually, they're fine, but the processing on them is horrible. So we're going to tear them apart (semi-constructively) and tell you what's bad about them, and how bad or unnecessary processing can lead to an inferior portfolio, and what you can do to improve your existing work without leaving your computer.

olddad.jpg

Easy on the clarity slider, buddy – I can only imagine this chap thought 'Maybe if I keep hitting "sharpen", the image will get better and better every single time! I've seen Manny Librodo's stuff – everyone loves that guy. Let's copy it!'

Add to that the weird yellow glow which I can only imagine is coming from a nearby burning Lancaster Bomber and you have an introspective moment ruined by gaudy, overblown highlights and a shirt that STANDS OUT like a neon, strobe-lit fifty foot long thumb. Ugh.

oldinaba.jpg

Someone get some ice on that guy's cheek, it appears to be approaching 1,000 degrees Celsius. Not only that, but I'm pretty sure that's a wig: nobody's hair is THAT shiny.

oldmoly.jpg

Now this is an absolute cracker. What better way to draw attention away from the background than to put a massive, gaudy vignette around your image? I mean he might as well have put a large, red arrow pointing at the subject, accompanied by the words 'HERE! THE THING YOU SHOULD BE LOOKING AT IS THE DUDE IN THE MIDDLE. OK? GLAD I COULD HELP, DUDE.'

As for the headshot, I see the Germans took down another one of our brave pilots. Better move away from that burning wreckage, my friend – it looks like you're within about a metre of it.

The Not-at-all-obvious Reveal

These photos all have something in common: they're all my photos. 'Crikey O'Reilly of the First Degree!' I hear you exclaim, as your monocle pings out and shoots across the room, ricocheting off your cat, Mr Plot Twist, and sends him screeching and careering out of the room.

We all know it's very easy to allow your online portfolio to go stale: we diligently replace our old images with new, better work, ensuring only a representative and varied handful of our best work is on display at all times. Don't we? Admittedly sometimes we forget, and we all probably need to update, replace and trim the deadwood more often than we do. However, there is another way a portfolio can go stale, something that is much harder to detect: I'm talking about our processing.

My process of keeping my online portfolio up to date usually goes as follows: look over recent shoots and pick some of my absolute favourite images, look at my existing online work, hold a sort of faux television talent show where I print out all the photos, consider each one intently, and then pause for a ludicrously long time–giving everyone involved the collywobbles, or just sending them catatonic with boredom–before announcing who's made the cut and is still in with an opportunity of landing themselves a Christmas number one and first album deal that everyone will promptly ignore after the next series. Oh, sorry, no, just a place on my website. But anyway, the point is, I clean out the deadwood and ensure that only my best work is on display... except there's something I've missed.

With every portfolio update, there are always a couple of images that never get cut. This usually is either down to them having a particularly interesting quality or because they are notable in some other way, such as being a portrait of someone well known (or well known in the videogame world, in my case). The problem is, these images tend to evade scrutiny with each portfolio update. Well it hit me the other day when looking at some of my images that survive the cut every time, just how rough the processing was and how much I had learned since I'd first taken them, processed them, and uploaded them with a glowing sense of pride to my website.

I decided to pull the original files off my backup external hard drive (you are all backing up your images, right?) and reprocess some from scratch. Not only did they look better, thanks to a more careful post-processing approach than my previous, ham-fisted attempts, the reprocessed images actually helped my portfolio look stronger as a whole, as these new images now fitted into to the overall aesthetic a lot better. What I ended up with was a more consistent look which reflects my current style, instead of a fairly consistent style punctuated by nasty little poorly processed shots.

It's a really great, uplifting thing to do: I was happy with what I had captured in these images but shocked at how I had treated them in post. In addition, it allowed me to reflect on what lessons I had learned from my days as a naive, wet-behind-the-ears but terribly enthusiastic post-processor to where I am today.

One of my biggest lessons? You don't need to over-process everything. Sometimes a shot benefits from an aggressive filter. Sometimes a vignette is appropriate: it depends on your customer, the target audience, and the theme.

For example, although I reprocessed a couple of the photos of game designer and artist Keita Takahashi, I retained the aggressive processing, because the images are intended to reflect Takahashi's wild and bizarre imagination. Seeing as the background is a mural painted by Takahashi himself, I wanted the images to feel like we were inside his imagination.

taka.jpg

More often than not, however, filtering and gaudy effects are unnecessary and often detract from the final image. Keep your eye on what's interesting in the original image and draw out that; if there's nothing of interest there, then it's probably not the photo for your portfolio.

Another lesson learned was the importance of good cropping, an understanding and respect of the power of composition and how it can can draw out a lot more from an image than a gaudy filter. 

moly.jpg

I looked at the image of Peter Molyneux sat at a table with the counters properly for the first time in a long time and wanted to crawl into a very tiny space, never to emerge, feeding on moss and small insects that were unlucky enough to scuttle into my awful, fauxtographic gobhole. What was I thinking adding that horrendous vignette?! If I wanted to draw attention to the subject, a good crop would do a significantly better job than a vignette on a whiteboard.

And just for completeness, here are the re-edited versions of the other two originals:

dad.jpg


inaba.jpg

It will hurt and it will force you to critically tear your own work apart but it's a bit like doing the vacuuming: the longer you leave it, the worse it will get, but you'll feel so much better afterwards.


The illustration is by the talented James of Sweet Meats Illusttration.