Portraiture, face pics, mush captures, gob snaps. In today’s PCoF (it’s what all the cool kids and hip youngster-dudes are calling Photography Concept on Friday) we’ll be dipping our toe into the gigantic swimming pool that is portraiture. It’s a metaphorical swimming pool. Into which we metaphorically will be dipping our metaphorical toe. Got it? Good. I can feel myself starting to waffle already, so I will resist the charms of loquacity and press on.

A natural light portrait - this ladybird wanted in on the action. No I did not pin it to her thumb.
Essentially, there are two sides to portraiture: lighting and, for want of a less hateful phrase, ‘people skills’. Lighting is a massively complex subject, and there are many, many blogs, books and videos out there to teach you the basics and more. I’m going to focus on the ‘people bit’, as repeating basic lighting theory is horribly boring and can be found elsewhere. Not only that, but the actual interaction with people and how you get the best out of them is the bit I actually enjoy.
First, however, I will briefly look at a couple of technical basics that you should follow to take your portrait from 'holiday snap on your mum’s compact' to 'ooh, very professional!', whether that's Venture Photography-style light and bright or far more whimsical magazine-style images.
Basics
In most cases, the eyes should be the focus of any portrait (in most cases), so ensure that the eyes are in sharp focus. Anything less and you should be throwing it away, I’m afraid. Composition is also of the utmost importance. The ‘rule of thirds’ (as explained by our very own Duncan Howsley here) should be kept in mind at all times. Of course, don’t be afraid to break the rules every now and then if it works for the shot.
Finally, on the subject of composition, pay close attention to your backgrounds. If you’re not shooting someone against a plain background, you really want to avoid having anything too busy going on behind your subject. There’s nothing worse than getting home after a shoot and loading up that shot you were so pleased with, only to find that there’s a double decker bus growing out of the side of her or his head.
Even if your portrait is well lit, technically sound, in perfect focus and head object-free, if the subject of the shot looks awkward and uncomfortable (unless that’s the intention of the image, of course) the image is, essentially, a big ol’ failure. So how do you get them to act natural?
Relaxing Your Subject

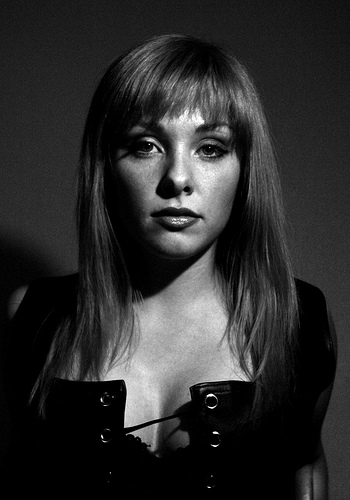
An example of a studio lit portrait.
First off, talk. Talk, talk, talk. Give your subject directions on what to do. Give them positive feedback, even if it’s going horribly. You’ll find that the more you praise (‘good’, ‘that’s great’ and ‘yeah that looks really nice, let’s do a couple more like that’), the more their confidence will build.
Not only that, but talk to them in general. Show an interest, get them chatting, perhaps between lens and lighting changes. Not only does this help you get a bit more background about the kind of person they are, it helps them to relax a little more. Finally, don’t be afraid to tell them when they’re doing something wrong, just do it constructively. Tell them what is working, but that they’re doing a thing with their eyebrows that looks insane, and oh Lord it needs to stop. Except more constructively than that.
I often find that people get very dry-eyed and ‘blinky’ after a relatively short space of time, so a little trick I like to use is getting the sitter to close their eyes while I compose and then asking them to open their eyes and look into the lens. Not only does this keep the subject more relaxed, it adds a bit of movement to the equation, meaning that there is less of a posed look to the shot.

An example of an "on location" portrait for a magazine.
In general, movement is good. Although it can feel cheesy, getting the sitter to turn their head into the shot can also remove some of that stiff, posed element, as they spend less time keeping their head perfectly still. To avoid blinking, I sometimes count people in, so they know when to not blink. Check with your subject whether they like this or not, though, because I find some people are straight up terrified of a countdown and will pull crazy, panicked faces.
Don’t spend too long framing your shot – get used to framing quickly. The longer you make your sitter wait for you to take the photo, the more anxious they become, and the less natural and relaxed they will look. Just imagine being on the other side of a dSLR with two large softboxes pointed at you, waiting for a good four or five seconds for a flash to go off, trying to keep your eyes open and a fixed smile on your face for the duration.
A nice, cheeky one is to tell your subject that you’re just ‘testing the lighting’. This doesn’t have to be a complete lie: you could indeed be experimenting with your lighting setup. This little trick sometimes has the effect of the subject completely relaxing, in a ‘oh, well this shot doesn’t even count’ sort of way and you can snap them while they’re totally off guard. Sneaky, eh?

Another studio image, captured during a quiet spell.
Finally, make sure you switch up the poses quite a lot. Not only does this allow you to get a good idea of the subject’s best side, it also allows you to keep them busy and distracted. This will make them forget about the fact that there’s a camera pointed at them, as they’ll be busy taking on the directions you’re giving them. In short – practice, practice, practice. The above advice is the most relevant for very simple headshot setups with ‘normal’ people, or anyone whose job doesn’t involve being photographed five times a week.
Good portraiture, in my opinion, is essentially about tricking your subject into forgetting that there’s a camera pointed at them, even if it’s just for a split second. The examples in this article, shamelessly taken from my own portfolio, have been chosen because I think they all reflect that philosophy in some way.
So, on your ‘to do’ list this weekend – grab an unsuspecting friend and have a portraiture session with them. See what you get out of it! You might just get hooked.