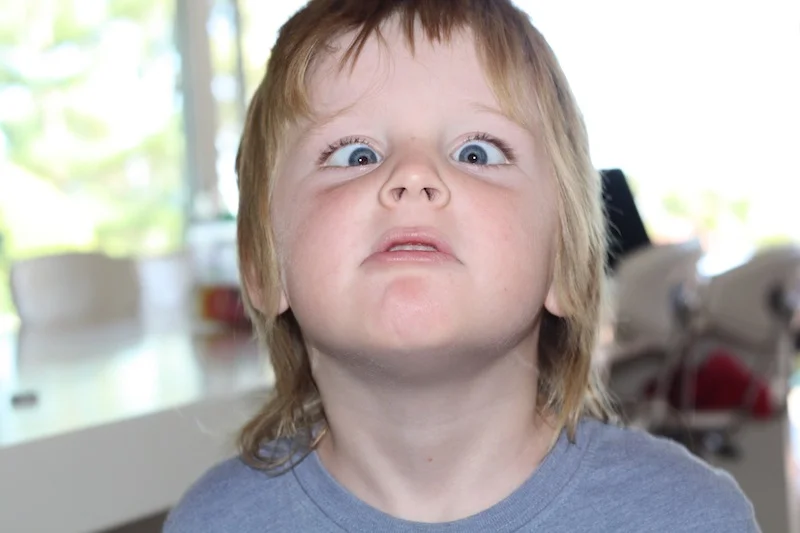
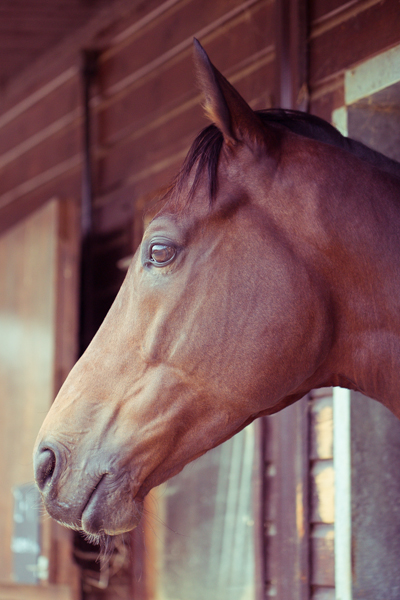
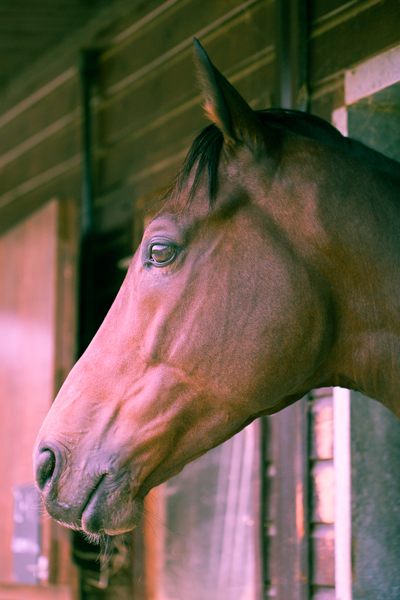
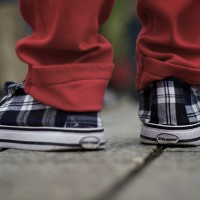
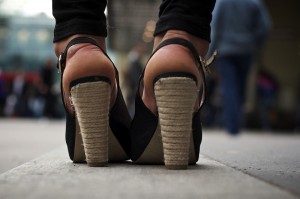
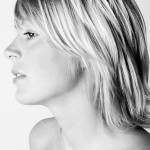
Where to stand, how to stand, and what to wear for relaxed portrait session.

When you hear the term 'high-res' thrown about with such abandon when it comes to images for web use, have you ever stopped to think just how big or how high quality and image meant for the web needs to be?
There's an assumption that high-contrast images are more dynamic, more compelling, more inviting. Have a go at some low-contrast photography. You might surprise yourself with the results.
Balance doesn't mean symmetry; it means an internal consistency and tension within your photos. And it's a vital element of composition.
Great photos might be down to a little bit of luck, but most of that 'luck' you make yourself. Don't believe us? Read on...
If you've ever noticed how beautiful lights can look when they are out of focus, you'll probably already have realised that we're about to enter the high season of everything that's awesome in the field of bokeh-liciousness. That's right - Christmas lights are pretty much the holy grail for gorgeous out of focus light effects. But how do you create the effect?
One of the most important things you're going to need to capture good bokeh, is that you need some great out-of-focus areas to begin with. So: Grab your lens that has the widest aperture (so, the smallest f-stop number). If you've got a prime lens, that's probably your best bet, but it's also possible to use a long zoom lens.
If you're shooting with a zoom lens, you'll want to zoom in, and focus on something close to you to get the maximum depth of field effect you're looking for in this particular case.

The next step is aperture. If I'm shooting exclusively for depth of field, I'll be shooting in Aperture Priority. Start in the biggest aperture you have (the smallest number, remember? If that doesn't make sense, quickly brush up on your skills with our Why is the F-stop scale so weird article).
Don't blindly go for the largest aperture though - it's a good starting point, but I often find that on some of my lenses, that means the foreground is a bit much - experiment to find the best settings!

A big blurry mess can be abstract and interesting, but let's be honest: It isn't storytelling, which - as we know - is one of the most important things about photography. So: In addition to the beautiful blurry mess, you also need to think about what the story is that you're trying to convey. If it's Christmas, it shouldn't be hard - get baubles, presents, kids, or food into the photo as well, and you're probably half-way there.

The world of bokeh is lots of fun - so keep that lens stopped wide open and start pointing it at light sources. Busy cities, gorgeous christmas trees, and even the TV can be a great source of beauty. Have fun, explore, and do share some of your best results in the comments!
Finally, don't forget that bokeh isn't just for the background - if you're feeling brave and adventurous, switch things around and get your background in focus instead - like in this great example from Mikko.
As your photographic interests progress, you are likely to try and take photos of somebody in the nude – It’s a very honest and challenging artform, which allows for a level of intimacy far beyond your regular portraiture. Of course, with the modern world’s paranoia about nudity, it’s not easy to know where to begin, so I’ve written a guide which I hope will come in handy to everyone, and give some insight into the hows and whys.
Needless to say, the photos behind the cut may not be entirely safe for work, but rest assured they are all relatively tasteful.
The problem with the definition is that people seem to attribute different things to nude. The most important part of an nude photo is that the person(s) in the picture is naked – and that this nakedness has a purpose.
 See Tina Nude II bigger on my Flickr stream.
This is probably going to be your biggest problem. It is difficult to take good nude self portraits, so you will have to find a model. A wife or girlfriend (or husband / boyfriend) might be able to help you out, but the problem here is that you are likely to know this body well already. One of the few exceptions to this Petter Hegre (see the links section below), who has taken an extensive (and very intimate) nude series of his wife – titled “my wife”
My point is that it would be better to take shots of somebody you have never seen naked before. That way, the picture taking process will be as much as an exploration for you (the photographer) as for the viewer
Finding a model can be difficult, especially if you do not have a photo studio or a professional business card (Neither those mean anything, as even people owning both can be psychos, but it helps when talking people into nude modelling). You could, of course, call a professional modelling agency, and offer to do a few nude shoots for new models who need a portfolio, but this is not likely to be cheap. Alternatively, using a online modeling agency such as OneModelPlace, you could find amateur models in your area.
When choosing a model, take somebody who has features that intrigue you. Don’t fall in the trap of picking somebody with a supermodel body – it removes much of the challenge. Instead, you want somebody who is different than average (making somebody who is not automatically associated with “pretty” look gorgeous is a lot more of a challenge than taking pictures of head-turners). A few pounds too much or too little is great.
 When working with nude photography – no matter how much time you spend getting the pictures to look nice, and hiding away everything you would prefer not to show – the models will be moving, and everything will show, to put it that way. What you want to do is to find a reasonably secluded spot to take the pictures. A photo studio is ideal, but outdoors or on location somewhere makes for great pictures.
Make sure that the temperature wherever the pictures will be taken is good though, because remember; Somebody will be naked, and being cold definitely does not help to make people relax!
Before you take the pictures, you will have to have thought about what you will want to do. Make some sketches, or have the model go through some poses with clothing on, to get some ideas as to where the shoot is going. Let the model have some ideas or set a theme to get going (a big black leather couch and a pale model or vice-versa can be very exciting)
When taking the pictures, take lots of pictures. This goes for any style of photographs, but particularly nude photography. If you believe you got a shot right – take two more just to make sure.
This also means that you will run out of film fast. Great. That means you can take frequent breaks while you load new film. Have a chat, take it easy, have a glass of wine (if the model is nervous, this can help LOTS)
 Try new stuff. Combine strange things. Have you seen the picture of Atlas? Recreate this with a big beach ball, or a TV receiver set or something. Use candles as light sources. Take black and white or colour shots (whatever you normally don’t). Use an overhead projector or a slide projector to project shapes onto your model.
Philip Greenspun has an excellent guide to nude photography on Photo.net, complete with lots of examples, practical tips, and interesting pointers. Not to be missed!
About.com has invited Peter Marshall to do A Beginners Guide to Nude Photography, which has a series of articles about nude photos, and how to go about photographing them
 See Tina Nude I bigger on my Flickr stream.
Bodyscapes is a project by Allan Teger: set of photographs where bodies are seen as landscapes. Very clever, very sexy, but not rude.
Petter Hegre is a Norwegian photographer who specialises in nudes. In recent years he's strayed from the subtle to straight-up pornography, but one thing you can't take away from him: The man's got a great eye for a photo, and it's some of the classiest porn around. Is that a weird thing to say? Well, have a look and judge for yourself.
The Art Nudes blog has a daily update of an artistic nude photo – most of them are of world-class standard – sometimes provocative, sometimes a bit strange, but always of very good quality... And they've been going for the best part of 10 years, so there's plenty of content to get through.
Flickr is of course another source of nude photos – the “Tasteful nudes” pool is a great port of call for inspiration, mostly photos taken by amateur models, but a lot of it is rather good... Although it's not always the best moderated collection of photos. Nudes, yes, but 'tasteful' - not always.
A history of nude photography in the inter-war era.
And, of course, my own article 45 inspirational nude photographs
Good luck, and if any of my readers have galleries of tasteful nudes – please do post a comment, I’d love to feature your site!
A digital camera sees more infrared than we do, and all you need to do to capture it, is to block out all the visible (non-infrared) light. You can buy filters that do this, but they can be ridiculously expensive – and buying stuff removes all the fun of creating stuff, n’est-ce pas? The trick? In order to be able to withstand the heat on projectors, slide film will be created so it lets through infrared light, even past the portions of the slide that are completely black. In other words: Unexposed, developed slide film can be used as an IR filter!
Top tip: If your camera lens is bigger than 35mm film, why not just buy a roll of 120 slide film? It’s bigger :-)
More information about the hows, the whys, and the wherefores can be found on Wim Wiskerke’s website.
 1) Go into a camera store, buy a roll of slide film. (120 film is great, because it has larger surface area and no sprocket holes). If you can get film that is out of date, it’s cheaper. They may even give you a roll or two for free.
2) Hand the newly acquired roll of film back to the salesperson behind the counter, and tell them to get it developed. If they look at you in a confused way, explain why. Tell them to add a note on the film that yes, you know it is unexposed, and yes, you want it developing anyway.
3) Go back to the store 48 hours later, pick up your now-developed, still-underexposed slide film, which now is ready to be used as IR filter. The whole thing should cost you a fraction of the price of an IR filter!
Historically, split toning was used when developing photos from negatives. Two different toners would be used one after the other in order to produce different colours in the highlights and shadows of an image. For example, follow selenium with gold and you'll produce purple-blue mid-tones; or use sepia and then blue for sepia highlights, blue shadows, and green mid-tones. The effect could be altered by using different papers, too. While chemical split toning isn't an exact science, it does offer some compelling effects for your photos and can give them an entirely different feel. You can use it to add warmth or to cool down an image; you might want to introduce a blue tint, or an orange cast.
Now, split toning is more likely to be achieved using the dedicated split toning panel in Lightroom, or with a colour balance adjustment layer in Photoshop, and it is far more controllable. If you've not ventured into the split toning panel, the degree of variation that it offers you might be a little overwhelming; it can radically alter your photo in a ways that you might not anticipate. That shouldn't stop you from experimenting, and to get you started, here are some suggestions. And don't forget that if you're working in Lightroom, nothing can't be undone.
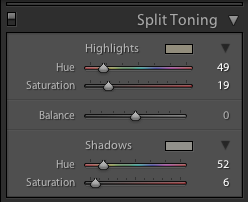
If you're using Lightroom, the split toning panel allows you to select the colours that you would like to emphasise in both the highlights and the shadows, the saturation for each of these tones, and then the balance between them.
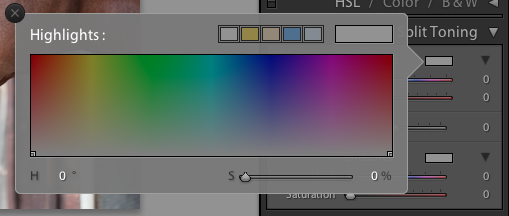
If you find using the sliders to control these adjustments a little too abstract, click on the colour swatches beside 'Highlight' and 'Shadow' and use the eyedropper to select the precise colour you'd like for each.
The balance slider places more emphasis on either the highlights or shadows. Once you've selected your highlight and shadow tones, move it about a bit to see which direction, if any, you prefer.
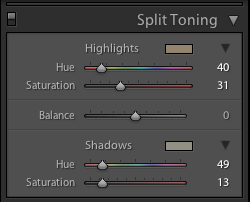
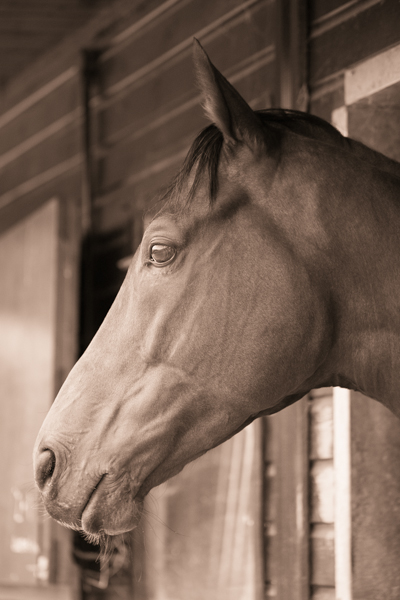
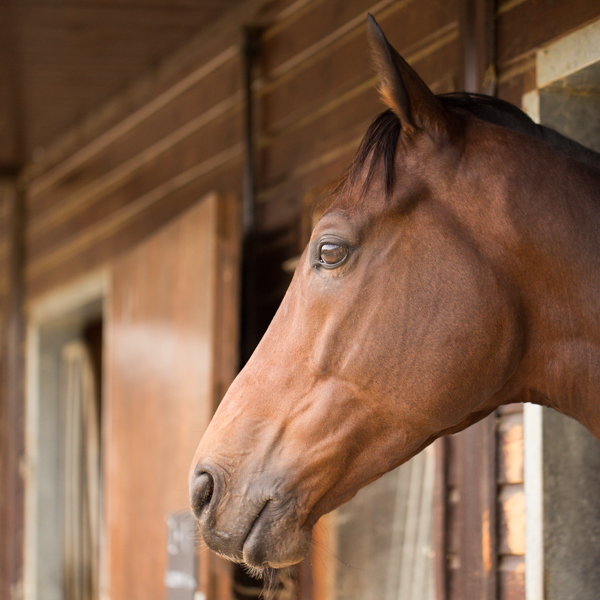
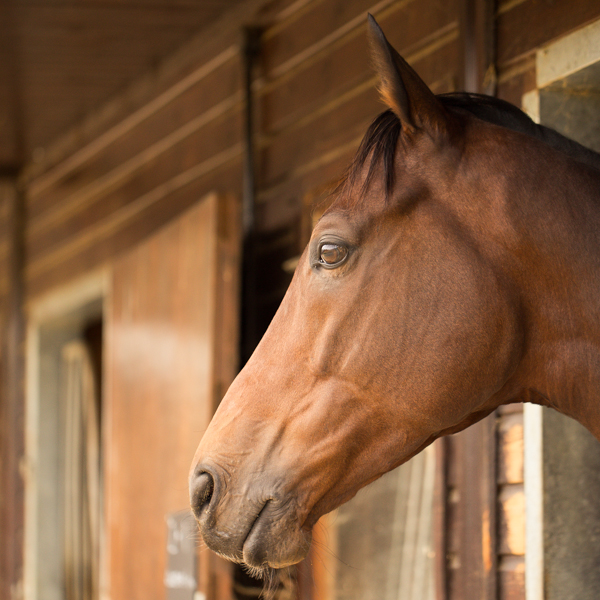
The original black and white conversion of Willie's portrait is coming up quite grey-green in tone. By adding some muted browns—that in the shadow very pale—you can introduce a great deal more warmth to the image and bring about an almost-sepia tone.
This photo was taken fairly early in the morning, on a day when the cloud didn't lift. While the light was wonderfully diffuse, it wasn't especially warm. Even after correcting the white balance, it still felt as if it needed to be brought to life. By adjusting the highlights and shadow tones, it meant I could introduce a more golden-hour feel to the photo.
You don't need to push too far into the oranges or yellows to intensify the warmth in a photo: sticking to browns and beiges might be enough.
Of course, if you wanted to do the opposite and bring about a colder feel to a photo, you would do that by applying more silvery-blue tones, greys, greens, and even some yellows, to the shadows and highlights.
Until now, I've used fairly similar highlight and shadow tones in my split toning adjustments. But for a cross-processed effect, you need to select contrasting colours for your highlight and shadow tones: green and magenta, or cyan and yellow, for example. Which you apply will depend on whether you're looking for a warmer or cooler over all effect.
[gallery columns="2" ids="7128,7127"]
By adding a graduated filter, upping the contrast and saturation, and reducing the clarity, you can create a fake toy camera look. We've a tutorial for that, in case you'd like to give it a go.
The best way to get a feel for split toning is to try it for yourself and see what you can achieve using it. Remember: if you don't like it, you can undo it.
So, you're ready to do a photo shoot? No, seriously, are you really ready for your shoot?
A while ago, I was challenged with creating a pre-shoot checklist for photographers - I figured it'd be rude not to, so I gave it a whirl.
Best of all, if you want a handy, keep-in-your-pocket version of this checklist, it's printed on the back of my super-handy Photocritic Grey Cards. Spiffing.
Haunting, surreal, and quite possibly the first major way in which digital photography does something which film photography can’t emulate – or even come near. HDR – or High Dynamic Range – photography is nothing new, but as new tools and techniques make the artform more available, HDR photography is taking off in a big way.
If you’ve never had a go… and especially if you don’t even know what I’m on about – you’re in for a real treat…

High Dynamic Range photography or HDR photography is an advanced set of photography techniques that play on image’s dynamic range in exposures. HDR Photography allows photographers to capture a greater range of tonal detail than any camera could capture thru a single photo.
While many imaging experts regard HDR photography as the future of digital photography, the discipline has long been in existence.
HDR photography is present in many pictures taken through modern day digital cameras. The truth is, if you are a real photography enthusiast then there is a great chance that you have taken at least one photo exemplifying HDR photography.
The real functions or even executions of HDR photography may be debatable. But no matter which website or source you consult they will always say it is a technique that employs the great use of exposure range to get distinct values between light and dark areas of the image. Its real intention is to create an image that accurately characterizes the intensity levels found in natural scenes. If you ever wondered why the picture you took was different from the scenery you actually saw, then maybe it’s time for you to learn HDR photography.
HDR Photography is the technique used to capture and represent the full (as possible) DR found in a scene with high perceptual accuracy and precision. To remember things better, think of the 3S: sunlight, shadows and subjects. These are the things that make an ordinary picture an HDR image.

While the technique is more commonly used now to create astounding images of art, fashion and landscape photography, HDR photography’s humble beginning is ironically designed to capture a rather fearing, shocking and destructive image – nuclear explosion.
Charles Wyckoff (the same guy who inspired Computational Photography) developed HDR photography in 1930s to 1940s. He is genius who took the 1940s Life magazine cover of nuclear explosions – an image that would later change the world. Of course the technique didn’t have the acronym HDR before, but the principles remained the same.
A deeper and perhaps more scientific understanding of HDR photography and imaging was first introduced in 1993. This was done by playing on two established photography elements: tone mapping and bracketing. A complex mathematical theory regarding differently exposed images of the same subject matter was then released two years after. Paul Debevec, a computer graphic researcher, applied this theory and combined several differently exposed images to produce a single HDR image was accomplished. Talk about putting a lot of science and even math to discipline.
Today, things are a lot easier. Thanks to the wide selection of portable and digital cameras as well as easy-to-use software, HDR is no longer limited to people studying nuclear explosion and computer graphics technology. But the technology on image capture, storage, editing and printing devices still has some limitations. And since each of these elements affect the DR of image; we need to study them if we want to get an HDR image with superb quality.

There are two theories behind HDR photography. And as the technology around HDR photography evolves so is the discipline itself. But if one wants to take HDR imagery seriously then he must first understand the concepts and theories that make up this discipline.
The most fundamental of all HDR photography theories is to take multiple shots at varying exposure levels of a particular subject. A special computer program will then combine the images together into a single image. This is just an incarnation of the original theory during the time when there are no digital cameras and advanced computers and programs were nothing more than a work of science-fiction.
The second theory is the one that capitalizes on the RAW processing software to create various exposure levels of the same image. Modern Digital SLR camera and a lot of the Point and Shoot models allow photographers to capture RAW images. A RAW image or file is the data captured by your Camera’s sensor that is not processed yet and therefore does have color information. You can manipulate this file, adjust its color, lighting or while balance.
 Taking the images is the first stage in HDR photography. You can use a simple point and shoot camera or a fully configurable digital SLR camera camera.
In both techniques you will need a camera with configurable exposure settings. All DSLRs and most point and shoot cameras have this. Certain SLR cameras have bracketing function which makes it easier for photographers to change exposure settings.
For starters, you can use the following setting: ISO 200 and Aperture Priority Mode. And as they say good things come in threes, you can take picture with three different exposure settings: EV 0, EV -2 and EV +2. You can experiment more on these but generally speaking, the more exposure versions you can have, the better your final image will be.
If you want to take more exposures as part of your HDR photos - up to 19, in fact - it's worth taking a closer look at Triggertrap Mobile, a mobile phone app that hooks up to your SLR camera. At $20 for the hardware and $10 for the software, it's an absolute bargain.
Oh, and obviously, It is recommended to use a tripod when taking HDR photo. This is because tripod stabilizes the camera and you need to get the clearest image you can get since you are experimenting on exposure values. The best way to do this is to use a shutter remote or if your camera doesn’t have one, just make sure you press the shutter button lightly.

Incredibly, the above photo is an Infra-Red HDR photo. Awesome, eh?
Post processing is the last stage in HDR photography that you can really control. This is where technical skills merge with creative sensibility. And with the introduction of advanced digital cameras and photo editing software, HDR image post-processing is made a lot easier.
However, this does not guarantee that having an excellent HDR image will be as easy as clicking the shutter button. There may be times that the three or more images you took with varying exposure values are simply not enough. With this, the only chance you are left with is to do a post-processing of the image.
Post-processing generally involves color correction, saturation, contrast and brightness and darkness adjustment and other image element manipulation. But in HDR photography we need to concentrate on contrast and brightness and darkness adjustment. Brightness and darkness adjustment is the direct digital translation of exposure manipulation in the picture taking stage. If in the camera you adjust exposure settings, in the post-processing stage you will adjust the brightness.
The main advantage of process is surpassing the limitation of actually configuring your camera in different exposure levels. While some cameras may have eight exposure settings and therefore 8 different images, post-processing can simply give you a limitless number.
After the shoot, transfer the images to your computer. There is a merge to HDR feature in many photo editing software including Adobe Photoshop and above, Photomatix Pro, Dynamic Photo HDR and others.
Post-processing software also allows you to blend photographs with different exposures. This clearly increases the dynamic range of the final output photo. There is also tone mapping which reveals highlight and shadow details in an HDR image made from multiple exposures.
Whether you are an HDR photography amateur, hobbyists or a professional these websites will surely give you something to focus on.
The site claims that it is the first and most visited HDR tutorial on the web. It offers easy to understand tutorials as well as Photomatix software walkthrough. But we think HDR101′s best content is the monthly favorite Flickr.com HDR photos.
HDRSoft, maker of one of the most popular HDR software Photomatix gathered tutorials, DVDs and videos as well as mailing list subscriptions for all HDR photography enthusiasts.
CambridgeInColour offers photography tutorials and forum where photography professionals and enthusiasts like you can discuss anything about photography.
This HDR group has 30,000 members and counting. Share your passion and be inspired with HDR images on different subjects taken by photographers from all over the world.
SmashingMagazine’s 35 Fantastic HDR Pictures
One of the most popular blogs combined “35 extremely beautiful and perfectly executed HDR-pictures” on different subjects and execution.
Camera, equipment and photography software reviews and video tutorials on HDR photography all in one place.
HDRcreme is the first HDR photo gallery that lets you share photos, explore and learn about High dynamic range imaging.
A Single link to many great HDR Photography resources.
The photos in this article are from Flickr, licenced under CC/Attribution licence. See the full-size photos of Pasargad Bank Branch by Hamed Saber, Moon on Mars by Extranoise, Tour Eiffel by Al Ianni, Toronto City Hall by Paul Bica, San Isidro IR HDR Panorama and HDR 01 by CodyR on Flickr.
Top tip: a Flickr search for ‘HDR’ filtered by ‘most interesting’ is a great way to get some awesome inspiration.
Enjoy!
You're probably familiar with taking photos with a digital camera. If you're adventurous (or mature) enough, you've probably had a go at taking photos on film as well. As a true film aficionado it's interesting to dig deeper into the history of photography, and give wet-plate photography a shot, too. If you manage to avoid poisoning yourself or blowing up half your city, it can give awesome results!
Wet-plate photography is pretty much exactly what it says on the tin: You don't use film; instead, you expose a wet film plate (usually a plate of glass or metal) that is covered in a still-wet chemical solution. You have to 'pour' the plate (i.e. add the chemicals), 'activate' them, expose your photo, and then develop it in a very short span of time - usually less than 20 minutes. That means that you can forget about taking a quick series of photos: Once you've prepared your plate, you have to run and take your photo, run back, develop it, and see how it turned out. If you messed up, you've wasted 20 minutes, and you have to start over again from scratch.
Because your final result isn't an enlargement of a photographic print, the detail in wet-plate photos can be absolutely astonishing - it is as if you are looking at an enormous negative, chock-full of glorious, glorious detail, often without a trace of 'film grain' - because there was no film involved in the first place.
Wet plate photography as it is done today is often known as the Collodion process, invented more than 150 years ago.
It's worth noting that wet-plate photography can be quite dangerous; you are working with volatile chemicals that have been known to catch fire, oxydise or explode (nitric acid, nitrocellulose and ethyl ether). Some of the chemicals used in these processes are poisonous (pyrogallic acid, silver nitrate, zinc bromide, cyanide and denatured alcohol), corrosive (silver nitrate), or bad for you in other ways - it's definitely a good idea to get someone who knows what they are doing to give you a tutorial - in person - before you try it yourself.
For starters, you would need a View camera (or 'field camera', which is the smaller, more collapsible version of the same). This will usually be a large- or medium-format camera that will accept your plates. It doesn't have to be big - the world's smallest wet-plate camera has a wet-plate size that takes half-inch square plate images, but part of the attraction is the huge sizes you can work with.
Glass plates will become your negatives or positives. For positives, you'd typically use black glass, or you can experiment with aluminium or polished steel if you want a different 'look' to your photos.
In addition, you're going to need a lot of chemicals; there's the Collodion mixture (consisting of pure alcohol and various chemicals), A Siver Nitrate bath used to make the plates light sensitive, a developer to develop the plate, a stop bath (usually just water), and a fixer.
To get a proper idea of what is involved, "The Wet Plate Collodion Process" by Quinn Jacobson on YouTube is a pretty decent introduction showing the photography process.
So; it takes a lot of practice to get right, it's dangerous to your health, and taking 10 wet-plate photographs will take approximately twelve thousand times longer than taking the same number of photos with your SLR camera. Sounds like a challenge!
Most local colleges and some photography clubs that have a photography department occasionally run wet-plate induction nights - or search online. There's a few very active forums where you can learn more, and perhaps you'll be able to find someone local to you who can show you the ropes before you blow up your face, set your poodle on fire, and poison most of your city.
Good luck!
Photo Credit: Andi Todea on Shutterstock.com
We love a bit of street photography here at Small Aperture, and we’re always looking for new ways to tempt newbies to have a go at it or give old hands some ideas for their next outing pounding the streets. When Thomas Leuthard, a photographer based in Switzerland, dropped a couple of suggestions in my inbox, I asked him if he wouldn’t mind expanding on them a bit. So, here’s one of his suggestions, and I have to say, I love it. Thomas, over to you…
Today, I’m only going to shoot feet…
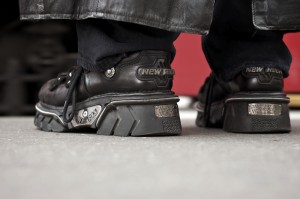
When you’re shooting on the street, it’s far too easy for your eye to get distracted. Therefore, it’s a good idea to have a small concept to concentrate on whilst out with your camera. Beginner or not, it helps to have a plan; something to hold on and to follow to. I like the concept of just shooting feet. The reason for that is very simple: feet are always out there and people wear different shoes.
In addition to saying that you’ll shoot only feet, it can help to set yourself some more boundaries. Try picking a few (or even all) from this list:

I like time limitations as I find that I normally work better under pressure. It means that I know that I have to hurry up and can’t just hang around with my camera looking down at ladies’ legs. I have a mission and have to fulfil it in the time provided. (How very James Bond!)
If you target your focus, you’ll be astonished by how much you can accomplish. It doesn’t matter if you’re a beginner or an old hand, try to focus on one thing. It can be a colour, body part, accessories, or whatever you fancy, really. It is all about focussing on the essential and not getting overwhelmed by the rest of the street.
Anyway: back to our feet that we’re shooting. If you want to get a good and easy shot on a pair of shoes, try a bus stop, a pedestrian crossing, or anywhere else where people have to stand still for a moment. This is your moment and you have to be quick. Set your camera to aperture priority and try f/4. If you’re shooting with your camera on the floor, flick on autofocus. You’ll look like an idiot with your head down there, peering through the viewfinder. You might need to practise, but that’s half the fun, no?
Sure, you’re going to have to be brave, but if anyone asks, tell her or him that you study photography and that today’s topic is feet. They will think you are crazy and walk away. It’s true, people often don’t understand what I do and why I do it, but I often find that showing them some photos helps to explain it. They soon realise how beautiful street photography can be.
It’s all a question of good ideas, interesting angles, and composition. A good street photo doesn’t need to show faces. Feet are perfect, and the chances are you won’t have any legal issues, publishing someone’s feet.
Now, go forth and have fun, and try not to walk into lamp posts or anything whilst you’re looking down!
This article was guest written by Thomas Leuthard, and all of the images are his. You can see more of his street photography on his website: 85mm.
One of the strengths of photography has always been its ability to freeze time. Before the advent of photography, it was impossible to see how a hummingbird moves its wings, how a tennis ball deforms as it is served, or what it looks like when a bullet hits an apple at the speed of sound.
In the microcosmos explored by macro photographers, there are hundreds of similar quick-moving phenomena that lay unexplored. I have a fascination with falling water and the way matches flare up as you strike them, so I decided to take a closer look.

Edgerton nearly drove himself to despair trying to capture this one photograph
There are photographers out there who have driven themselves to the brink of insanity trying to capture the perfect droplet photo. Harold Edgerton, for example, worked several years of his life in the mid-1950s the hope of one day capturing the perfect corona—the splash impact of a droplet in a layer of liquid transforming into a perfect crown of droplets thrown back from the liquid. Eventually, through years of trial and error, he managed to capture his droplet.
Today, photographers have the advantage of being able to share experience online. Because most photographers work with digital cameras, the experimentation time also decreases drastically. Imagine the poor people who had to wait for an hour for their film to develop properly, just so they could see if they had finally captured the perfect corona!

This photo, by Mattheu Collomp, shows an alternative way of photographing droplets - click the image for a bigger version!
Despite the fact that the technical side of capturing droplets is a lot easier, it is still a labor- and time-intensive mission on which to embark. There is something unique about seeing liquids and their motion frozen in time, however, and as a macro photography project, it is excellent.
I have tried capturing droplets on impact on many occasions throughout my photography lifetime, and every time, I did it a little differently. On the first few attempts, I tried it with an old flash unit connected to a Kodak DC4800 with a PC lead (the same type of connection that connects cameras to studio flashes). The results were not terrible, but the limitations of a digital compact camera turned out to be prohibitive of capturing the photos I wanted. The second time I gave it a shot, I had graduated from digital compacts and was using my first dSLR—one of the first Canon EOS D60s, bought on the very day it was released. The result wasn’t too bad — but it wasn’t great either.

My first attempts at photographing droplets weren't, exactly, what you'd call successful (click on image for larger version on Flickr)
With my shiny new dSLR, I was trapped indoors in a typical miserable rainy day. What could I do other than try to capture some more droplets? This time, I decided to give continuous lighting a try, and I lined up a pair of 600w work lights. Although the light was blindingly bright, in retrospect, there still wasn’t enough light: Even the best of my shots that day had a slight tinge of motion blur on them. Although I did get some spectacular photographs, the blur meant that they weren’t as perfect as I would have liked.
Throughout my experimentation, however, I did discover one thing: The translucency of water makes it difficult to capture the true dynamic of the fluid. If only there was a purely coloured, perfectly opaque liquid I could use—and paint would have created such a mess. My esteemed photography assistant Katherine came up with the idea of using milk, which turned out to be a terrible idea. The hot lamps made the milk turn sour within half an hour, and the smell in my make-shift photo studio stayed for weeks. I’ve since discovered the perfect liquid: long-life coffee creamer! This liquid is slightly thicker than water, doesn’t go bad as easily as milk, and makes a wonderful splash, too!

It took hundreds and hundreds of attempts before I started getting images I started to be happy with. This wasn't one of 'em.
When I started writing my macro book (from which this article is a small extract), I decided it was time to revisit the droplet experiment. Armed with a few containers of coffee creamer and using a 28-135mm macro lens with a 25mm extension tube and the Canon Twin Lite macro flash, I started experimenting again.
There are many ways to capture droplets, all depending on your taste. It’s possible to create tranquil photos, like the one Matthieu Collump shot above, but personally, I prefer the drama of liquid hitting liquid.
For my droplet shots, I used a large, flat surface with a very thin layer of coffee creamer in the bottom. I then used an eyedropper to let droplets of creamer fall into the film of creamer. (If you don’t have an eyedropper, you should be able to buy one inexpensively at a photography store or pharmacy.)
After a few photos, I started getting the knack of the timing, so that I took the photo a fraction of a second after the droplet impacted. From then on, it was four hours of patience, changing the batteries in the flash and camera, and refilling the eyedropper.
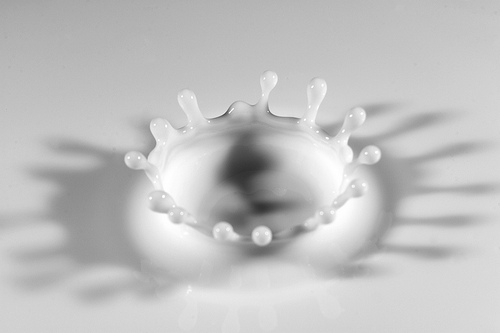
A nearly perfect corona. But only nearly.
It is the kind of activity that makes your family and friends question your sanity, no doubt about it, but in the end, I was left with about half a dozen photos I’m very fond of, including the photo above, which is nearly a perfect corona.
But only nearly…

My book!
This is an extract from chapter 4: The Macro in Everyday Objects, published by Wiley Publishing, and written by yours truly.
Obviously, I’m biased, but I highly recommend you get hold of a copy of my book, because it’s awesome. You can get it from Amazon in the US and in the UK, and most other good bookstores around the world.
It’s also available in Polish, Czech and Chinese, so if you prefer reading one of those languages, nip along to your local bookstore or book-peddling interwebsiteshop.
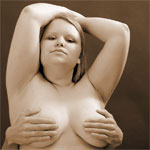
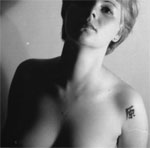
It doesn’t take much of a brain to fathom what a ‘nude’ photo is. If bits that are normally covered up on the beach are on display, then it’s a nude.
Similarly, a ‘non-nude’ photo is pretty straightforward: There are no hoo-hoos, wee-wees or breasticles on display.
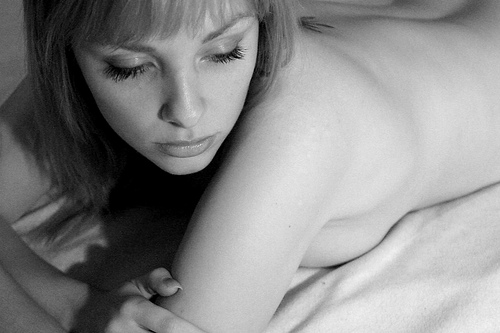
So, what is all this ‘implied nudity’ stuff all about? Well, it turns out that there’s an ‘in-between’ stage of nude photography: Implied nudity. Used creatively, it can add an interesting dimension to your portraiture. Here’s how and
 Right: Not a terrible portrait, but it isn't exactly super exciting ever. But there seems to be a lot of skin on display. Hmm, I wonder if I can make this photo more interesting... (click the picture to see it bigger, on Flickr...)
Put very simply, implied nudity happens in one of two ways: The model is dressed, but the photo is shot in a way where it looks as if she might not be. Or the model might be in some state of undress, but the photo is shot in such a way (through lighting, perhaps, or by the model’s position), where you can’t be sure whether or not they are naked.
H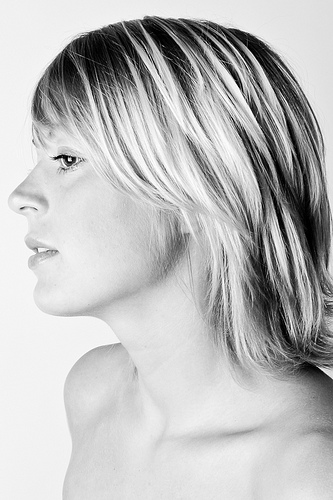 umans are funny creatures: our minds constantly play tricks on us. When pieces of information are missing, our minds tend to ‘fill in’ the information. When you read smthng lk ths sntnce, your mind doesn’t really struggle to fill in the missing letters, for example – the same happens in photography. In a photo where a model is covering up her breasts, your mind will automatically ‘fill in’ the missing bits.
With this in mind, you can use that to your advantage as a photographer: By hiding your model’s dangly, bouncy, or naughty bits, you can sometimes create a photo which is even more allusive and erotic that one where it’s all on display.
Right: Now that's more like it. All it took was to de-saturate the image, fiddle with the contrast a little, and do a tighter crop, which in effect hides all her clothes.
There are a few different situations where this works extremely well. In the past, I have been known to do ‘nude’ sessions with models (especially models who aren’t that experienced), and then taken photos only of their face or head-and-shoulders. Some people relax (or tense up) in a completely unique way when they are not wearing clothes – which gets reflected in their face.

Another great example of implied nudity by Emily - see the full version on Flickr.
I think I’ve taken some of my best portraits this way – simply because the model was concentrating on making their bodies look good, so they forgot to worry about their face. The result? Beautiful, intimate portraits where you would never have known the model wasn’t wearing clothes.
The opposite is also true, of course: You might well find yourself working with a model who would love to do nudes, but is too shy to actually strip off. Using these techniques, you can create the illusion of nudity.
 Right: You can use implied nudity to create tension in a photograph... She's in a graveyard. Surely, she's not naked. Is she? (clicky for bigger)
We all have different tastes and preferences for what we think is attractive. Combine this with the afore-discussed tendency for people to ‘fill in the blanks’, and you can see what might happen: In a photo where something is hidden, it gives the viewer the opportunity to read as much (or as little) into the scene as they want to.
The great thing is that the viewer tends to ‘fill in’ the blanks with whatever their own fantasies or beauty ideals are, which means that by tapping into the fantasy world of your viewers, you can actually make your model more attractive: After all, your viewers are going to be attracted to whatever their fantasies cook up!

You can't see much (is she wearing a bra? Is she not?) - but it's the implication of nudity which makes this photo. (clicky for bigger)
So – a rather long and picture-heavy post to make a rather simple point: If you haven’t experimented with implying nudity in portraiture before, why not give it a shot – you might like what you come up with!

Lightroom is magic - and as photographers, we've never had it this good.
There you are, after a long day of shooting, and you realise that some of your favourite photos are too contrasty, with parts of the image bathing in darkness. Adobe Lightroom to the rescue...
I was playing around with my brand new Canon EF 100mm f/2.8 macro lens in my kitchen on a rainy day, and was experimenting with a new reflector I was building (it works great, but more about that in another post). Some of the photos that didn't work out so well ended up on my camera, and then on my computer, and then in Adobe Lightroom. I figured I'd see if I couldn't edit one of them into shape a little, and was (re-)astonished by the fantasticness of Lightroom's Fill Light slider.
Starting with this photo:

I started experimenting with various settings. You can crank up the exposure to make the rest of the image brighter, of course, but that would over-expose the already bright highlight on the right of this Hershey's Kiss.
So, by instead adjusting the Fill Light slider:

I was able to recover the shadows remarkably well:

A closer look at the image shows that you do gain a bit of digital noise:

But it's possible to reduce it quite a bit by using Lightroom's rather phenomenal noise filters:

Of course, as always, it's much better to ensure that you get your lighting right when you take the photo; you get less noise, higher quality, and more precise control about what the hell you're doing. And yet, it's rather fantastic to see how photographers are given a lifeline if you balls things up just a little bit too much.
How did we ever survive without Lightroom?
Do you enjoy a smattering of random photography links? Well, squire, I welcome thee to join me on Twitter - Follow @Photocritic
© Kamps Consulting Ltd. This article is licenced for use on Pixiq only. Please do not reproduce wholly or in part without a license. More info.

This photo was taken at broad daylight. Because I used flash and a fast shutter speed, it comes out looking like this...
I am a photo geek. I admit it. I love photography technology - especially the crazy high-tech stuff the camera manufacturers come up with. One of the most incredible pieces of electronic engineering you can buy in the photography world today is a humble flash. I'll tell you why...
In most circumstances, your flash can sync with your camera up to a certain shutter speed. back in the dawn of photography, this 'sync speed' used to be 1/60 second on most cameras. When you buy a SLR camera and a flashgun today these days, standard flash sync is 1/200th or 1/250th of a second for almost all makes and models of camera equipment.
But then, the camera boffins came up with something deeply awesome: High-speed flash sync. To understand why you need it, and to explain how and why it works we need to take a look at how flashes work normally.

Inside your camera, there are two pieces of black fabric (known as 'curtains' - this is also where the expression 'second curtain flash' comes from) that move across the sensor at very high speed. Think of this whole set-up as a window that has two curtains that go all the way across the window. When you press the button, one curtain is pulled from left to right, and at the end of the exposure, the second curtain is pulled across to cover the window again. Once the exposure is complete, both curtains are returned to their original position on the left, ready for the next exposure.
Only a few years ago, when we were shooting on film cameras that had a manual advance lever, these curtains were on springs. When you were pulling the thumb lever to forward to the next frame on your roll of film, you would also pulling the two curtains back in preparation for the next exposure.
When your flash is in normal flash mode, the following happens: You press the shutter. The first curtain of the shutter opens fully, and the camera sends a signal to the flashes, and the flashes fire. At the end of the exposure (whether the exposure is short or long), the second curtain is pulled across to finish the exposure. If you had your camera set to 'second curtain' sync, the flash would trigger just before the closing curtain gets pulled back to cover the sensor.
When you start talking about very fast exposures - like the 1/8000 second exposure offered by cutting-edge SLR cameras - but basically at any speed faster than the camera's flash sync speed, something interesting happens.

The shutter curtains themselves move incredibly fast, but when you're talking about extremely fast shutter speeds, the speed of the shutters starts to become a factor: As the shutter has to be open for such a brief period of time, the closing shutter actually starts moving before the opening shutter has finished moving. The effect is that the whole imaging chip does get the same amount of light, but the imaging sensor is never exposed all at the same time.
If you're shooting in natural light, this isn't a problem at all, but if you want to add a flash to the mix, it becomes tricky: If the shutter is never fully open, when do you fire the flashes?
Flash manufacturers realised that people still wanted to use flash even at high shutter speeds, came up with an ingenious solution: High speed sync mode, which changes the way your flash works, enabling you to take photos at much higher shutter speeds.
When the flash is set to high-speed mode, instead of a single flash once the shutter opens, the flash actually sends lots of tiny flash pulses for the duration of the exposure. This ensures that the subject is evenly lit as the shutter curtains move across the sensor: Perfect exposures even though the sensor is never open all at once!
So, is there a downside? Well, in High Speed sync mode, your flashes do take significantly more power, so you drain the batteries much faster. On the other hand, if you need it, use it: The effects can be incredible, and it gives you a lot more flexibility in your flash photography!
I did a video for Gizmodo UK about high speed flash sync; in all its poorly-animated glory here:
You can use high speed flash sync for lots of things - but start by having a look at Darkening a Room by Adding Light - that should bring you a few ideas!
Do you enjoy a smattering of random photography links? Well, squire, I welcome thee to join me on Twitter - Follow @Photocritic
© Kamps Consulting Ltd. This article is licenced for use on Pixiq only. Please do not reproduce wholly or in part without a license. More info.
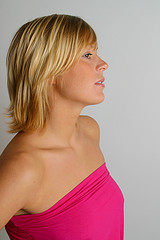
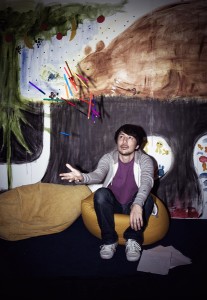
 Portraiture, face pics, mush captures, gob snaps. In today’s PCoF (it’s what all the cool kids and hip youngster-dudes are calling Photography Concept on Friday) we’ll be dipping our toe into the gigantic swimming pool that is portraiture. It’s a metaphorical swimming pool. Into which we metaphorically will be dipping our metaphorical toe. Got it? Good. I can feel myself starting to waffle already, so I will resist the charms of loquacity and press on.

A natural light portrait - this ladybird wanted in on the action. No I did not pin it to her thumb.
Essentially, there are two sides to portraiture: lighting and, for want of a less hateful phrase, ‘people skills’. Lighting is a massively complex subject, and there are many, many blogs, books and videos out there to teach you the basics and more. I’m going to focus on the ‘people bit’, as repeating basic lighting theory is horribly boring and can be found elsewhere. Not only that, but the actual interaction with people and how you get the best out of them is the bit I actually enjoy.
First, however, I will briefly look at a couple of technical basics that you should follow to take your portrait from 'holiday snap on your mum’s compact' to 'ooh, very professional!', whether that's Venture Photography-style light and bright or far more whimsical magazine-style images.
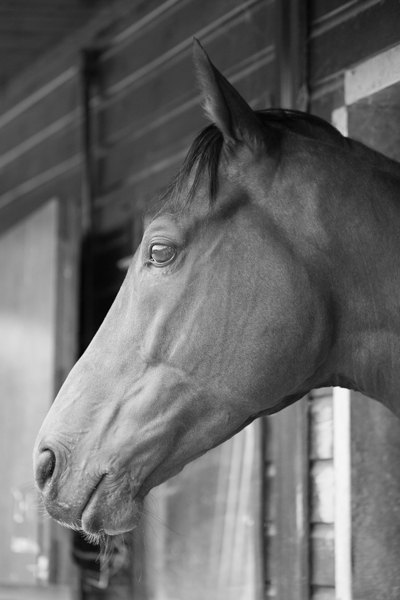
In most cases, the eyes should be the focus of any portrait (in most cases), so ensure that the eyes are in sharp focus. Anything less and you should be throwing it away, I’m afraid. Composition is also of the utmost importance. The ‘rule of thirds’ (as explained by our very own Duncan Howsley here) should be kept in mind at all times. Of course, don’t be afraid to break the rules every now and then if it works for the shot.
Finally, on the subject of composition, pay close attention to your backgrounds. If you’re not shooting someone against a plain background, you really want to avoid having anything too busy going on behind your subject. There’s nothing worse than getting home after a shoot and loading up that shot you were so pleased with, only to find that there’s a double decker bus growing out of the side of her or his head.
Even if your portrait is well lit, technically sound, in perfect focus and head object-free, if the subject of the shot looks awkward and uncomfortable (unless that’s the intention of the image, of course) the image is, essentially, a big ol’ failure. So how do you get them to act natural?
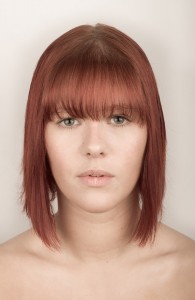
An example of a studio lit portrait.
First off, talk. Talk, talk, talk. Give your subject directions on what to do. Give them positive feedback, even if it’s going horribly. You’ll find that the more you praise (‘good’, ‘that’s great’ and ‘yeah that looks really nice, let’s do a couple more like that’), the more their confidence will build.
Not only that, but talk to them in general. Show an interest, get them chatting, perhaps between lens and lighting changes. Not only does this help you get a bit more background about the kind of person they are, it helps them to relax a little more. Finally, don’t be afraid to tell them when they’re doing something wrong, just do it constructively. Tell them what is working, but that they’re doing a thing with their eyebrows that looks insane, and oh Lord it needs to stop. Except more constructively than that.
I often find that people get very dry-eyed and ‘blinky’ after a relatively short space of time, so a little trick I like to use is getting the sitter to close their eyes while I compose and then asking them to open their eyes and look into the lens. Not only does this keep the subject more relaxed, it adds a bit of movement to the equation, meaning that there is less of a posed look to the shot.
An example of an "on location" portrait for a magazine.
In general, movement is good. Although it can feel cheesy, getting the sitter to turn their head into the shot can also remove some of that stiff, posed element, as they spend less time keeping their head perfectly still. To avoid blinking, I sometimes count people in, so they know when to not blink. Check with your subject whether they like this or not, though, because I find some people are straight up terrified of a countdown and will pull crazy, panicked faces.
Don’t spend too long framing your shot – get used to framing quickly. The longer you make your sitter wait for you to take the photo, the more anxious they become, and the less natural and relaxed they will look. Just imagine being on the other side of a dSLR with two large softboxes pointed at you, waiting for a good four or five seconds for a flash to go off, trying to keep your eyes open and a fixed smile on your face for the duration.
A nice, cheeky one is to tell your subject that you’re just ‘testing the lighting’. This doesn’t have to be a complete lie: you could indeed be experimenting with your lighting setup. This little trick sometimes has the effect of the subject completely relaxing, in a ‘oh, well this shot doesn’t even count’ sort of way and you can snap them while they’re totally off guard. Sneaky, eh?

Another studio image, captured during a quiet spell.
Finally, make sure you switch up the poses quite a lot. Not only does this allow you to get a good idea of the subject’s best side, it also allows you to keep them busy and distracted. This will make them forget about the fact that there’s a camera pointed at them, as they’ll be busy taking on the directions you’re giving them. In short – practice, practice, practice. The above advice is the most relevant for very simple headshot setups with ‘normal’ people, or anyone whose job doesn’t involve being photographed five times a week.
Good portraiture, in my opinion, is essentially about tricking your subject into forgetting that there’s a camera pointed at them, even if it’s just for a split second. The examples in this article, shamelessly taken from my own portfolio, have been chosen because I think they all reflect that philosophy in some way.
So, on your ‘to do’ list this weekend – grab an unsuspecting friend and have a portraiture session with them. See what you get out of it! You might just get hooked.
What do you mean by flashguns, Gareth? Are you talking about ostentatious weaponry?
To be fair, I’m sure you’ve heard of flashguns before, but I needed an excuse to start with a bad joke. This week’s Photography Concept on Friday is about flashguns, and why you should consider taking the plunge and buying one.
Flashguns come in a variety of shapes, sizes and prices, each having their pros and cons. They all share the same selling point, though – a flashgun allows you to have much greater control over the power and direction of your flash.
Most flashguns fit snugly into the hotshoe on top of your camera (that metal thing that sort of looks like a giant staple… sort of… ) and give you an immediate creative advantage. Here’s an exciting bullet point list of what you can do with flashguns that you can’t with most built in flashes:
Now you may be wondering ‘Why on earth would you want to fire your flash somewhere other than at what you’re photographing? That’s a bit postmodern isn’t it?’ As a portrait photographer, I’ll use the example of a headshot to explain why it’s beneficial to be able to control the direction of your flash.
When you point your flash directly at someone’s face for a headshot, the quality of light is often both too strong and too ‘hard’. This can create nasty big, sharp shadows on someone’s face. Direct flash can also have one of two other effects: your subject either ends up looking very shiny and sweaty, or their entire face is bright white, save for their irises, as if they were part of some kind of benevolent alien race.
A flashgun allows you to bounce your light off the ceiling, wall or other object by taking advantage of its ability to swivel and move. This diffuses the light and allows it to spread before reaching your subject, giving them a more naturally lit appearance.
With a flashgun, you can manually set the strength, or power, of your flash. This is an advanced technique and will take practice but the results can be fantastic. A common example of manually setting the strength of a flash is when shooting a portrait with a bright light source behind the subject, such as the sun (a fairly bright light source, I’m sure you’ll agree). A small amount of what’s known as ‘fill in flash’ will allow you to do just that – fill in the light that will be missing from the front of your subject. Now, a shot that would usually result in a sihouette has turned into a dramatic, interesting portrait. Good eh?
If that sounds daunting, don’t worry – most modern flashguns have what’s known as a ‘TTL’ or Through The Lens mode, where your flashgun talks to your camera (not literally – if this is happening, go see a doctor) and automatically sets the correct flash power depending on your camera settings and direction of your flashgun.
Adding a diffuser to your flashgun provides you with even greater control over your light source. They’re not too expensive but are, essentially, glorified yoghurt pots that have been shaped correctly to fit over the head of the flashgun. When bouncing the light off an object with a diffuser attached, you get two stages of diffusion, making the quality of your light even better.
I didn’t even get to off-camera flash yet or the idea of using multiple flashguns to light a scene, but I think that’s enough for you to digest for now. I’ll leave you with an example of a portrait I took using a flashgun:

Suda51 of Grasshopper Manufacture, photographed using a flashgun.
As an on-location portrait photographer for magazines, a flashgun is absolutely essential for me. In this diptych, I used a flashgun with diffuser attached. The flash was pointed upward and was bounced off the ceiling, back down onto the subject. What you will notice is that aside from the small dot of light within the pupil, it isn’t apparent that a flashgun was used at all. This is the sort of effect you’re looking for.
Now have you taken all that in? Promise? Good. Off you pop, then.

In my second round of videos for the Nokia N8 Camera School, I'm getting up close and personal – with some bumble bees. In this video, you’ll see the Nokia N8′s macro mode in action, and the results? Well, let's just say that the compact camera manufactures have plenty to be getting worried about...
Do you enjoy a smattering of random photography links? Well, squire, I welcome thee to join me on Twitter - Follow @Photocritic
© Kamps Consulting Ltd. This article is licenced for use on Pixiq only. Please do not reproduce wholly or in part without a license. More info.
When you think 'Product shoot', you probably wouldn't immediately think of taking a load of photos with your mobile phone... or would you? I'm exploring how you can take fantastic product photos - with a Nokia N8.
Do you enjoy a smattering of random photography links? Well, squire, I welcome thee to join me on Twitter - Follow @Photocritic
© Kamps Consulting Ltd. This article is licenced for use on Pixiq only. Please do not reproduce wholly or in part without a license. More info.