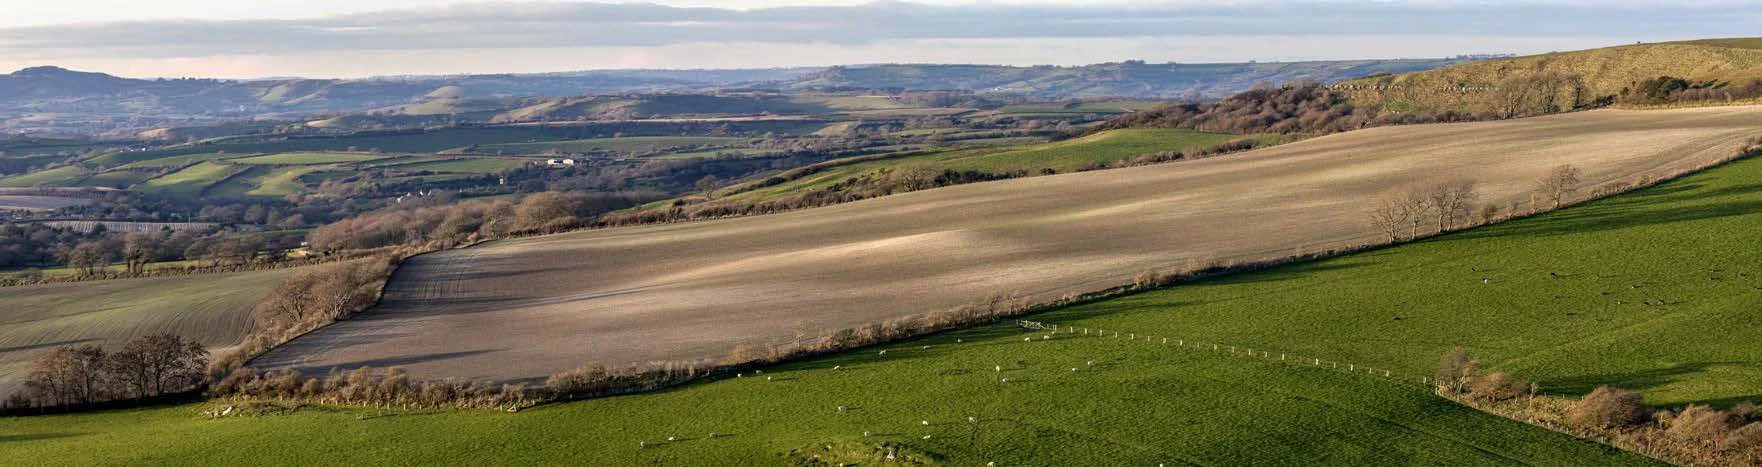
Remember, remember, the fifth of November, gunpowder, treason, and plot!

When you hear the term 'high-res' thrown about with such abandon when it comes to images for web use, have you ever stopped to think just how big or how high quality and image meant for the web needs to be?
There's an assumption that high-contrast images are more dynamic, more compelling, more inviting. Have a go at some low-contrast photography. You might surprise yourself with the results.
Balance doesn't mean symmetry; it means an internal consistency and tension within your photos. And it's a vital element of composition.
Great photos might be down to a little bit of luck, but most of that 'luck' you make yourself. Don't believe us? Read on...
Historically, split toning was used when developing photos from negatives. Two different toners would be used one after the other in order to produce different colours in the highlights and shadows of an image. For example, follow selenium with gold and you'll produce purple-blue mid-tones; or use sepia and then blue for sepia highlights, blue shadows, and green mid-tones. The effect could be altered by using different papers, too. While chemical split toning isn't an exact science, it does offer some compelling effects for your photos and can give them an entirely different feel. You can use it to add warmth or to cool down an image; you might want to introduce a blue tint, or an orange cast.
Now, split toning is more likely to be achieved using the dedicated split toning panel in Lightroom, or with a colour balance adjustment layer in Photoshop, and it is far more controllable. If you've not ventured into the split toning panel, the degree of variation that it offers you might be a little overwhelming; it can radically alter your photo in a ways that you might not anticipate. That shouldn't stop you from experimenting, and to get you started, here are some suggestions. And don't forget that if you're working in Lightroom, nothing can't be undone.
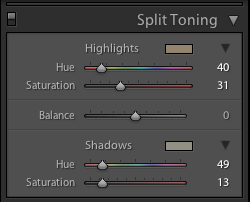
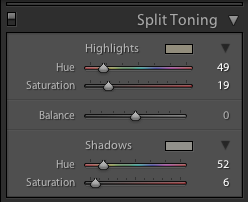
If you're using Lightroom, the split toning panel allows you to select the colours that you would like to emphasise in both the highlights and the shadows, the saturation for each of these tones, and then the balance between them.
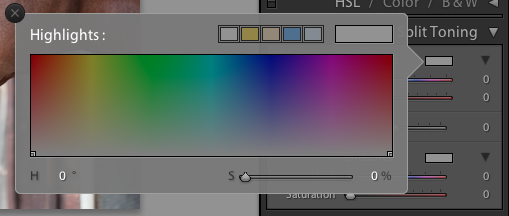
If you find using the sliders to control these adjustments a little too abstract, click on the colour swatches beside 'Highlight' and 'Shadow' and use the eyedropper to select the precise colour you'd like for each.
The balance slider places more emphasis on either the highlights or shadows. Once you've selected your highlight and shadow tones, move it about a bit to see which direction, if any, you prefer.
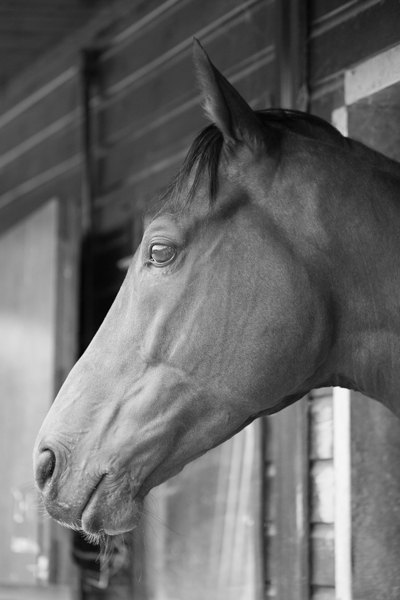
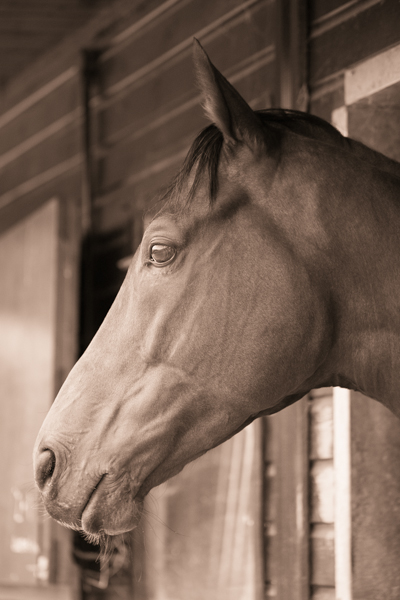
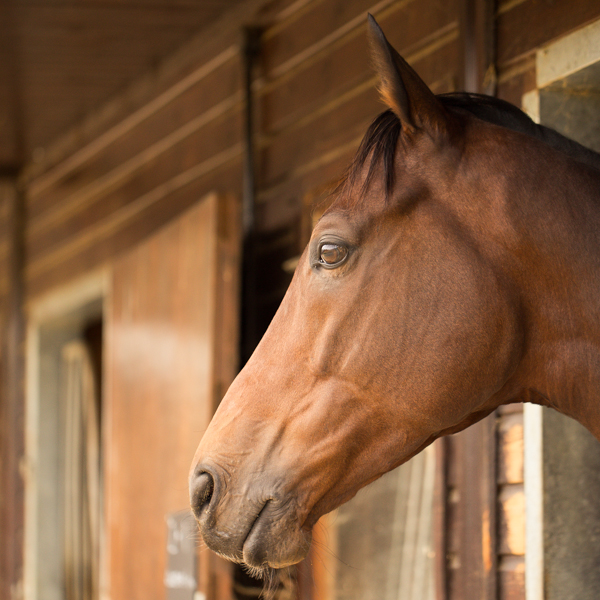
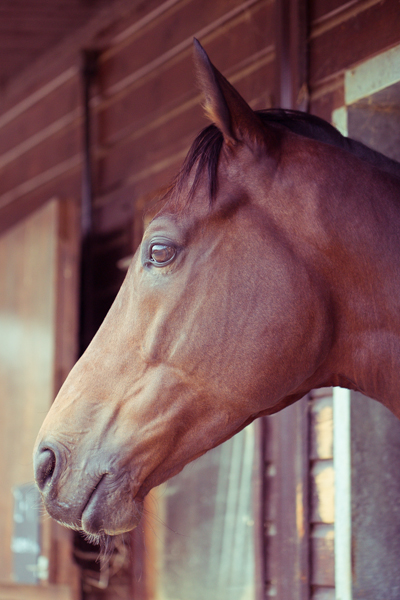
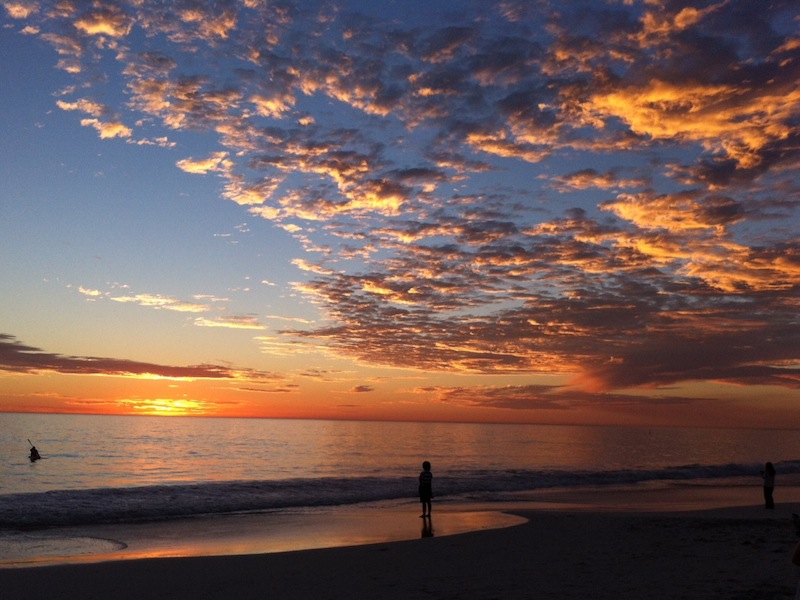
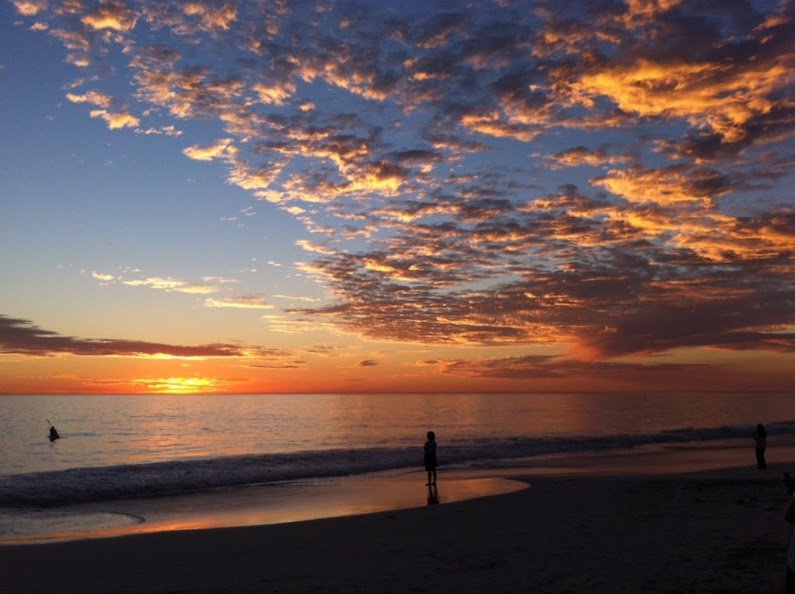
The original black and white conversion of Willie's portrait is coming up quite grey-green in tone. By adding some muted browns—that in the shadow very pale—you can introduce a great deal more warmth to the image and bring about an almost-sepia tone.
This photo was taken fairly early in the morning, on a day when the cloud didn't lift. While the light was wonderfully diffuse, it wasn't especially warm. Even after correcting the white balance, it still felt as if it needed to be brought to life. By adjusting the highlights and shadow tones, it meant I could introduce a more golden-hour feel to the photo.
You don't need to push too far into the oranges or yellows to intensify the warmth in a photo: sticking to browns and beiges might be enough.
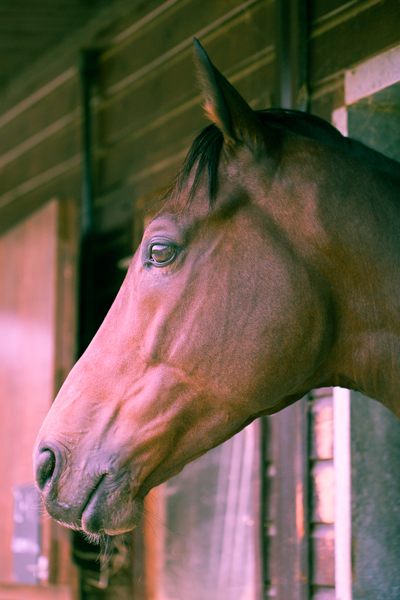
Of course, if you wanted to do the opposite and bring about a colder feel to a photo, you would do that by applying more silvery-blue tones, greys, greens, and even some yellows, to the shadows and highlights.
Until now, I've used fairly similar highlight and shadow tones in my split toning adjustments. But for a cross-processed effect, you need to select contrasting colours for your highlight and shadow tones: green and magenta, or cyan and yellow, for example. Which you apply will depend on whether you're looking for a warmer or cooler over all effect.
[gallery columns="2" ids="7128,7127"]
By adding a graduated filter, upping the contrast and saturation, and reducing the clarity, you can create a fake toy camera look. We've a tutorial for that, in case you'd like to give it a go.
The best way to get a feel for split toning is to try it for yourself and see what you can achieve using it. Remember: if you don't like it, you can undo it.
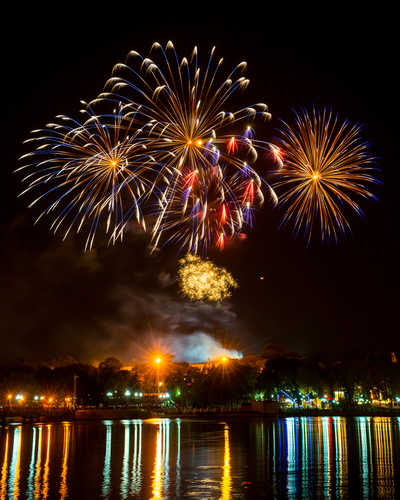
Halley's Comet made its last swoop past earth in February 1986. I remember it well because I was in primary school at the time, learning about the Norman Conquest. In addition to the boos, hisses, and cheers elicited by the key players and the confusion surrounding Harold Godwinson's death, Halley's Comet plays a starring role in the Bayeux Tapestry, which documents the invasion of a loosely termed 'England' by William of Normandy and his cronies. That we had the opportunity to experience the same celestial phenomenon as the people we were learning about, all of whom lived 900 years before us, was rather special. The timing could not have been better for a memorable series of lessons.

Seeing as Halley's Comet is on a 76 year schedule, it isn't expected again in all its glory until July 2061; however, we are being treated to an impromptu meteor shower in the next few days. The comet is likely to deposit a trail of cosmic dust into our atmosphere on 21 and 22 October 2014, giving us a shooting star display visible to the naked eye.
If that isn't an excuse for trying a little night photography, I don't know what is. So apart from the hoping for clear skies, what else can you do to maximise your chances of capturing the tail lights of Halley's Comet?
Whatever means you use to take your photos, capturing a meteor shower is fundamentally the same process: shooting a series of long exposures. There are a few options for how you go about it, but once you know that bit, it's fairly simple.
The darker the sky, the better the chance you will have of being able to see the streaks of light as the comet's dust burns through the atmosphere. Ideally, then, you need to be somewhere that doesn't suffer from too much light pollution and has an uninhibited view of the sky. Open and accessible heath- or park-land that's relatively far from city lights is ideal; just be certain you're not venturing somewhere you shouldn't, either because the land is privately owned or you're disturbing a sleeping bull! I'd advise not going alone, either. Shooting in secluded or isolated locations is not necessarily a solitary activity.
Shooting the night sky means long exposures, so you're going to need a tripod, and an intervalometer will ensure the best results, although you can get by without one. Naturally we recommend Triggertrap, especially because its star trail mode makes life easy, but your mileage may vary. For your lens, a fast, wide-angle lens is advisable. You're never quite certain where they'll start or where they'll end, so the wide-angle provides you with sufficient flexibilty, and it gives you the option to introduce an interesting foreground to the shot, too. The darkness of the sky means that you need fast glass to let in enough light. And an empty memory card is a good idea: you'll be taking a lot of images.
While shooting stars can turn up anywhere, they are most likely to cluster around a single point called the radiant. Don't aim your camera directly at the radiant, when you've worked out where it is, but about 45° to one side of it. You also want to compose the frame so that it is visually interesting beyond just the shooting stars. Think about including something intriguing in the foreground. Turn off the auto-focus, use as wide an aperture as you dare—you might not want it all the way open for sharpness—and focus to infinity.
The best option to photograph a meteor shower is very similar to capturing a star trail image, when you compile a series of long exposures shot over a significant period of time into a single image, but with a few key differences. You can read our star trail tutorial here, and if you'd like to shoot a star trail image that hopefully captures some shooting stars, go right ahead. Otherwise, you can tweak the process and use it as the basis to capture a series of photos from which you'll select the ones that show shooting stars streaking across them.
What are these tweaks you'll need to make, then? First and most obviously, you'll not compile all of your frames into a single image that charts the movement of the celestial bodies across the heavens. Instead, you'll pluck out the indvidual images displaying shooting stars, or maybe composite several images showing shooting stars.
Second, you might need to use a slightly shorter shutter speed than you would with a star trails sequence, to ensure that you don't capture the turn of the earth. With a star trails shot, the movement of the earth is exactly what you want, but with single meteor images, not so much. Between 10 and 25 seconds is recommended, but a few test shots should help you to decide what you need to use. This slightly shorter shutter speed will require you to adjust the ISO to get a good exposure, too.
Finally, you can chance not taking your series of images with very short intervals between them, as you would with a star trails sequence, but leave the gaps a little longer. That means you might miss a few opportunities, but the law of averages suggests that if you shoot over a period of a few hours, the odd photo will have a shooting star zooming across it.
When you have set the focus and established your shutter speed and ISO, you will need to set your intervalometer as you would for a recording a time-lapse sequence, using the exposure time that worked best in your test shots. If you're using Triggertrap's star trail mode, set the exposure time that you established in testing with your chosen interval between frames, and select the number of frames you want to take. With a slightly longer interval between frames, say five or ten seconds, you could shoot for hours!
If you don't have an intervalometer, there's no reason why you can't try your hand at meteor shower photography. Instead of relying on a remote triggering device to release your camera's shutter, you'll be doing it yourself, which might get tiresome. Just as you would with a star trail-based sequence, aim your camera in the right spot and focus to infinity. With your camera in manual mode, use the widest aperture you can, select a shutter speed between 10 and 25 seconds, adjust the ISO accordingly, and press that trigger. Over, and over, and over, again!
Remember to keep warm, and here's hoping for clear skies.
As a photographer, you're usually aiming to ensure that your photos are well-exposed and have an even tonal distribution. If you were to look at the histograms from these images, the data would be spread across them. Neither the shadows nor the highlights would be 'clipped', or have areas that are so dark or so light, respectively, that they contain no data. If you were to look at these images, they would look 'right', and be pleasing to the eye.

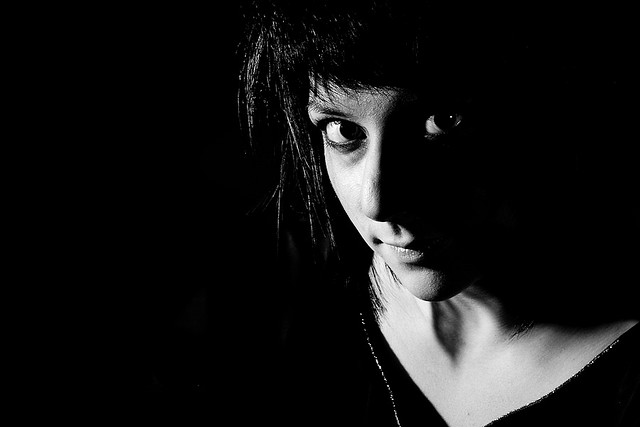
However, that isn't always going to be the kind of story that you want to tell. On occasion, you are going to want to convey a dark and brooding narrative, maybe even so far as to be menacing, that delves into darkness. You will look to shoot a low-key image.
Low-key photography is a style of taking pictures that focuses on producing shots that mostly include dark tones—a person in a dark room with only a tiny bit of light on their face is a good example. You might have noticed how products are often shot using low-key photography, too.
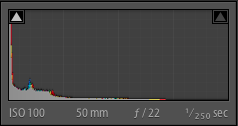 If you were to look at the histogram of a low-key image, you'd see that the majority of the data are pushed towards the left-hand side. Don't worry that your shadows might be clipped: it's a part of the look.
You're aiming for extreme contrast in a low-key shot, with most of the image dark or even fully black with just a little of subject highlighted to draw the viewer's eye. Since a lack of lack is your primary tool in taking a low-key photo, it's actually fairly easy to set up and while you do need extensive control over your light source, don't think that you require an elaborate studio.
One method of getting the low-key feel is to place the subject in a dark room, then turn the light on in an adjacent room. Open the door just enough to get the right amount of light on your subject, but not enough to light up the background.
Another means to getting a low-key feel is with candle-light, which can elicit a suitably gothic feel, or by using a torch. Torches are easy to direct and definitely cheap! If you want to start manipulating light in your photography but don't yet have the means or desire to go the whole hog with flashes or a studio set-up, low-key is a good option.
You will certainly need to be in manual mode in order to achieve a low-key shot. If you leave it to your camera to decide on optimal metering, it will try to over-expose the scene and ruin the effect. Using spot-metering to expose for the sliver of light, wherever it might be, is a good idea, too. This will help to keep that area light but the shadows dark.
The general rule is to keep things dark. Complete blackness around your subject (or even as part of your subject) is perfectly acceptable.
Ideally, the combination of manual control and carefully manipulated light means that you won't need to adjust the exposure beyond the odd tweak to the blacks or the highlights to ensure that they're sufficiently dark or light. It is worth considering converting your low-key images to black and white: initially, this can help you to identify and perfect the contrast in low-key images but over all it can help to increase the drama and mood in the photo.
 More unusual ways of looking at things, remembering rules, and then breaking those rules, are in my lovely book, The Rules of Photography and When to Break Them. It's available as an e-book and in a dead tree version (UK, US).

Earlier this week an infographic design agency, NeoMam Studios, sent us an infographic about 'smoasting' which they'd produced on behalf of print company Photobox. Once I'd got over the shock of awful elision of 'social media' and 'boast' to form the ghastly portmanteau word 'smoast', there was one particular statistic that caught my eye. Take a look at the infographic and guess which it was.
Despite the prevalence of Instagram, the host of editing features that are built into apps such as EyeEm, Facebook, and Twitter, and the plethora of free-to-download editing programmes, only 28% of photos are cropped or styled in some way? Wow! I am surprised. And it's something I think deserves remedying.
While Team Photocritic advocates getting as much right in-camera as possible—you'll certainly not be able to turn a sow's ear into a silk purse—we're not beyond a little post-processing, either. If it's good enough for Cecil Beaton and Horst, it's good enough for us, too. A snip here and a swipe there can elevate an ordinary image into something a bit more special.
This isn't about air-brushing away half of someone's thigh, but about making minor adjustments to three specific areas: the crop, the colour, and the contrast. Here at Photocritic we call them The Three Cs. They're not complicated and they'll make a world of difference.
However well composed you think your image is, it will almost certainly benefit from having a few pixels shaved off it. It might be a case of reinforcing the rule of thirds, removing a bit of unwanted background that crept into the frame, or getting a bit closer to your subject.

Being a purist, I tend to stick to traditional 4:3 or 3:2 ratios, but don’t feel limited by my prejudices. Select from any of the standard crops, from square to 16:9, or free-style it to adjust the crop any way you like.
At the same time as cropping, make sure to straighten your image, too. Unless you are deliberately tilting the frame for creative reasons, uprights should be upright and horizons should be level. When lines that are expected to be upright or level are wonky, it has an unpleasant impact on our sense of balance. By correcting wonky lines, you'll produce a stronger image.
Light has a temperature, and depending on the source of the light, or the time of day if it’s the sun, that temperature will vary. When the temperature varies, so does the colour of the light. As a general rule, we don’t notice the variation because our eyes cleverly adjust to the changes. Our cameras on the other hand aren’t quite so clever.

Have you ever noticed how white objects in your photos can show up with blue or yellow casts? That’s because the white balance in your photo was off.

It's a relatively easy correction to make using the 'Warmth' or 'White Balance' function in an editing programme. If you think the whites are looking a bit too blue (or if an image looks a little 'cold' over all), nudge the slider to the right. If the whites are too reddish in tone, or the photo looks a bit warm, slide it to the right. It's a case of trial and error to make the right adjustment, but the more that you practise it, the better you'll understand the shortcomings of your camera and how it reacts to different types of light.
Now if you want to intensify or tone down your colours, you can do so using the saturation slider. I don't recommend bumping up the saturation too much; it can result in a cartoon effect rather than a photo!
Contrast is the difference between the dark and light tones in your photos. Images shot on bright sunny days tend to have a lot of contrast, with dark shadows and bright highlights, but those taken in fog won’t have a great deal of tonal variation and will be low contrast. From time to time, you’ll want a low-contrast image, but, generally speaking, your photos can be improved by increasing the contrast a touch. It brings definition and depth to them.
Don’t go overboard, though, as too much of a good thing can turn bad. You’ll find that if you over-cook the contrast you’ll lose too much detail and end up with an ugly image. Subtlety beats brickbats.

If you use Snapseed to make your edits, it's worth getting to know the ambiance slider, too. I've often found that this is a preferable alternative to the contrast slider.
At this point, any other adjustments are gravy. I'm a fan of Snapseed's 'centre focus' options and often apply one of those. You might want to play with a tilt-shift effect. Or there's the waterfall of filters you can try in any programme, but you might find that you prefer your own edits to prefabricated filters, now.
Oh, and don't forget that it all starts with a decent photo, so check out our eight tips for better smartphone photos, too.
The sheer scope of Photoshop means that when you first open it up, and indeed for a good long while thereafter, it can be a little—or even a lot—overwhelming. It offers you so many possibilities that deciding where to start can be an agony of choice. Whatever bells and whistles Photoshop might offer you, one of its biggest boons is most certainly layers, making them one of the first things with which you should experiment.
Layers are what allow you to edit non-destructively, so that any adjustment that you make can be easily amended or even removed altogether without having an impact on your other edits, or your original files. The most common description that you will hear about the layers function is that it resembles a pile of transparencies, each of which contains information comprising the final image and can be altered individually. How many layers can each image have? As many as your operating system can support.
Some layers might contain images, effects—for example shadowing—or text. Other layers, however, could appear devoid of content. These are adjustment layers, and they hold the information that governs the edits made to the image as a whole, or to given areas of it. This way, you can alter how something looks without destroying the original image.
You can name layers individually, so rather than trying to remember that Layer 23 adjusts the luminosity of the unicorn’s coat, you can call it ‘Unicorn coat luminosity.’
If you want to create composite images, layer masks will be essential to your work. A layer mask will allow you to place one image over another and mask selected areas of the upper layer from view. Effectively, this allows you to see through it to the image below, thereby creating a montage. Of course, you’re not restricted to just two layers when it comes to compositing; you can include as many as you need.
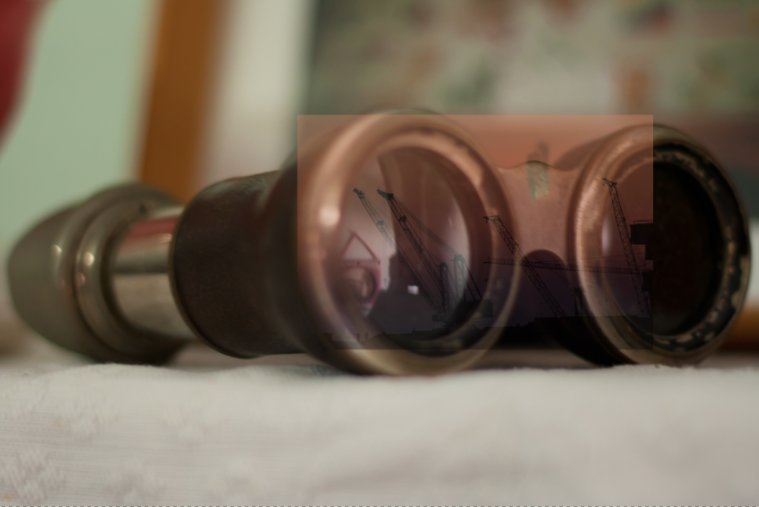
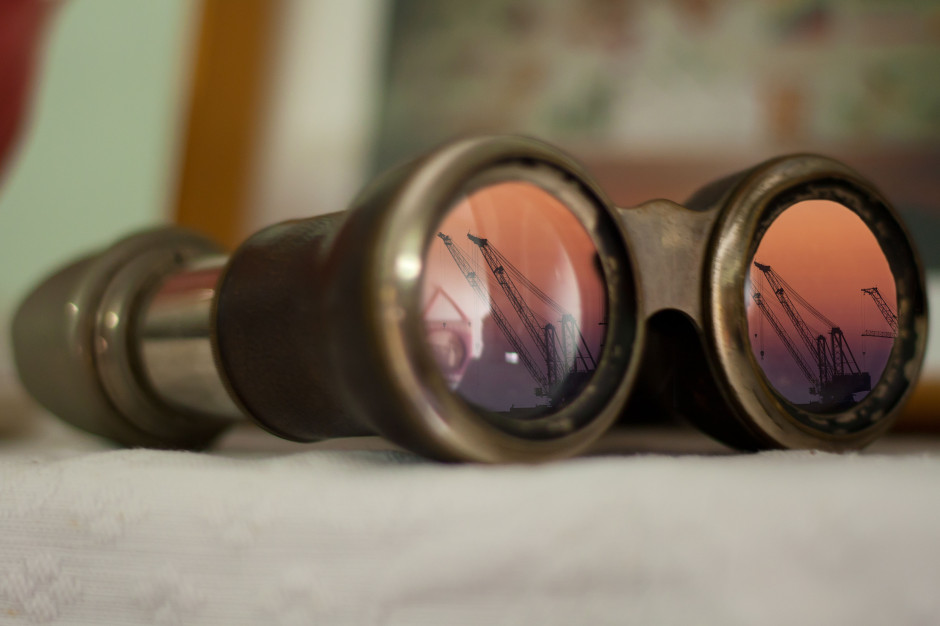
To give you some idea of what layer masks can achieve and how you can use them, I created an incongruous scene of an industrial sunset reflected in the lenses of a genteel pair of antique opera glasses.
[gallery columns="2" ids="7012,7013"]
Having a clear idea of the story that I wanted to tell with the image was the first step. It meant that I didn't have to engage in too many changes and I was able to line up the images and accoutrements I needed. Of course things will evolve as you create them, but I would advise starting out with at least a basic 'recipe'.
As contradictory as it might sound, surreal images need to be grounded in reality to ensure that they're believable. Unless you're creating a Peter Pan-type figure, objects need shadows, for example. In this case, I needed to check that how my image reflected in the glasses was accurate, even if it were several degrees from reality. I did this using a pair of sunglasses and a torch to look for reflections.
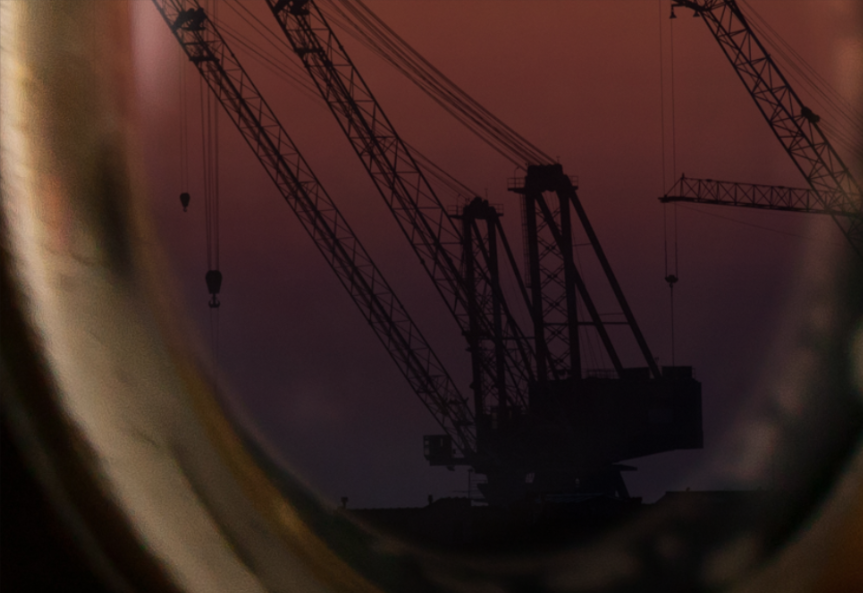
My torch experimentations determined that I couldn't use one copy of the sunset scene to cover both lenses; the angles were wrong. It needed to be positioned separately over each lens of the opera glass. That meant importing the sunset image twice, onto two different layers.
I started by making the opera glasses my background layer and then imported the first sunset layer and then added a layer mask by clicking on the Create new layer mask button at the bottom of the Layers panel.
I decreased the sunset layer’s opacity to about 40% to help me to scale it down to the size that I wanted and shift it into place over the opera glasses' lens.
Scale images at Edit>Transform>Scale; hold down the shift key to maintain proportions when adjusting the size.
Happy that my sunset layer was in the right place, it was time to mask the parts of it that interfered with the image of the opera glasses. I did this by using the brush tool and the layer mask to 'paint away' the areas of the sunset scene that I didn't want visible.
When you're choosing what to show and what to hide in a layer mask, you paint with black to hide anything extraneous. If you paint away something and change your mind, switch the brush colour to white and it will reveal it.
[gallery columns="2" ids="7021,7022"]
I zoomed in close and used a relatively small brush with a mid-size feather to get the edge that I wanted.
When I was satisfied with my handiwork, I played around with the opacity and blending mode options to determine how the layers meshed together over each other to finalise the effect I wanted. Opacity and blending modes are the subject of a whole other article, but in this instance I set the opacity to 100% and opted for a screen blend.
With the second lens, it was a very similar process, except that I positioned the image of the sunset differently across the lens.
[gallery columns="2" ids="7018,7019"]
I selected the screen blend again, and adjusted the opacity until I was happy with the result.
Happy with my handiwork, I saved the image as a PSD file before flattening the layers and saving it as a JPEG file.
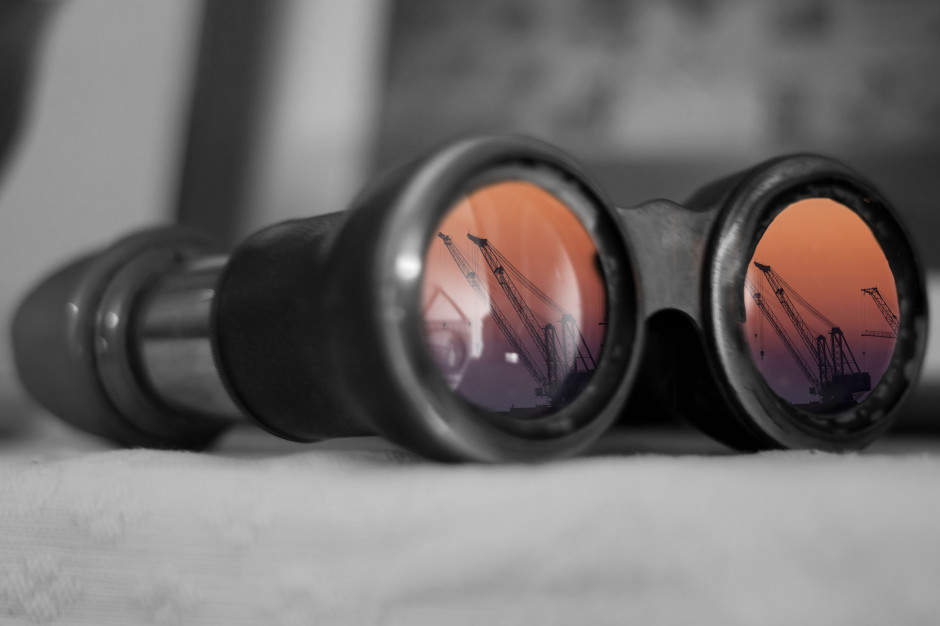
Having saved my 'finished' version as a PSD file meant that I was able to return to it for adjustments, or to try other looks having laid the ground work. One of the alternative views I created of it was to insert a black & white adjustment layer above the background layer to create black-and-white opera glasses with coloured lenses.
 This image, together with lots of advice on creating surreal images through in-camera and compositing techniques as well as examples from surreal masters such as Miss Aniela, can be found in my book Surreal Photography: Creating the Impossible. Right now it has been selected by the fickle finger of Amazon super-deals and is available for the bargain price of 1 penny or 2 cents; there's no telling how long it might last, so why not give it a try? Even if you don't own a Kindle, you can download a Kindle reading app for free to use on your smartphone or tablet.
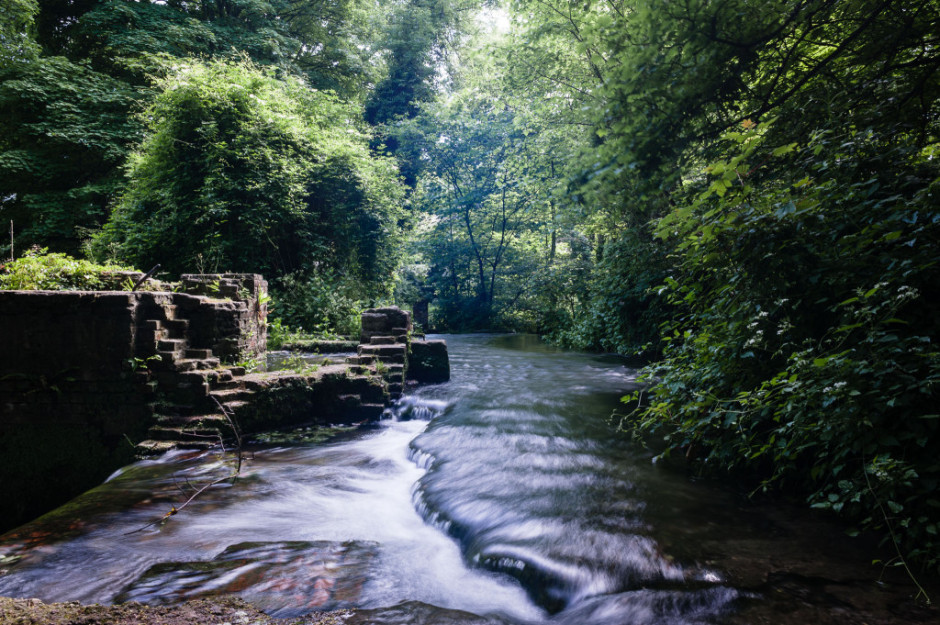
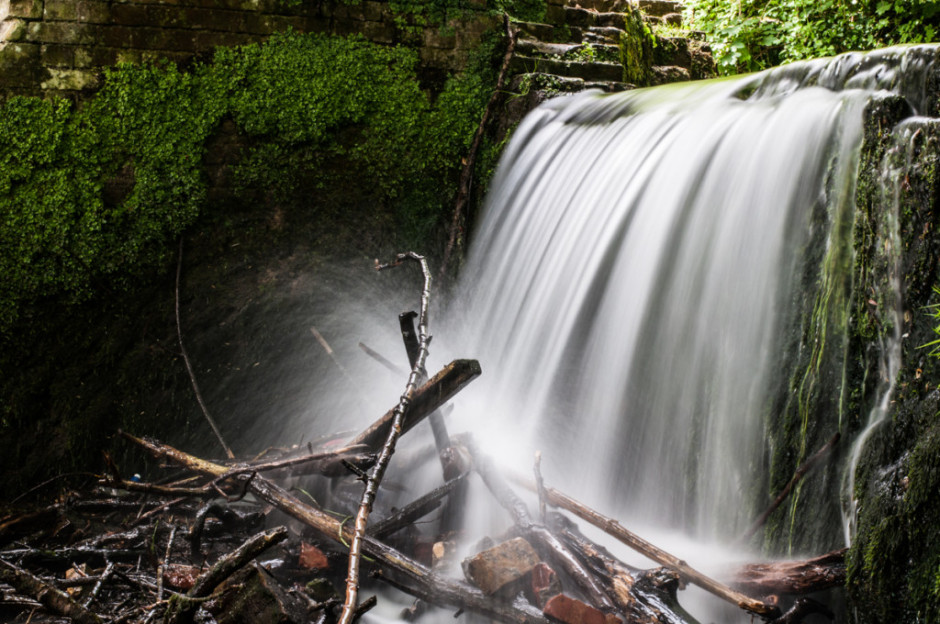
Photos that feature milky-smooth flowing water seem to have a Marmite effect on people: they're either loved or hated. I'm often rather ambivalent towards them, but it doesn't mean that it isn't a useful technique to have up your sleeve if you're faced with a weir or waterfall and you want to capture an image with smooth-looking water that has a sense of flow to it.
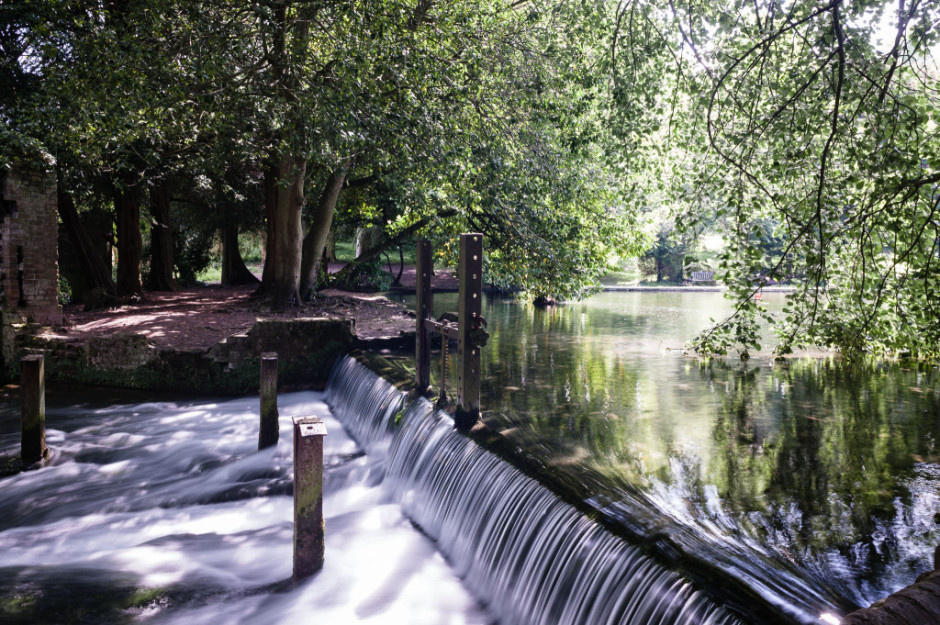
There's no great secret to shooting a photo that has water flowing through it that looks smooth: it's done using a long exposure. The slow shutter speed captures the the water as it moves, making it blurred. The blur, in this instance, gives the water a smooth appearance.
Shooting long exposures in daylight hours comes with an inherent problem, however. Over-exposure. Our cameras' sensors are capable of detecting far more light than we think they are, and even using the lowest possible ISO and smallest available aperture, a long exposure can result in an over-exposed photo when taking during the day. To get around this irritation, you might want to try a neutral density (ND) filter over your lens.
ND filters are grey filters that cut down the amount of light that enters your lens without affecting the colour of your images. They come in different grades, or densities, blocking out between one stop and 12 stops of light. Screw one over your lens and you'll give yourself a great deal more flexibility when it comes to shooting daytime long exposures.
Then of course you'll need a tripod. You might want to capture the motion blur of the water, but you'll want to avoid camera-shake and the rest of the scene getting the wobbles. Even though you'll be using a very small aperture with an enormous depth-of-field, still think carefully about your framing of the shot and its point-of-focus. Make sure it's telling a story.
Obviously you'll need to have your camera in manual mode to ensure that you can adjust the shutter speed, ISO, and aperture to get the photo that you want. Almost certainly you will need to use the lowest ISO and smallest aperture avalable. When it comes to shutter speed, you might find that you need to venture into bulb mode to get the shutter speed you need. And we recommend that you use a remote shutter release to prevent jolting your camera on its tripod and shifting its focus, too.
Then it's a case of hitting the cable release and leaving the camera to do its thing.
All images are courtesy of Triggertrap. You can learn more about using remote releases on the awesome Triggertrap How-to site!
We spend quite a bit of time discussing sharing our images here, there, and yon on Facebook, Twitter, and Instagram, as well as on custom-built platforms such as Photoswarm or Photoshelter, but we don't tend to talk so much, if at all, about good old Wordpress. I've no idea why we tend to overlook CMSs—perhaps because there's an assumption that you should know what you're doing if you have one—but at least for once, I thought we'd change that. [gallery ids="6934,6938,6939,6935,6936"]
Wordpress benefits from a huge number of plugins that you can use to augment your website-running experience, from free ones to premium ones, to plugins that block spam to those that manage your editorial calendar. But if you want to insert a simple gallery of images into a Wordpress post, there's no plugin required. You can manage it directly the Add Media function. It's not the most glamorous of galleries—it doesn't offer a carousel, for example—but it does allow you to sample a selection of images.
That's an obvious place to start. Give it a title, add the text that you want, create some tags; all the usual.
Go to add images just as you usually would. Hit the Add Media button towards the top left of the page.
You'll automatically find yourself on the Insert Media panel. On its top left you'll see three options: Insert Media, where you already are; Create Gallery; and Set Featured Image. (There's Insert from URL just below those, too.) Choose Create Gallery.
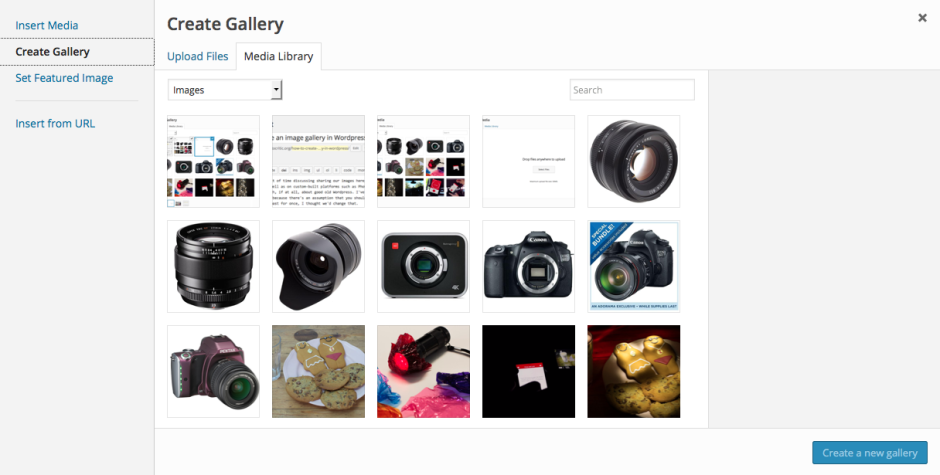
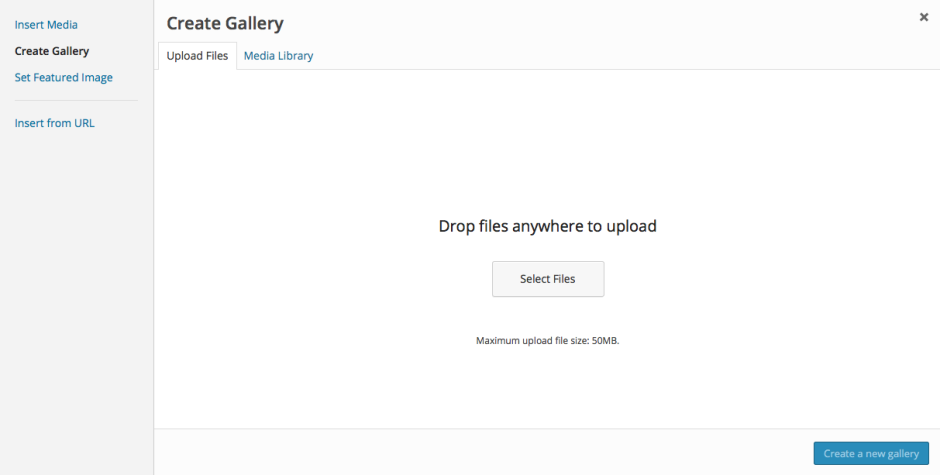
If you've already uploaded the images to your Media Library, go ahead and select them now. Otherwise choose the Upload Files tab and go ahead and upload your chosen images from your computer as you usually would.
When you've selected your images, press the 'Create a new gallery' button at the bottom right of the page.

Now you get to organise your gallery, deciding on the order in which you want the images to appear (drag-and-drop to re-arrange them), in how many columns you'd like them arranged, and whether you'd like the images to link through to an attachment page when a viewer clicks on them. Don't forget to add captions if you need them, too. Do that beneath each image. Tap Insert Gallery and you're done!
If you'd like to try a carousel of images, you might want to check out the Jetpack plugin, but otherwise, this should keep you in image galleries for the moment.
If you'd like to try a more unusual approach to lighting a photo, whether that's because you want to experiment or because you don't have access to studio lights, you might want to consider light painting. This isn't the type of light painting when you make patterns and shapes and designs with light sources to create your image, but using light sources to illuminate your scene during a long exposure. At its simplest, it involves outing the lights, setting your camera to bulb mode, and using a torch to 'paint' light onto your subject. Want to give it a go? Read on!

You don't need anything especially fancy for light painting: a camera on a tripod, a scene that you want to illuminate, and a torch are the minimum requirements. You might find it easier to control your camera's shutter using a cable release for flexibility and when you're more confident you might want to try some more advanced techniques, but let's start here.
Before embarking on your light painting adventure, it's best to think about the scene that you want to illuminate and the story that you want to tell. While you might herald some impressive results from waving your torch about in random formations, that's unlkely to result in the image that you anticipated. Take a little time to consider your subject and how you want to light it.

Scene set and lighting scenarios imagined, you need to secure your camera on your tripod and select your exposure. For light painting, try bulb mode controlled by a cable release, a low ISO, and an aperture that gives you the look you want. You'll need to manually focus on your subject, too!
Turn out the lights and start your long exposure.
Use your torch to begin to paint light over your subject. There's going to be some trial and error involved in getting the effect that you want, but that's half of the fun! Not keen on what you see? Try it again!
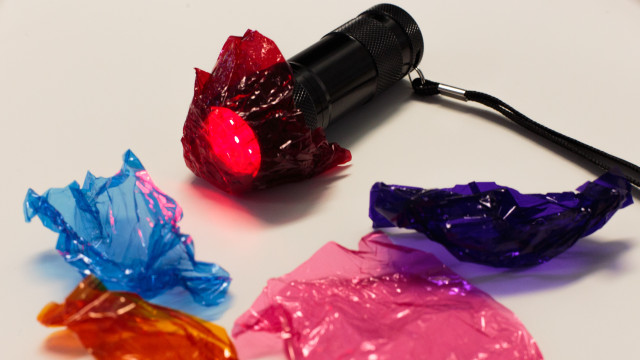
When you've mastered the basics, you can push your experimentations further. Try introducing coloured light to your images by covering your torch with coloured gels, or even sweetie wrappers. You can make cut-out filters to shape your light. Or direct your light more accurately with a snoot manufactured from cardboard and gaffer tape. You're not limited to inside, either. Try light painting buildings and monuments or flower pots - whatever takes your fancy and you've sufficient fire-power to illuminate!
This is something that doesn't have to cost the earth but can render some fabulous results.
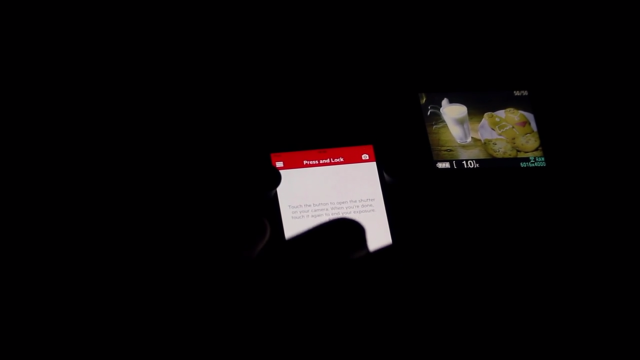
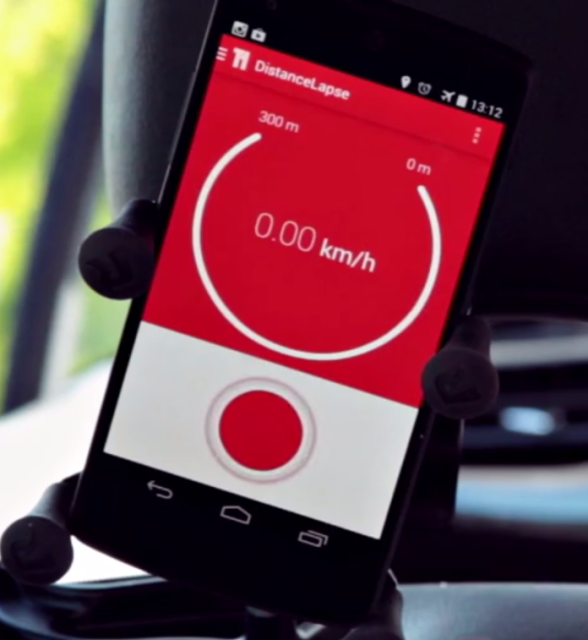
I'm meant to be driving to Edinburgh tomorrow—good health permitting—and if my car weren't due to be crammed to the gunwales with my brother's belongings, I might've considered turning it into a drive-lapse. Or a time-lapse of the journey. It would be possible to do this using a common-or-garden time-lapse technique, but if I were to find myself stuck in a traffic jam (heaven forfend), we'd have shot after shot of my car stationary on the A1, which isn't so thrilling. The clever people at Triggertrap have developed a way around this problem, however: distancelapse mode. Rather than triggering your camera to take a photo at timed intervals, it exploits your smartphone's GPS to take a photo at specific distance intervals. How very nifty!
Shooting a drive-lapse will necessitate mounting your camera and triggering device securely in your car, with a decent view of where you're going. While this might seem simple, whatever means you choose to mount your camera in your vehicle, you must do it safely. Laws will vary from country to country, but the primary consideration is that your kit mustn't obscure the driver's vision and neither must it be a distraction. Do be sure of the regulations before you go anywhere.
You have a few options to mount your camera in your car. A superclamp attached to the passenger seat's headrest stalks is ideal: it won't obscure the driver's vision and the camera has a great view. Alternatively, you could opt for a suction cup on the windscreen or a tripod wedged in the backseat. Remember: it's about being safe.
Choosing your preferred shooting mode for a drive-lapse can be a bit of a conundrum. If you're likely to encounter changes in the weather conditions or light throughout the duration of your journey, manual mode will leave some shots over-exposed and other under-exposed. Aperture priority mode can solve the exposure issue, but leave you with a flicker problem. You're going to have to weigh up which mode will suit your journey, and therefore your final video, best.
If you're going on an especially long journey, you'll need to make provision for this, in terms of your personal needs and your kit's. Your memory card will require sufficient space and you might need an external charger for your phone, too.
With all of these considerations, ehm, considered, it's time to do this!
As we've already discussed, your camera needs to be mounted legally and securely. You don't want it wobbling about if you encounter potholes or sleeping policemen.
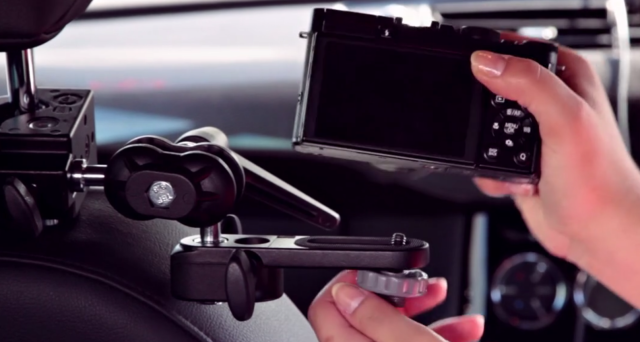
Hook up your camera to the Triggertrap dongle and the dongle to your smartphone. Secure your smartphone, too, as you don't want that moving about.
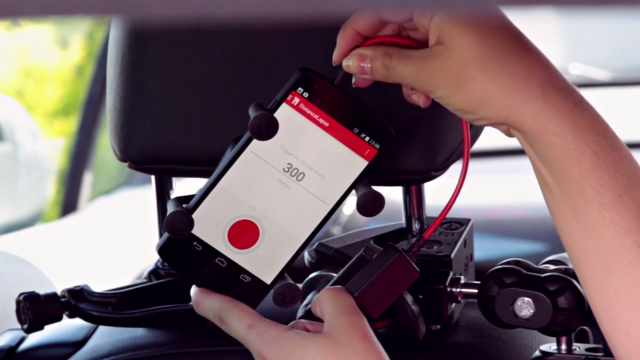
Your camera needs to be in manual focus mode in order for Triggertrap to function, so if it isn't already, switch it to manual focus and adjust to get the image sharp. You also need to choose between aperture priority and manual exposure modes, and set your exposure accordingly.
Open up the Triggertrap app and select the Distancelapse mode. If you're driving on the motorway, 300 metres is a good interval. Hit the big red button, allow the GPS to settle, and then off you go!
When you've completed your journey and have all your images, it's time to compile them into a video. We'll save that for another article, but this one should get you started. Then you get to relive the journey, in shortened form.
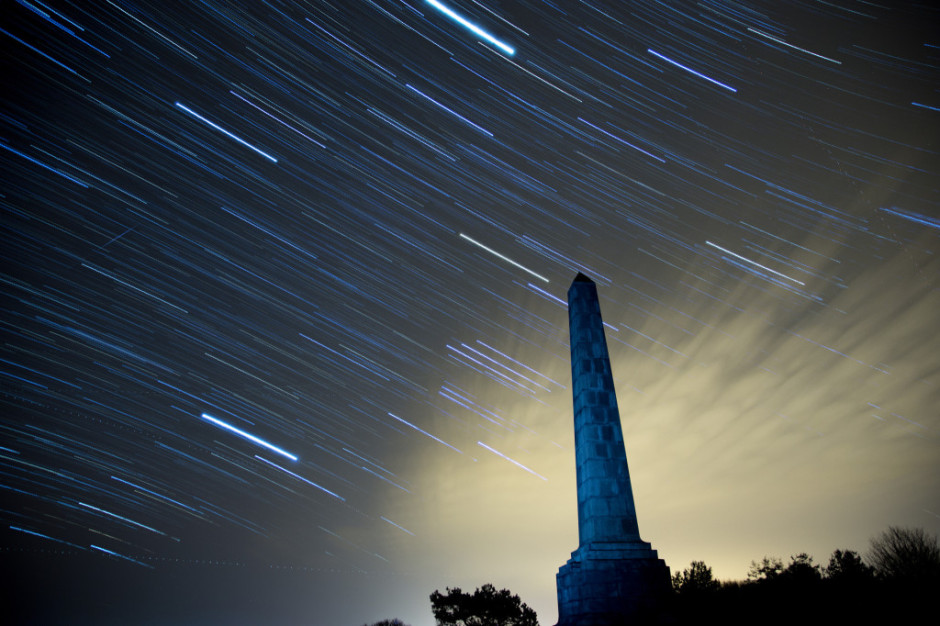
Star trail photos can be incredibly compelling and while they take time to produce, they're probably not as difficult as you might think they are. In fact, there are two methods that you can use to capture the night sky with the stars streaking across it: a single long exposure or what effectively amounts to a time-lapse composited into a single image. This is our guide to shooting star trails.
Light pollution can be a pain when you're attempting to shoot a star trail photo. If you're not able to see the stars, your camera won't be able to, either. Should you live in a city, this means looking for a location that's suitably isolated to give you a view of the sky, but isn't so isolated that you make yourself vulnerable. And if you don't live in a city, you still need to be somewhere accessible.
You also want to think about your scene. You might find that having something of interest in the foreground of your shot will improve it. Barns, dilapidated or otherwise, obelisks, and rock formations are all good starting points.
By finding Polaris and focusing on that, you'll produce a circular star trail; point your camera somewhere else in the sky and your trails will be more linear.
The best time of year for shooting star trails is definitely dependent on personal preference. How long you can manage safely in the cold is probably your primary concern. But you do need to be shooting on a cloudless night with no or little moon.
Once you've decided on your location and set up camp with warm clothes, thick boots, and a thermos flask, it's time to set up your camera.
Set your camera on its tripod; place it in manual mode and switch the lens, preferably a wide-angle one to get as much sky in the shot as possible, to manual focus, too. Frame your shot—ideally with something of interest in the foreground—with the lens focused to infinity.
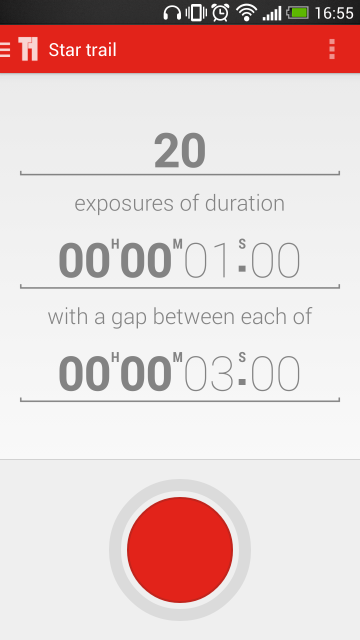
When it comes to exposure, you need to be in bulb mode, the aperture should be as wide as possible, and try ISO 1,600.
Take a test shot with a exposure time of 30 seconds; if the stars are bright and clear, you're ready to go. If it looks a little dark, adjust the exposure time until you're happy.
If you're using an intervalometer, you need to set it to record as you would for a time-lapse video, using the exposure time you tested for.
If you're using Triggertrap Mobile with its star trail mode, set the exposure time that you established in testing with a two second interval between frames, and select the number of frames you want to take. You can choose a huge number of frames and stop after half an hour or 45 minutes of shooting if you're not certain how long you need to be out there for.
That should be about it. Hit go and wait for your camera and the universe to work its magic. Do remember to keep warm and safe!
When you've accumulated all the images that you need, it's time to compile them into a single image with the help of some software. If you have Photoshop, that's perfect. If you don't, there are other options including the star-trail-specific StarStax.
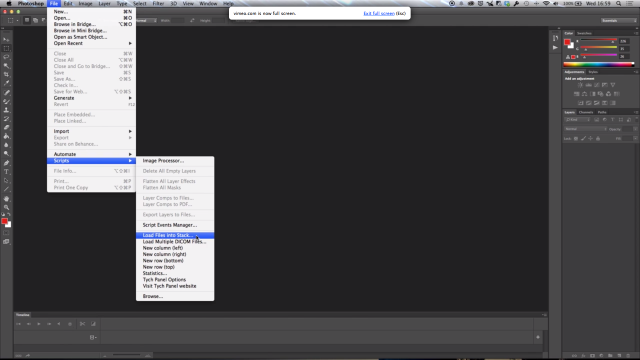
Transfer your images from the memory card to your harddrive, keeping them in a single folder with their original file numbers. Whichever programme you use, this is important to ensure that the images don't get out-of-synch. The rest of this tutorial uses Photoshop to assemble your star trail shot, but you should be able to extrapolate the process to any other programme.
Open Photoshop and import your star trail images using File –> Scripts –> Load Files into Stack. Select your folder of star trails photos, highlight all of the photos, and then select Open followed by OK.
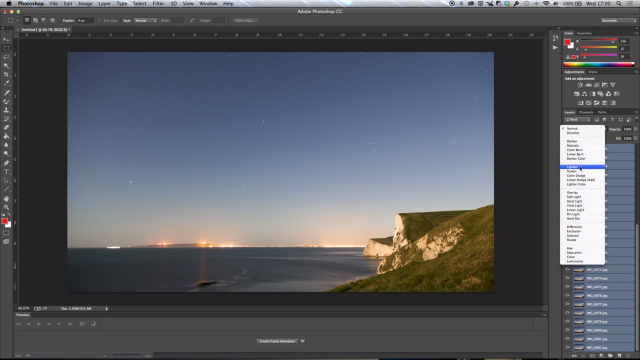
When all of your photos have made their way into Photoshop, select all of them in the Layers panel, and then in Blending Mode select Lighten. Tah-da! You should have a star trail composite.
You can make adjustments to individual layers if you want, but otherwise, you're done and it's a case of saving. (You might want to save an unflattened PSD file and a flattened JPEG version.)
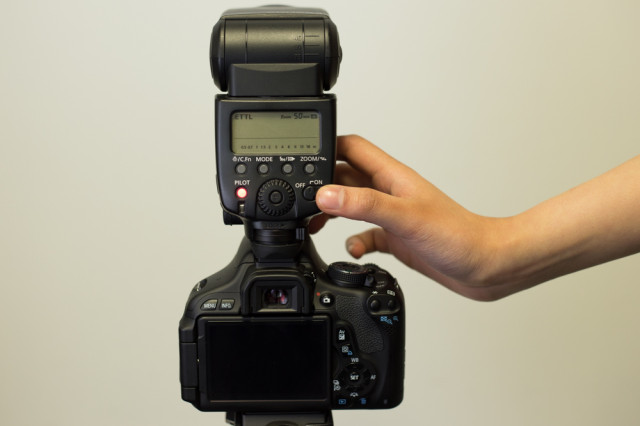
Once you've got a proper handle on your camera and what it's capable of, and you've built up an understanding of your lenses, you might find that you want to extend your photographic experimentations to flash so that you can create alien space lemons and bright and breezy high-key portraits. It's probably easiest to start out using through-the-lens (TTL; iTTL; or eTTL) metering, but much the same as you progress and take more control over your camera, there will probably come a point when you need to exert more control over your flashes and have to change the mode to manual. Adding a new variable into any mix can be a daunting prospect, but don't let it put you off. It's another skill to master and put to use.
TTL stands for through the lens metering. Rather than you dictating how much power your flash puts out, your camera and your flash will combine to make the calculation. It does this by emitting a small pre-flash to determine how much light is required for the scene and your camera settings.
The primary advantage of TTL metering is that you don't need to think too hard, so when you're photographing an event or something fast-moving, you won't miss your shot for need of fiddling.
But if you need consistency in your exposure between shots, then TTL isn't very useful. You'll have to switch to manual mode.
Much like using manual mode on your camera gives you complete control over your exposure, manual mode on your flash gives you complete control over the power it emits. Between them, they will provide you with consistency.
The power out-put on a flash is typically displayed as fractions. Full power is 1/1; the least powerful setting is usually 1/128.
Don't forget that if you set your flash to full power, it'll be working at its hardest and will take longer to refresh in between shots.
When you're experimenting with your flash, you might want to set the power to 1/16, which is roughly half-power. You won't have too far to move in either direction if you need to make adjustments.
Your camera and flash need to synchronise in order for the sensor to be able to detect the flash. Open the shutter for too short a period of time and it won't be able to catch the flash, rendering the entire process futile. Cameras, therefore, have a maximum shutter speed that can be used in conjunction with an off-camera flash; it's known as the sync speed. The maximum sync speed tends to be 1/125 second, but do check your camera's manual to be sure.
Seeing as you'll be using manual mode on your camera, you'll need to be certain of the impact that altering shutter speed, aperture, and ISO will have on your exposure.
First: changing your shutter speed will not have an impact on your flash exposure. Shutter speed will have an impact on ambient light. Want more ambient light? Use a slower shutter speed.
Second: adjusting your aperture will have an impact on your flash exposure.
Third: ISO has an effect on both flash and ambient exposure.
Now that the theory is in place, how about some practical photography?
Turn on the flash and set it to manual. This is normally achieved by cycling through the MODE button on most flashes. If you’re not sure about this bit, check the information in your flash manual.
Now you can adjust the power by pressing the arrow keys. 1/1 is full power, and each click down will decrease the power.
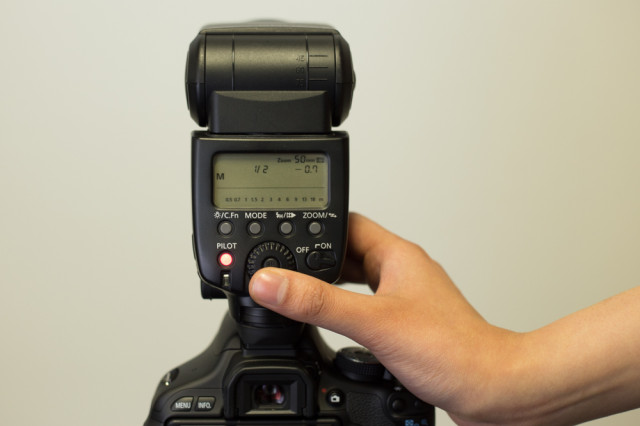
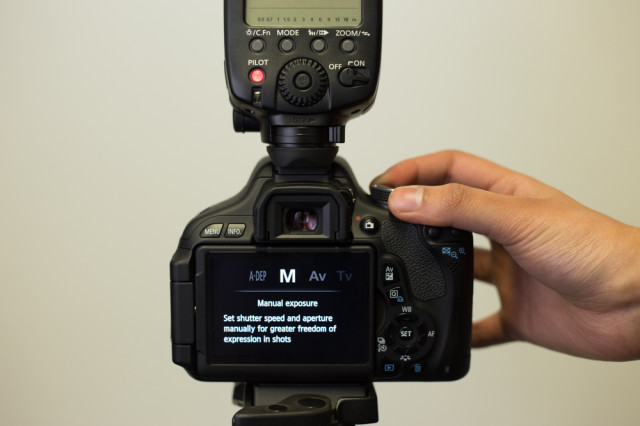
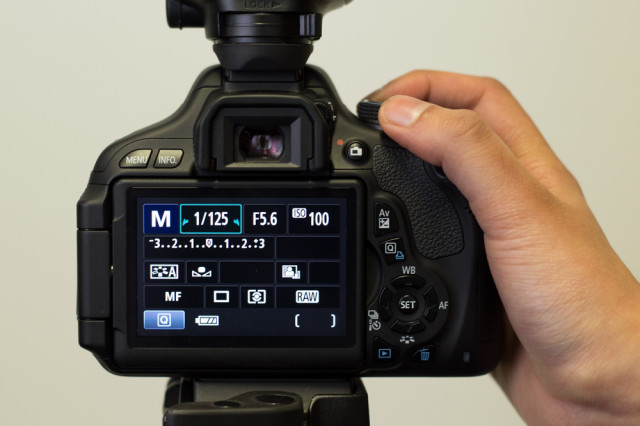
Place the flash on the hotshoe of the camera, or attach the lead or radio trigger if you're using either of those, and switch on the camera. In manual mode, set the shutter speed to 1/125 second and adjust your aperture and ISO.
Take some photos!
If your images are too bright you can:
If your images are too dark, do the opposite!
Experiment with different combinations of flash power, aperture, and ISO to get a feel for what you can achieve with flash photography. After that, the world is your playground!
For a video version of this tutorial, here's Team Triggertrap explaining things:
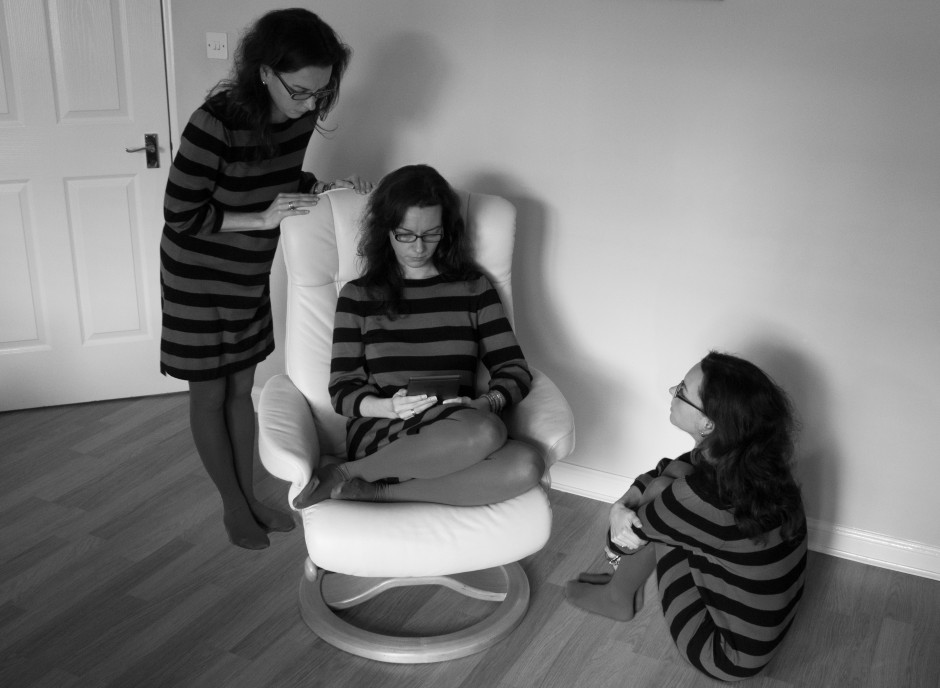
Multiplicity, or the art of creating images containing several yous, or anyone elses for that matter, isn’t a digital discovery. It’s something that people have been doing for decades: it's remarkably easy to achieve with film. You set up your shot and either you don’t wind on your film before re-exposing the frame with your subject positioned anew in the scene; or you wind on your film and then wind it back again in between shots. The important thing here is to slightly under-expose all of your shots in the sequence to ensure that your final image isn’t an over-exposed white mass.
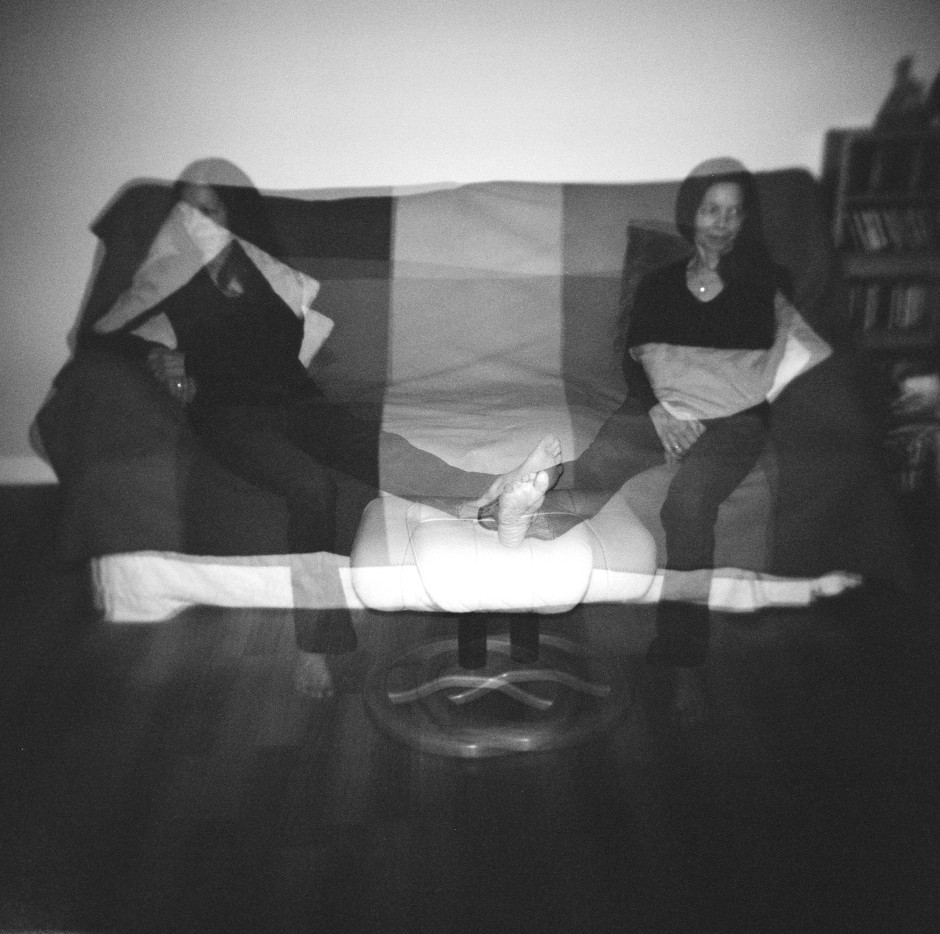
If you don't happen to have a Holga lying about (they're great for creating multiple exposures), you can do it with a digital camera, too. Depending on the camera you have, you've a few options for creating a multiplicitous image. Quite a few come with a multiple exposure setting now: you determine how many exposures you want to make and the camera will re-expose the same 'frame' in-camera and adjust your expose settings accordingly to ensure that you don't end up with a too-dark or too-light image. Marvellous... if you have a camera that can do that. If not, you'll need to make friends with Photoshop, or a Photoshop-esque editing package.
Before we go any further, it’s important to remind you that achieving a great final image relies on producing a good image in-camera first. It doesn’t matter how ginormous the barrage of editing you’re going to subject your photo to, it’s got to be good from the get-go. This is just the same for a multiplicity image as any other.
When you set out to create a multiplicitous image, your starting point is your concept. Think of the story that you're trying to tell and what you need to tell it. Having a clear plan makes it so much easier when you're shooting the images because—unless it's a distinct element of the story—you need consistency in your images: furniture can't move between shots, the light needs to be coming from the same direction, and you don't want to be flapping around.
When the scene's arranged, set your camera on a tripod, adjust it's exposure settings and focal point, and shoot a 'plate' image. This is a base photo, devoid of the story's characters, onto which you'll build your final creation.
Now you can shoot your series of images containing your subject in as many different positions as your composition merits. I've found it useful to go for more rather than fewer photos; it gives you more flexibility when you compile your final image.
[gallery ids="6703,6704,6705"]
When you've shot your images, import those you think you might want to use into Photoshop using the Load Files in Stacks option (File>Scripts>Load Files in Stack), which should import your images so that they are perfectly layered one on top of the other.

Next apply a layer mask to each of the layers, barring the background image, which should be the ‘empty’ plate.
Using the eye icon on the Layers Palette, toggle off all of the layers from view except Layer 1. Now brush your subject, along with anything like indentations in the chair where she or he is sitting or shadows, out of the image. It's those small details which add credibility to the unbelievable, which is what makes them important to the final composition. And while it might seem counter-intuitive to brush your subject out of the image, it isn't really.
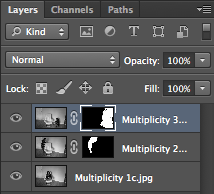
When you’ve disappeared your subject from the scene and you’re happy with the refinement of the edges, invert your selection by pressing Cmd+I on a Mac or Ctrl+I on a Windows machine. The subject will miraculously reappear and the superfluous background will disappear.
Do take care when you're areas where overlapping occurs, because it's here where your image will succeed or fail in its realism.
Repeat this process for each of the layers, toggling them on and off as necessary to decide on which placements you want to keep, and which you wish to discard. I’d recommend saving the image as a PSD file with all the layers intact, which will allow you to revisit it and re-edit as often as your Dr Jeckyll needs to meddle with your Mr Hyde.
When you've settled on a final version, delete the layers that you don't want, save it as a PSD file, and then flatten it and export it as a JPEG image. Ta-dah!
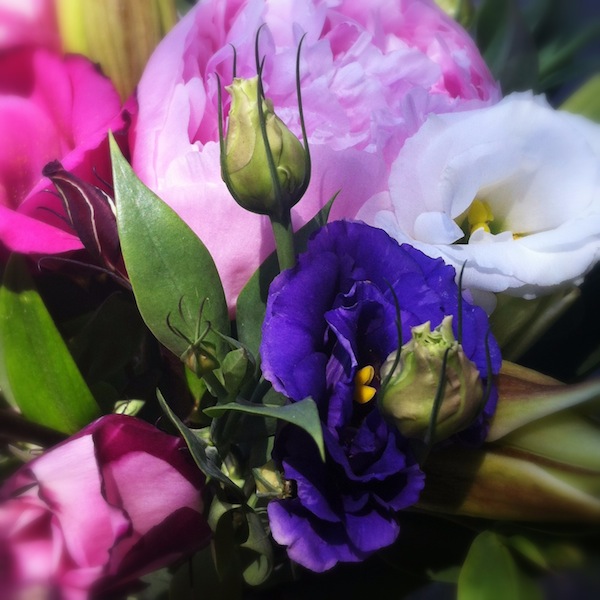
A few weeks back, we took a peruse around Lightroom's clarity slider, to see what it does to your photos and how you can get the best out of your photos by giving it a gentle nudge here and there. This week, it's the turn of the vibrance slider—clarity's bed-fellow—to come under the Photocritic microscope.
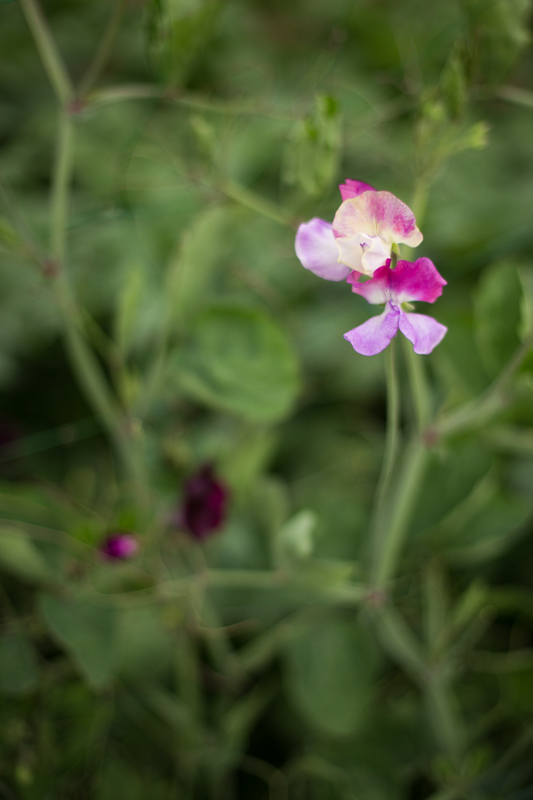
Much the same as the clarity slider has its most pronounced effect on the mid-tones of your images, the vibrance slider is also a 'smart slider' and applies its effects selectively. Rather than adjusting the contrast in the mid-tones, a la clarity, vibrance takes hold of the more muted tones in your photo and gives them some oompf. It's a selective saturation slider, if you will.
More often than not, vibrance will pick up on the blues and greens in a photo but go easier on the reds and oranges. This is great for bringing out the intensity of a sky or making a lawn look that bit more inviting while not letting your portrait subjects look as if they've been tangoed. I've heard some people refer to vibrance as being like 'fill light for colours'.


With the exception of the sweetpea, I've not been exactly subtle with either the vibrance or the saturation in any of my examples here, but that's to give you a clear illustration of the difference between them. Usually, I'd be far more reserved and I'm sure you would be, too. But at least you know what vibrance does now, and can begin using it to intensify your colours without feeling you've chucked a red wash over your photos.
Rules. They're pretty important. Can you imagine trying to get anywhere without some rules for the road? No one would know when to stop, when to go, or even where to go. It'd be chaos, and not my idea of fun. They provide us with a framework, a means of understanding how things work, which enables us to get from A to B more safely. Then there are photography's rules. They aren't quite so critical to everyone's navigational competence and safety—the rule of thirds will hardly prevent me from getting run over—but they are there to make pictures look better.
If having rules and laws and dos and do-nots seems terribly restrictive to a creative pursuit (or how fast you want to ride your motorbike), remember that if you know and understand them properly and put them into practice, it gives you one up on anyone who doesn't. In fact, it gives you two up on people who follow them blindly. When you know them properly, you know when you can break them successfully, too.
Make sure your horizons are level...
The power in breaking a rule comes from understanding why it's a rule in the first place. When you know how and why something works, you also understand its limitations and restrictions. This means that you know when you need to reverse it, to stand it on its head, or to smash it altogether in order to get the effect that you want.
...except when they're definitely not.
This works better with an example.
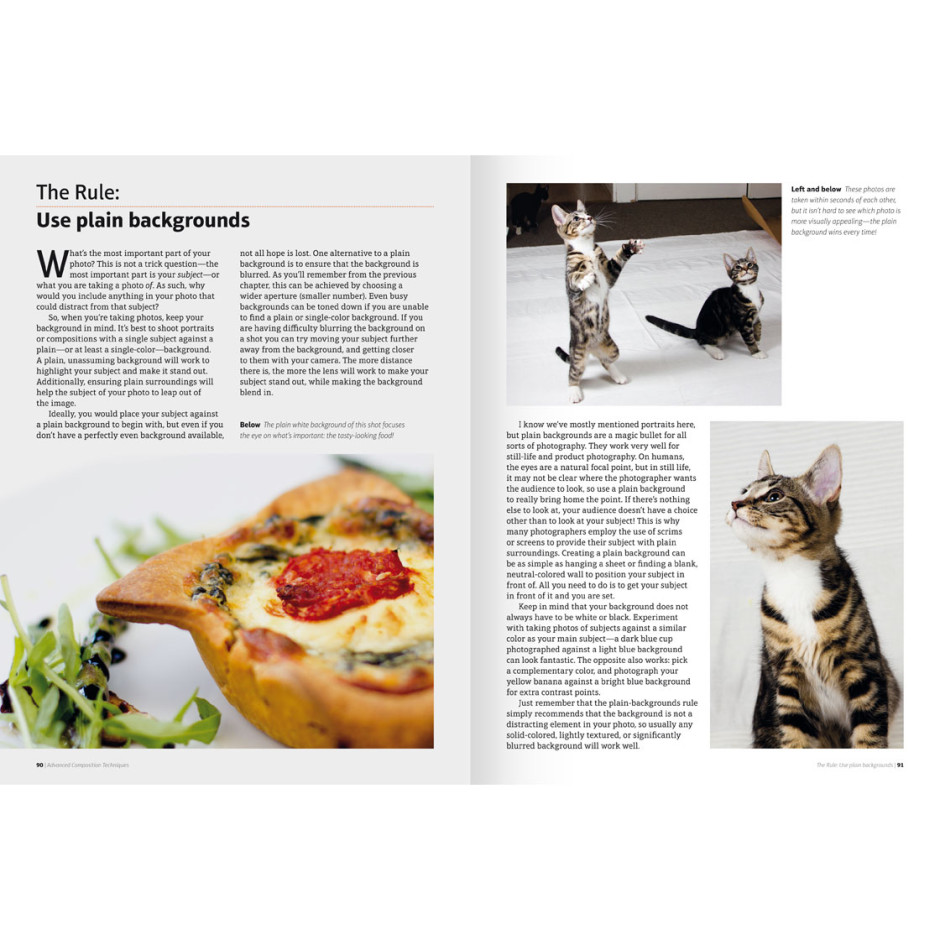
If you want to show off your subject optimally, you're best to use a plain background. That's a fairly obvious photographic rule. A busy background will compete for attention with your subject and your eye will struggle to focus where it should be focusing. The type of plain background that you use has its own set of rules that goes with it: black makes colours bolder, white makes them duller, complementary colours are striking, and using the same colour background as your subject can look stunning, too. But you know that the rule is a plain background will serve your subject best.
Nothing else to distract from gorgeous Sheara
Except...
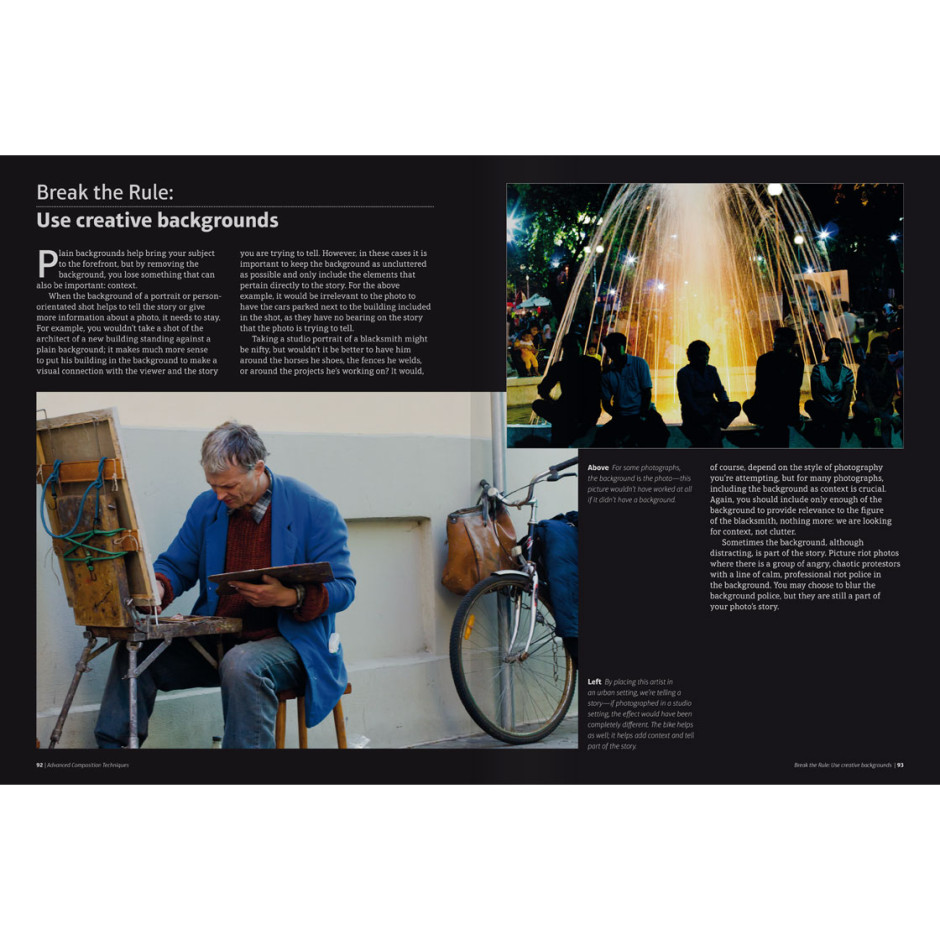
When you need to provide some context for your subject. Photographing an academic against a plain background might make for a lovely portrait, but it doesn't really convey who this person is or what she does. Photographing her in her study, surrounded by her books, would be much more meaningful. What's important here is that the background isn't cluttered or confusing. You need the eye to fall on the professor, but the books to relay who she is.
This background helps to show the context in which the photo was taken, however busy it is
Of course, if you're photographing something like a riot or a protest, the chaos and the confusion needs to come over in the picture. You'll need a point of focus for the eye to fall upon, but everything swirling around it will add to the story.
Photography is full of rules. Which means that understanding them properly presents you with hundreds, thousands of opportunities to break them to creative effect. Rather helpfully, Haje combined lots rules and examples of when and how to break them into one rather awesome book: The Rules of Photography and When to Break Them.
Even better, Rules is currently only £4.99 if you download it from the swish looking Ilex Instant site. That's half-price! This means you can read all the rules and learn how to break them. Go on, be a rebel!
I spent Saturday at the Cambridge Festival of Science and Royal Photographic Society's photography day, listening to talks on megapixels and watching videos of caesium react with water in slow-motion. It was mostly a fun and informative experience, but apart from the caesium videos, the best bit was sitting inside Fotonow's Camper Obscura. That, just as its name suggests, is a camper van that has been transformed into a camera obscura. A camera obscura is the basis of any photographic camera, from a pinhole to a dSLR. A camera obscura is literally a dark (obscura) room (camera) with a hole poked into it, through which light can pass to create an image of the outside world on a screen. There are room-sized camerae obscurae in Bristol and Edinburgh, but they don't have to be walk-in activities. It's easy enough to scale them down and make something portable. I was aiming for something more along these lines when I decided to devise my own.
Of course, if you replace the screen with photo-sensitive paper you have a pinhole camera and by steadily improving the light-gathering and focusing abilities of the hole, with lenses, you end up with a camera more akin to those we use every day. But that's another project for another day.
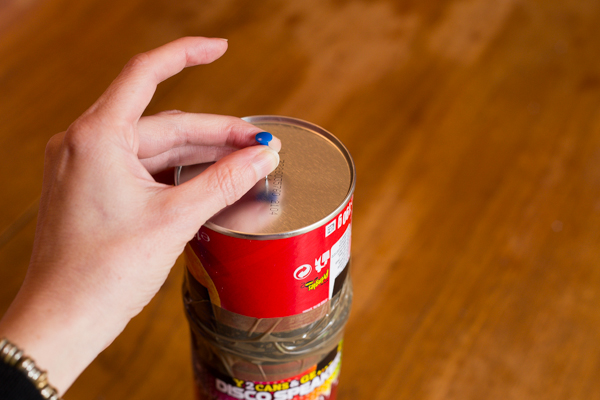
Undeterred, I looked around for some DIY camera obscura instructions and found the perfect example on Exploratorium, which used a Pringles can. Seeing as Haje has already used a Pringles can to create a cheap macro extension tube, it seemed entirely appropriate to transform the snack container into a portable camera obscura. A Pringles Can Obscura.
After securing a can of Pringles either from a nearby shop or your pantry, you'll need to divest it of its contents—whether you eat them all or transfer them to a new container is up to you—and then wipe it clean and keep the lid.
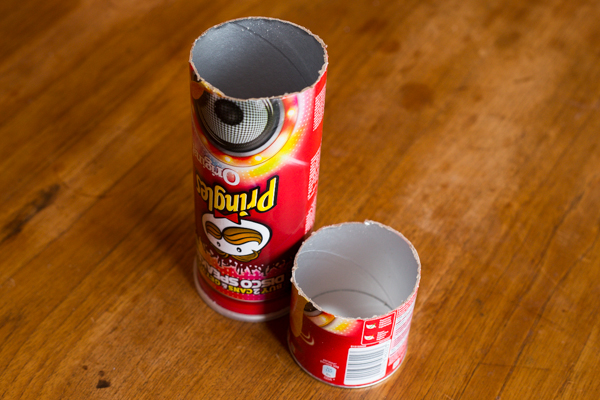
Draw a line around the tube, about 6cm or 2½" up from the base. Using a craft knife, or in my case, a bread knife, cut through the tube so that you're left with two pieces. The shorter section will be from the bottom of the can, and the longer section from the top.
You need to make a screen onto which your image will be projected inside the can. The cheapest and most readily available means to make one is from tracing paper.
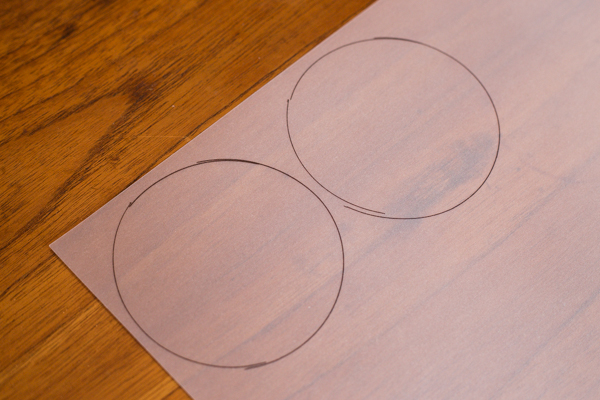
Place the lid of the Pringles can on a sheet of tracing paper, draw around it, and then cut it out. Secure the tracing paper on to the top of the tube using the lid.
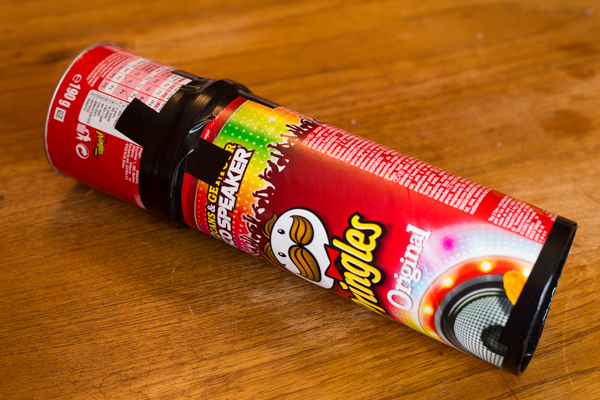
Rather than reconstruct the can with the two cut ends meeting again, you want the cut end from the bottom section of the can meeting the lidded, tracing-papered end from the upper section. Secure them in place using gaffer tape or electrical tape. No light should be able to pass through the join.
I got so carried away sticking it together that I forgot to take a photo. I'm sorry.
In order for the light to pass into the can and create an image, pierce a hole using a drawing pin in the base of the can.
To make sure that you don't end up with spurs of cardboard poking into your face when you hold your Pringles Can Obscura to your eye, tape up the cut surface with some electrical tape. And if you don't want it to resemble a Pringles can that you've hacked up, wrap some coloured paper around it.
The brighter the day, the better the image you'll be able to render on your screen. Just remember that everything will appear upside down. And then it will be a case of moving nearer and farther away from your subject to get it in focus.
It's a great tool to remind you just how simple the principles of photography are, and to get you back in touch with moving subjects into and out of focus.
(And don't go getting any ideas about the gorgeous image of the tree. That's obviously, from the Camper Obscura.)
If you were under the impression that time-lapse sequences are the preserve of condensing the observation of periods of slow change into something that can be watched in a few minutes, photographer Mike Bons might encourage you to think again. He used the time-lapse technique to capture the precise moment that he proposed marriage to his girlfriend Erin: a single moment of immense change. Given that Erin said yes, I suppose we should call her Mike's fiancée now!
Mike succeeded in setting up the proposal and shoot with only a marginal amount of deception. Being a photographer, Erin and Mike don't tend to have very many photos of them together: someone is always behind the camera. By suggesting a photoshoot of the two of them together, he had every opportunity to capture the moment without giving away the game and getting some photos of them together. By creating a time-lapse of the proposal, he wouldn't need to worry about getting his timing right, either. Cunning!
Having bought the ring and settled on St Valentine's Day as D-Day, it was time to do the deed at Meyer’s Pier, in Belleville, Ontario, with their car's headlights backlighting the scene.
Mike set up his Canon 6D with a 70-200mm lens set at 175mm, manually focused on the point they'd be standing, and an exposure of 1/80 second, ƒ/3.2, ISO 3200. He set his time-lapse device to record one photo every second, and then it was a case of getting Erin out of the car, where she was keeping warm, and getting down on one knee.
The next step was all in Erin's hands!
After she'd said yes, and they'd got all the photos they wanted, I rather hope that they spent a romantic evening together before he embarked on his post-processing.

To create the final image, Mike selected his favourite shot from the time-lapse sequence and stitched it together with some panorama shots that he'd taken when he was setting up. This was to ensure that he achieved the field-of-view that he wanted along with the depth-of-field that he wanted from his settings of 175mm and ƒ/3.2.
Tah-daa! One life-changing instant captured by time-lapse. And many felicitations to Mike and Erin.
Oh, and seeing as Mike is a photographer, you might want to check out his website for his other photos that don't necessarily involve proposing to his girlfriend.
(Headsup to Triggertrap)