


There's no need to be shy of increasing your ISO. There are both creative and practical applications to the third facet of the exposure triangle.

When you hear the term 'high-res' thrown about with such abandon when it comes to images for web use, have you ever stopped to think just how big or how high quality and image meant for the web needs to be?
There's an assumption that high-contrast images are more dynamic, more compelling, more inviting. Have a go at some low-contrast photography. You might surprise yourself with the results.
Balance doesn't mean symmetry; it means an internal consistency and tension within your photos. And it's a vital element of composition.
Great photos might be down to a little bit of luck, but most of that 'luck' you make yourself. Don't believe us? Read on...
As a photographer one of the first things that you need to understand is exposure, or how to control light to create an image. If you're new to photography or have just picked up a camera with manual control for the first time, we suggest that you start here. Learning how to manipulate light to achieve the shots that you want is a life-long project, but these are the foundations.
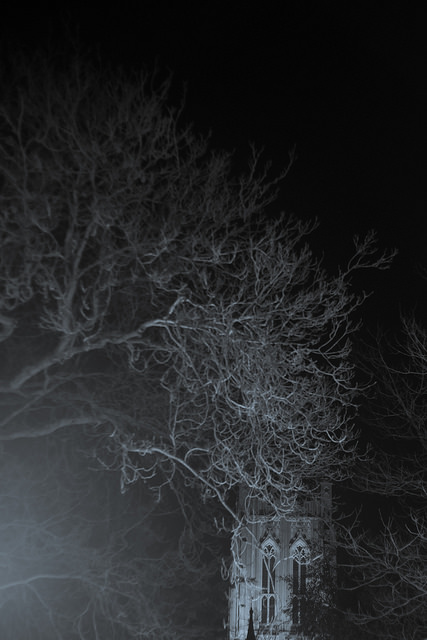
Here in the northern hemisphere, the shortest day is fast approaching and whether we like it or not, much of our photography will be of the low-light variety. We've put together some suggestions for coping as best you can when things are a little dim and the light with wish you wish to draw is a scarce commodity.
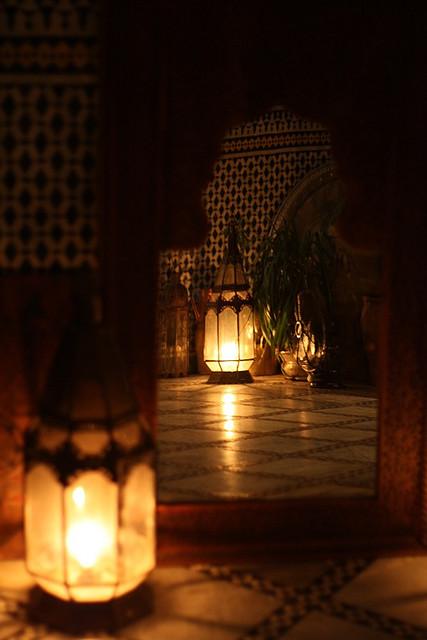
This might sound terribly obvious, but it's a fundamental of photography: look for the light in your scene and use it to your advantage. Use the light from streetlamps, from candles, from the moon to illuminate your subject—even be the subject—and create interesting shadows in your photos.

While a too-high ISO can be responsible for noisy, grainy photos, advancements in sensor technology mean that it's possible to push ISO much higher than was previously acceptable to get the shot you want. Remember: a little grain can be better than motion blur; if you shoot in Raw, images can be cleaned up; a black and white conversion can produce noise-negating miracles.
The wider the aperture you select, the more light you'll let onto the sensor and the faster shutter speed and lower ISO you'll be able to use. This will of course come with the caveat of a shallower depth-of-field, but that can be applied creatively.
A slower shutter speed will permit more light to reach the sensor, but it also has the potential to introduce motion blur if it isn't sufficiently fast to freeze the action in your scene, as well as camera shake if you're hand-holding your camera. Sometimes, however, motion blur contributes to the story that you wish to tell, so don't dismiss it entirely.
The general rule for hand-holding a camera is that you shouldn't do it if your shutter speed dips below the inverse of the focal length of the lens you're using. Thus, for a 50mm lens, you shouldn't attempt to hand-hold your camera using a shutter speed slower than about 1/60 second. If you find that you need to go slower, you might wish to bring out your tripod. Think about a remote shutter release, too.
If you adhere to matrix or multi-segment metering, your camera will attempt to adequately expose the entire scene. That might not be what you want if you're looking to play with light and shadow. For dramatically lit shots, switch to spot metering and meter from the illuminated area that you wish to be in focus. This will maintain dark shadows while correctly exposing the point-of-focus.
Spot-metering might not be appropriate for your scene, but at the same time, matrix or multi-segmented could render it over-exposed. If that's the case, try dialling in a stop or two of negative exposure compensation.
Auto-focus can struggle to hit its mark in low-light situations, in which case manual focus might render better results if you're both confident enough using it and the scene isn't changing so fast that you miss the photo opportunity. Should auto-focus be the better option, ensure that you're using one-shot auto-focus. Try, too, shining a light where you wish your camera to focus. The illumination will assist it in locking-on to the point-of-focus.
Whether it's reflection off of pale clothing, off of glass, polished metal, or liquid, or from a reflector, keep an eye out for reflected light and put it to use in your shots. That might be making reflections on water the focus of your photo, but it can also be bouncing back reflected light to illuminate shadows.
If you're not already shooting in Raw, switch now. Not only will help you to tidy up any noise in your shots, or even to adjust the exposure a little if necessary, but it will allow you to adjust the white balance of your photos more effectively. Accurately white balancing low-light shots can be tricky; the more flexibility that you have, the better.
How warm or cool is your light source? Or are you working with mixed light sources? If you're shooting by candle light, you can set the light temperature on your camera to more accurately render colours in your photos. For mixed-light sources, remember to white balance according to the light falling on your subject. If you're shooting in Raw, you might find that adjusting the white balance in post-processing will give you the most accurate result.
Finally, have fun with the darkness and put it to creative use. Let reflections dance or shadows draw you in to moody scenes. Low-light might force you to think for a moment, but remember that you often have longer than you think you do, and experimenting is half the fun.
Halley's Comet made its last swoop past earth in February 1986. I remember it well because I was in primary school at the time, learning about the Norman Conquest. In addition to the boos, hisses, and cheers elicited by the key players and the confusion surrounding Harold Godwinson's death, Halley's Comet plays a starring role in the Bayeux Tapestry, which documents the invasion of a loosely termed 'England' by William of Normandy and his cronies. That we had the opportunity to experience the same celestial phenomenon as the people we were learning about, all of whom lived 900 years before us, was rather special. The timing could not have been better for a memorable series of lessons.

Seeing as Halley's Comet is on a 76 year schedule, it isn't expected again in all its glory until July 2061; however, we are being treated to an impromptu meteor shower in the next few days. The comet is likely to deposit a trail of cosmic dust into our atmosphere on 21 and 22 October 2014, giving us a shooting star display visible to the naked eye.
If that isn't an excuse for trying a little night photography, I don't know what is. So apart from the hoping for clear skies, what else can you do to maximise your chances of capturing the tail lights of Halley's Comet?
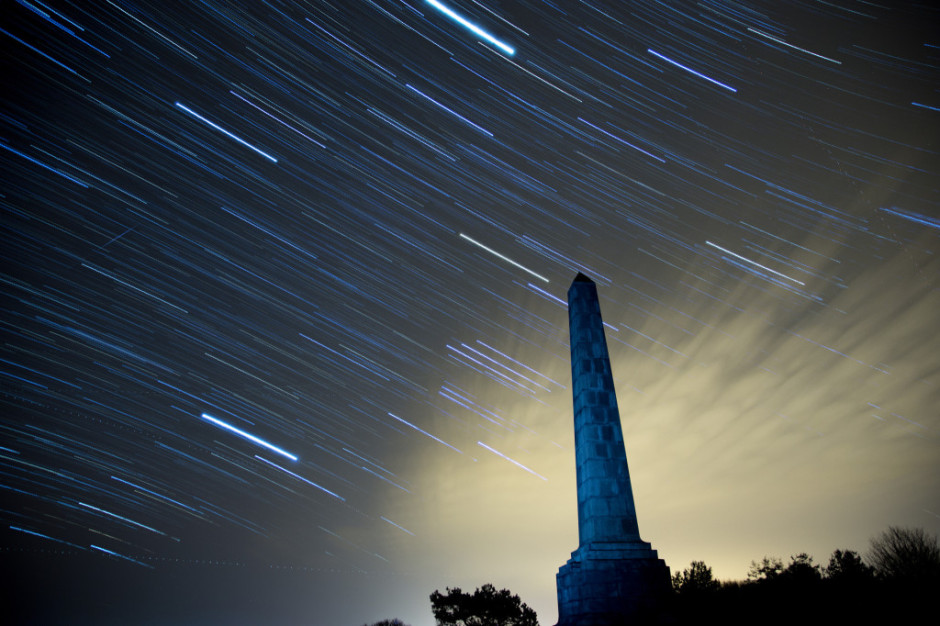
Whatever means you use to take your photos, capturing a meteor shower is fundamentally the same process: shooting a series of long exposures. There are a few options for how you go about it, but once you know that bit, it's fairly simple.
The darker the sky, the better the chance you will have of being able to see the streaks of light as the comet's dust burns through the atmosphere. Ideally, then, you need to be somewhere that doesn't suffer from too much light pollution and has an uninhibited view of the sky. Open and accessible heath- or park-land that's relatively far from city lights is ideal; just be certain you're not venturing somewhere you shouldn't, either because the land is privately owned or you're disturbing a sleeping bull! I'd advise not going alone, either. Shooting in secluded or isolated locations is not necessarily a solitary activity.
Shooting the night sky means long exposures, so you're going to need a tripod, and an intervalometer will ensure the best results, although you can get by without one. Naturally we recommend Triggertrap, especially because its star trail mode makes life easy, but your mileage may vary. For your lens, a fast, wide-angle lens is advisable. You're never quite certain where they'll start or where they'll end, so the wide-angle provides you with sufficient flexibilty, and it gives you the option to introduce an interesting foreground to the shot, too. The darkness of the sky means that you need fast glass to let in enough light. And an empty memory card is a good idea: you'll be taking a lot of images.
While shooting stars can turn up anywhere, they are most likely to cluster around a single point called the radiant. Don't aim your camera directly at the radiant, when you've worked out where it is, but about 45° to one side of it. You also want to compose the frame so that it is visually interesting beyond just the shooting stars. Think about including something intriguing in the foreground. Turn off the auto-focus, use as wide an aperture as you dare—you might not want it all the way open for sharpness—and focus to infinity.
The best option to photograph a meteor shower is very similar to capturing a star trail image, when you compile a series of long exposures shot over a significant period of time into a single image, but with a few key differences. You can read our star trail tutorial here, and if you'd like to shoot a star trail image that hopefully captures some shooting stars, go right ahead. Otherwise, you can tweak the process and use it as the basis to capture a series of photos from which you'll select the ones that show shooting stars streaking across them.
What are these tweaks you'll need to make, then? First and most obviously, you'll not compile all of your frames into a single image that charts the movement of the celestial bodies across the heavens. Instead, you'll pluck out the indvidual images displaying shooting stars, or maybe composite several images showing shooting stars.
Second, you might need to use a slightly shorter shutter speed than you would with a star trails sequence, to ensure that you don't capture the turn of the earth. With a star trails shot, the movement of the earth is exactly what you want, but with single meteor images, not so much. Between 10 and 25 seconds is recommended, but a few test shots should help you to decide what you need to use. This slightly shorter shutter speed will require you to adjust the ISO to get a good exposure, too.
Finally, you can chance not taking your series of images with very short intervals between them, as you would with a star trails sequence, but leave the gaps a little longer. That means you might miss a few opportunities, but the law of averages suggests that if you shoot over a period of a few hours, the odd photo will have a shooting star zooming across it.
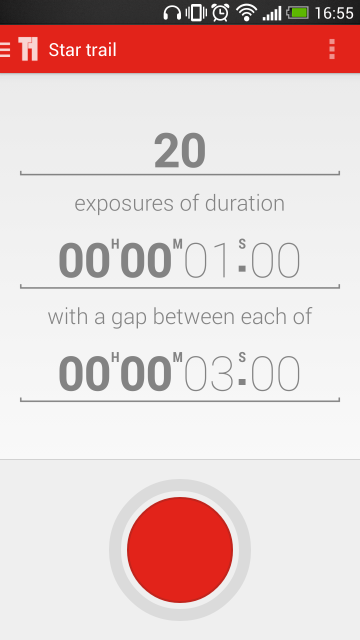
When you have set the focus and established your shutter speed and ISO, you will need to set your intervalometer as you would for a recording a time-lapse sequence, using the exposure time that worked best in your test shots. If you're using Triggertrap's star trail mode, set the exposure time that you established in testing with your chosen interval between frames, and select the number of frames you want to take. With a slightly longer interval between frames, say five or ten seconds, you could shoot for hours!
If you don't have an intervalometer, there's no reason why you can't try your hand at meteor shower photography. Instead of relying on a remote triggering device to release your camera's shutter, you'll be doing it yourself, which might get tiresome. Just as you would with a star trail-based sequence, aim your camera in the right spot and focus to infinity. With your camera in manual mode, use the widest aperture you can, select a shutter speed between 10 and 25 seconds, adjust the ISO accordingly, and press that trigger. Over, and over, and over, again!
Remember to keep warm, and here's hoping for clear skies.
Nice picture... shame about the blur. There are times when you expect to see some blur in a photo: panning shots, long exposures, and even in some short exposure photos when the subject is moving really fast (think the wheels on a Formula 1 car). But most of the time, we're looking for sharp photos without any evidence of fuzziness. In this photography fundamentals session, we're looking at vibration and camera shake, and how best to avoid it. Unfortunately, it's easy for the photography deities to conspire against us so that we end up with not-quite-sharp images. Often it's because our subjects move—about which there's little that you can do, especially if you're photographing children or animals—but frequently it's down to camera shake rather than motion blur. We might get the wobbles, we might need to use a slightly longer exposure to ensure that there's enough light on the subject and that means we can't hold the camera quite as still as it needs to be, or we might be using a lens that has a high magnification factor, in which case the slightest movement can show up as camera shake.
If you're not sure if a photo is exhibiting signs of camera shake or if you've just screwed up your focus, take a look at the nature of the blur. A plain old badly focused image will probably have at least one area in focus, but it won't be the right area. The blur will likely be quite smooth, too. A camera shaken photo, on the other hand, will be blurry all over, and the blur is probably sharp and jagged. You might have a double-exposure-like effect, with everything appearing twice in the frame. However it manifests itself, it isn't ideal.

Camera and lens manufacturers have made it easier for us to capture tack-sharp photos with the introduction of stablisation technology. You'll often hear manufacturers claiming that their vibration reduction or image stabilisation mechanisms can offer however many stops advantage, or let you shoot with a slower aperture or shutter speed than you could manage only hand-held without noticing any camera shake. Still, there's nothing like going back to basics and doing everything that you can to produce a blur-free photo.
First of all, you can take the technical approach and reconsider your exposure. If you can, use a faster shutter speed and compensate for it using a faster aperture and a faster ISO. If you're concerned about noise, remember that a smidge of noise is better than a blurry photo.
Second, brace yourself. If you're hand-holding your camera, keep your elbows in, against your chest. Don't stand there trying to stop traffic with your arms out at 90° to your body. If I had a penny for every person I'd told to keep their elbows in, I'd be a few pounds to the better by now. If you're using a long lens, make sure that you have one hand on the camera and the other supporting the lens. The combination of a long lens' weight and its magnification factor makes it a camera shake party.
Third, breathe right. Seriously. Inhaling or exhaling at the wrong moment can cause camera shake. Try not to inhale or exhale at the same time as you depress the shutter button. And while you're at it, depress the shutter button gently.
Four, use a stabilisation device. It doesn't matter if it's a tripod, a monopod, a brick wall, or a string tripod: get your camera stable. And trust me, the length of time for which you're capable of holding your camera steady is much shorter than you think it is.
Five, use a remote shutter release. We've already noted that breathing at the wrong moment and an over-zealous trigger-finger can lead to camera shake. If you're in a very sensitive situation, for example you're using a macro lens, using a remote shutter release eliminates your need to touch the camera and with it the inherent threat from your lungs and muscles.
That should help to keep your photos sharp.
Time-lapse << Photography Fundamentals >> White balance

