

As a photographer one of the first things that you need to understand is exposure, or how to control light to create an image. If you're new to photography or have just picked up a camera with manual control for the first time, we suggest that you start here. Learning how to manipulate light to achieve the shots that you want is a life-long project, but these are the foundations.
What is an exposure?
Photography means 'drawing with light'. You take something that's photo-sensitive—whether that's paper, film, or an imaging chip—and by exposing it to light, you create an image. That's an exposure. More light means a brighter image and less light creates a darker photo. It's a fairly simple principle, although getting it 'right' can be a bit trickier!
What's a 'good' exposure?
We use the terms 'over-exposed' and 'under-exposed' to describe photos that are either too light or too dark, respectively. It follows then, that a 'correctly exposed' picture is somewhere in the middle. But what determines if a photo is 'correctly' exposed or not? Aside from the basic parameters of being able to make out your subject, correct exposure is a subjective measure—it's whether or not the exposure tells the story and makes the photo that you envisaged and intended.
Controlling exposure
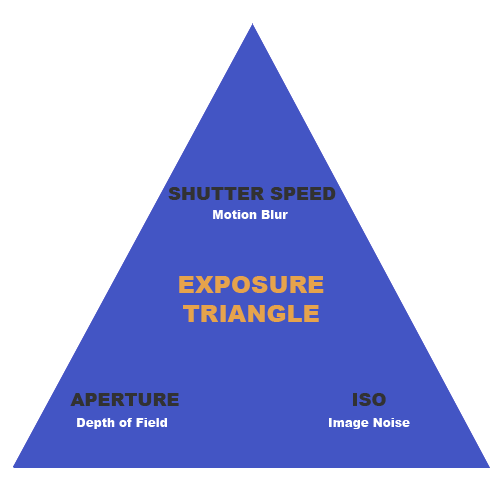
Ensuring that you get the right exposure means controlling how much light meets the sensor. Our cameras use three variables to regulate this: aperture, shutter speed, and ISO. The aperture is the size of the hole that lets in the light; the shutter speed is the period of time for which the sensor is exposed; and the ISO is a measure of the sensor's sensitivity to light.
Depending on which exposure mode you use, you can adjust each of these variables independently or control some yourself and allow the camera to select the others, to get the exposure that you want. However, each of these variables also have creative impacts on the appearance of your photos in addition to adjusting the exposure.
Aperture
The aperture is the hole that allows light to pass through the lens and reach the sensor. It's measured in ƒ-stops. Increase the size of the hole and more light gets through; reduce the aperture's size and there's a corresponding decrease in light hitting the sensor. That's intuitive.

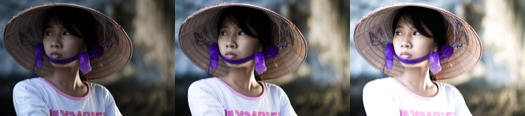
The creative element of aperture is that by reducing its size, you increase the depth of field in your photo. Use a smaller aperture and more of the scene will be in focus. Conversely, a larger aperture, which lets in more light, puts less of the scene in sharp focus and produces more background blur.

What confuses people about aperture, at least at first, is that the ƒ-stop scale seems to work backwards. An aperture of ƒ/2.2 is larger than an aperture of ƒ/22. As soon as you know that aperture is measured as a fraction of the length of the lens, it makes more sense. Say that you have a lens with a focal length of 100mm. An aperture of ƒ/4.0 is a quarter of the length of the lens, so 25mm. Decrease the aperture to ƒ/8.0 and it will measure 12.5mm.
Shutter speed
Shutter speed measures the duration of time for which the sensor is exposed to light. A longer shutter speed lets in more light; a shorter shutter speed allows through less light.

When it comes to using shutter speed creatively, you need to think about motion. If you leave the shutter open for a second, you capture everything that the camera is able to 'see' for that second. That includes wind rustling leaves or hair, people blinking, and water flowing. All of that motion will come out in your photo and it will include some blur. Sometimes, that's just what you want. But when you want a sharp, crisp photo, you'll need to use a shorter shutter speed that doesn't record so much motion.

ISO
Back in the days of film, how sensitive a particular film was to light was measured in ISO. A film with an ISO of 400 was twice as sensitive to light as ISO 200, and four times as sensitive to light as ISO 100. While ISO in digital cameras works slightly differently, the notion that increasing the ISO will help you to capture images when there is less available light still holds good.

What's the creative catch with ISO? Noise, or grain. When you increase sensitivity, you increase the prevalence of grainy flecks in your photos. Don't be deterred from using higher ISOs, especially if it helps you to get the shot that you want, but it is a good idea to play with the ISO feature on your camera and judge just how high you can go before a photo is too noisy and therefore unusable.
What about auto?
You could of course set your camera to auto-exposure and let it do all the heavy lifting from now until the end of days. But where's the fun in that? You took up photography to create your own photos, and with all the creative possibilities that altering aperture, shutter speed, and ISO affords you, why should you let your camera decide how your photos should look?
Knowing when your exposure is 'good'
Knowing to increase or decrease aperture, shutter speed, or ISO is all well and good when you're fine-tuning your images, but how do you get your exposure in the ball park in the first place?
First of all, you need to have an idea of how you want your photo to look, which means deciding on your desired depth-of-field and a fast or slow shutter speed. If the available light is limited, you might have to think about increasing your ISO, too.
When you've settled on some rough settings, remember that your camera has a light meter. That little scale which appears in the bottom of your viewfinder or screen? That's the exposure meter. Use it!
Half-depress your shutter release button and the camera will focus on your chosen subject. At the same time it will take a light reading and display it on the exposure meter. When the light meter thinks that the exposure is just about right, the marker will sit in the centre of the scale. If it's over-exposed, it'll sit towards the right and an under-exposed image will show the marker on the left.

The meter isn't perfect. Sometimes you will need to deliberately over- or under-expose your photos to get the shot that you want (which is why you've moved on from auto-mode), or you might need to select a different metering mode from the default (more on that another day), but it's a fair indicator of where you need to be. You can always take a look at an image's histogram to adjust the exposure with even more precision, if you need to. But we'll save that for later.

Equivalent exposures
Whenever you adjust one of the three elements in the exposure triangle—aperture, shutter speed, or ISO—you'll alter both the exposure and make a creative change to your photo. For example, if you adjust the aperture to give a smaller depth of field, you'll also be letting in more light. That's fine if the photo needs to be brighter, but what if it doesn't?
Enter equivalent exposures.
You can compensate for the increased exposure of a larger aperture by adjusting either the shutter speed or the ISO accordingly. You can shorten the shutter speed or lower the ISO by a measure equivalent to the increase in the aperture to maintain an equivalent exposure.

To give an example, let's look at an initial exposure of ƒ/4.0; 1/100 second; and ISO 200. You want a shallower depth of field, so adjust the aperture to ƒ/2.0. But this doubling of the light reaching the sensor makes the image too bright. To compensate you can either shorten the shutter speed by half, taking it to 1/200 second, or halve the ISO, to 100.

It's a case of pushing and pulling, really. If you push up one value, you can pull down on another, or even both of the others, to maintain the exposure.
Want to know even more?
We've written quite a lot pertaining to exposure here on Photocritic. Many of those articles are linked from key words in this one. But here are a few more that might of interest if you want to learn even more.
- What is exposure?
- Struggling to understand the exposure triangle? Try thinking of it as a glass of water.
- Depth of field in greater detail
- How can a lens have a speed?
- ISO: the biggest change to photography in the past ten years!
- Embracing automatic ISO
Four things to do straight away with your new camera << I have a shiny new camera! Now what? >> Composition in a nutshell