consulting ltd

Video Photo Critique III: Biz Eating Apple


Today's video critique is Biz Eating Apple, by DiaspirePhoto. Take a closer look at it on Flickr!

This is the third in my now-weekly series of video critiques. To see all (well... Both) critiques and to find out how to get your own critique, check out this post.

Well then, with that out of the way, let's get cracking on the critique:


Do you enjoy a smattering of random photography links? Well, squire, I welcome thee to join me on Twitter - Follow @Photocritic

© Kamps Consulting Ltd. This article is licenced for use on Pixiq only. Please do not reproduce wholly or in part without a license. More info.

The magic of fill light


Lightroom is magic - and as photographers, we've never had it this good.

There you are, after a long day of shooting, and you realise that some of your favourite photos are too contrasty, with parts of the image bathing in darkness. Adobe Lightroom to the rescue...

I was playing around with my brand new Canon EF 100mm f/2.8 macro lens in my kitchen on a rainy day, and was experimenting with a new reflector I was building (it works great, but more about that in another post). Some of the photos that didn't work out so well ended up on my camera, and then on my computer, and then in Adobe Lightroom. I figured I'd see if I couldn't edit one of them into shape a little, and was (re-)astonished by the fantasticness of Lightroom's Fill Light slider.

Starting with this photo:

haje_jan_kamps_20110317_img_5209.jpg

I started experimenting with various settings. You can crank up the exposure to make the rest of the image brighter, of course, but that would over-expose the already bright highlight on the right of this Hershey's Kiss.

So, by instead adjusting the Fill Light slider:

screen_shot_2011_03_18_at_083717.jpg

I was able to recover the shadows remarkably well:
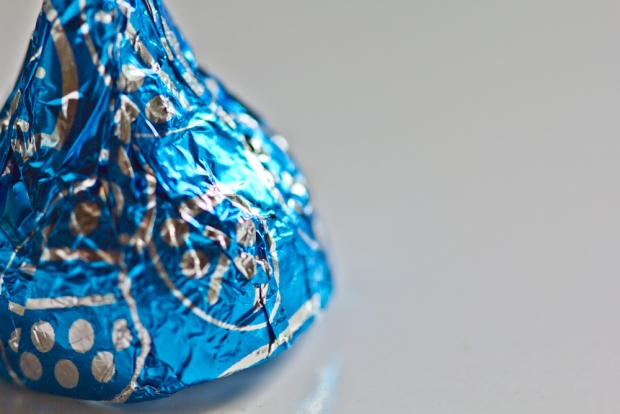
haje_jan_kamps_20110317_img_5209_2.jpg

A closer look at the image shows that you do gain a bit of digital noise:

20110317_img_5209_5184_x_3456.jpg

But it's possible to reduce it quite a bit by using Lightroom's rather phenomenal noise filters:

20110317_img_5209_5184_x_3456_2.jpg

Of course, as always, it's much better to ensure that you get your lighting right when you take the photo; you get less noise, higher quality, and more precise control about what the hell you're doing. And yet, it's rather fantastic to see how photographers are given a lifeline if you balls things up just a little bit too much.

How did we ever survive without Lightroom?


Do you enjoy a smattering of random photography links? Well, squire, I welcome thee to join me on Twitter -

© Kamps Consulting Ltd. This article is licenced for use on Pixiq only. Please do not reproduce wholly or in part without a license. More info.

My best from 2010


A realy fun photo shoot outside a public swimming pool

One of the great things about a new year is that it gives you a bit of time to breathe and consider what has happened over the past 12 months. Myself, I like going back over the photos I've taken over the past year, and have a look at what I've  learned. 

I'm just going to throw this gallery out there - have a poke around (and follow me on Flickr if you're interested in keeping up to scratch with what I'm up to, photographically), and have a dip into your own archives. Who knows what lovely memories it brings up!

Stay awesome, keep snapping, and have a well-exposed 2011!

~ Haje


Do you enjoy a smattering of random photography links? Well, squire, I welcome thee to join me on Twitter -

© Kamps Consulting Ltd. This article is licenced for use on Pixiq only. Please do not reproduce wholly or in part without a license. More info.

Clean your imaging sensor!

DSLR sensor chips collect dust. That is a Photoshop-time-consuming fact of digital life. At The Sun, whenever we send in our DSLRs to be otherwise repaired, one nice little bonus is that (along with the obscene repair bill) they come back with a freshly cleaned CCD.

Which, of course, lasts for about a week. Two if you are lucky. 


You may not even notice that you have dust at all, until you stop down and shoot with a wide lens or macro. Then, all of a sudden it looks like you are looking through an electron microscope or something. Eww.

Heck, I used to even keep a little sticker on one of my bodies to denote which one had the “cleaner” (and I use the term in the relative sense) CCD. That was so I would know which one to use if I needed to shoot something at f/11 or higher.

Read the rest of David’s article over on the Strobist blog!


Do you enjoy a smattering of random photography links? Well, squire, I welcome thee to join me on Twitter -

© Kamps Consulting Ltd. This article is licenced for use on Pixiq only. Please do not reproduce wholly or in part without a license. More info.

Contrast, colours, and curves, oh my!

curves-galore.jpg

curves-galore.jpgCurves is one of the most powerful tools a photographer has in his or her arsenal. You can do a lot more with curves than you can do with the Levels tool. In fact, most photographers who embrace curves stop using the Levels tool altogether – although until you fully understand what Levels is, what it does, and how to use it, you’ll never be able to get the full potential out of the Curves tool either.  


So I figured it was time that we had a very close look at Curves, what they do, and how to use them. Just when I started researching the topic, I discovered that my new friend Matt Greer has an amazing write-up on curves over on his web-site, creatively titled Photoshop Adjustment Layers – Curves.

In fact, his whole blog is worth reading, because he has a series of good Photoshop tips, tricks, and in-depth tutorials that – without being a patronizing git – gives you a gentle introduction along with more in-depth power tips.


Do you enjoy a smattering of random photography links? Well, squire, I welcome thee to join me on Twitter -

© Kamps Consulting Ltd. This article is licenced for use on Pixiq only. Please do not reproduce wholly or in part without a license. More info.

Try before you buy: Rent glass!

rentglass.jpg

rentglass.jpgA good way to get to grips with camera equipment is to go out and rent some. Here in the UK, I’ve found Calumet Photo to be an invaluable source of expensive glass on a temporary basis (they also have a presence in Germany, Holland, and the US), but I just stumbled across a brand new concept: On-line lens rental! 


It is such an obvious thing to do, but I guess it’s like Columbus’ egg – you have to think about it first. Of course, you can’t keep a good idea to yourself for very long, so when I started to look for it, I actually found two companies that do on-line camera equipment rental – One of them is Ziplens, and the other is the unimaginatively named RentGlass.

As far as I can tell, they both only cater for the US market, but hey – it’s a brilliant idea, and I bet it’s only a matter of time before the concept goes around the planet.


Do you enjoy a smattering of random photography links? Well, squire, I welcome thee to join me on Twitter -

© Kamps Consulting Ltd. This article is licenced for use on Pixiq only. Please do not reproduce wholly or in part without a license. More info.

Try food photography!

photo_ingredients.jpg

photo_ingredients.jpgIf you thought portraiture was difficult, think about how perishable hot foods are. When you photograph it, you’ll want it looking fresh, happy, steaming, and appetising. A normal photo shoot – where you photographs something to perfection – takes a few hours, but the food will only remain good-looking for about 10 minutes at the most.

So what do you do? God knows, I’ve never tried. But my new friend L over at Still Life With laid down the gauntlet… 


This month, I got inspired by Chez Pim’s post a week ago about “the ugliest food photo ever.” It’s stunning that a professional actually published this photo of Tuna Tartare in the New York Times, taking what sounds like a decent recipe and making it look just awful.

Of course, because this was a food article in the NYT, it also included a recipe. The challenge is obvious: Make the food (see, I knew there would be a DIY element to this, even though it is a food DIY rather than a photography DIY), and then take a photo that doesn’t look disgusting.

Read the challenge over at L’s blog, and then get cracking! If you get any good results, tell her, and me too!


Do you enjoy a smattering of random photography links? Well, squire, I welcome thee to join me on Twitter -

© Kamps Consulting Ltd. This article is licenced for use on Pixiq only. Please do not reproduce wholly or in part without a license. More info.