exposures

Quality versus quantity

This instalment in the Photography Fundamentals series is a slightly cerebral departure from the norm. We're going to explore the idea of quality versus quantity. It's not a debate over the merits of digital compared to film, more a costs and benefits analysis of them both. Quality versus quantity; it's a purely digital conundrum. Back in the days of film, you had a given number of exposures per roll and that was that. Even if you kept a ready supply of film on you, having the rolls developed wasn't a cheap business, so you thought carefully about every image. You set upon the story, you nailed the composition, and you got the exposure bang-on. Or at least you tried to. The point was that you aimed for quality every time.

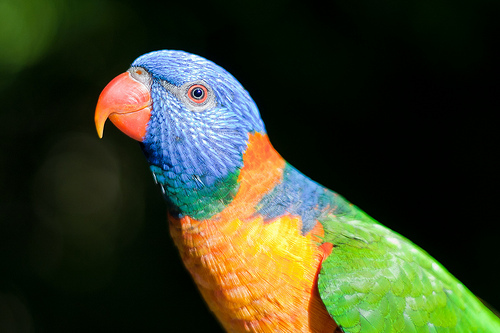
Red collared lorikeet

Now, memory is cheap—you can pick up an 8GB memory card for under £10—and you can shoot and shoot and shoot until your heart is content: I can get several hundred Raw images from my Canon 6D on said same card. If you fill up your memory card and don't have a spare, you can scan back through your files and delete those that are out of focus, horribly exposed, or just don't work. We're no longer hide-bound by physical (and economic) limitations of film, allowing us the ability to play, experiment, and get things wrong ad infinitum. The barometer has swung from quality to quantity.

This has to be a good thing, right?

Well… yes, and no.

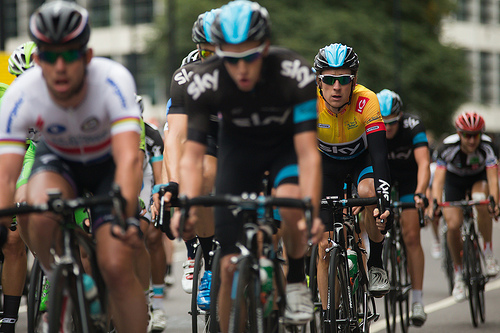
Being able to take hundreds and hundreds of images off the reel is stupendous, especially when you combine it with the ability to shoot in high frame rate bursts. I was epically grateful for this last weekend, when I went out to photograph the final stage of the Tour of Britain. Not only did the cyclists racing around the central London circuit ten times give me ample opportunity to capture them as well as stand and cheer, so did my memory cards. I wasn't concerned that I'd waste rolls of film and not have anything to show for my endeavours; digital had me covered.

Sir Bradley Wiggins

However, there's also a possibility that the ability to shoot almost endlessly is making us lazy as photographers. We don't have the over-arching need to plan our photos properly anymore, we can simply 'hit and hope'. Are there elements of the craft that are being forgotten, lost, and ignored because quantity is ruling over quality? If I'd only had one chance to capture those cyclists on Sunday, as opposed to ten, would I have been able to get the shot because I'm too accustomed to being able to go back and try again?

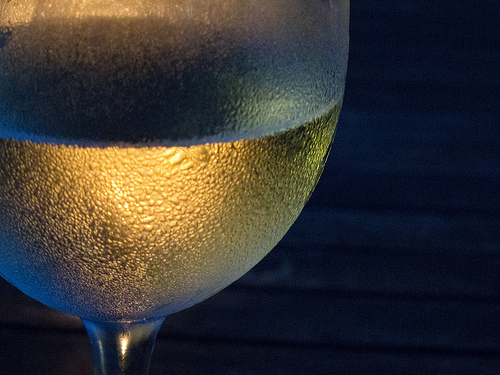
Sauvignon Blanc

Does this make me sound like a curmudgeonly luddite who'd rather be shooting wet plates? Probably. But it isn't meant to. It's meant to highlight the balancing act that we need to perform between the limitations of restricted exposures and the potential for exploration and experimentation with virtually unlimited exposures. It's actually me saying that quantity is awesome, but we shouldn't worship at its altar to the ignorance of quality.

So why don't you try this as an experiment. Allow yourself 36 exposures, and no peeking at your LCD screen. How many shots from your 36 make the grade and what did you learn from the experience? Maybe you always under-expose, or perhaps you have a tendency to sloppy framing. Are you thinking about your aperture carefully enough? You might notice that your subject placement is something that you do consistently well. Perform the exercise on a regular basis and it could lead to an improvement in your photography. Then you won't need to take so many shots off the reel!

Prime lens << Photography Fundamentals >> Rule of thirds

HDR: Making impossible shots possible


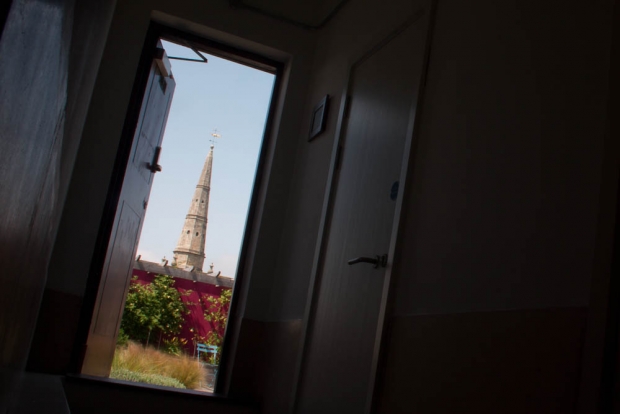
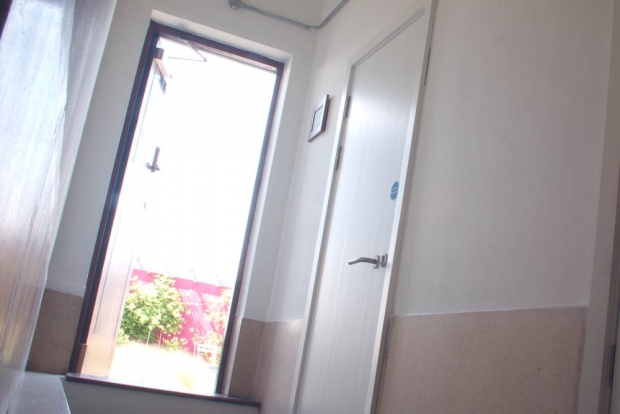
If you've ever been faced with photography situations with extreme contrasts, you know that basically, you're out of luck. Say, for example, you are taking a photo out of the door of a building.

You have to make a hard choice; are you going to expose for the outdoors? If so, you end up with something like this:

img_2510.jpg

... And your indoors are completely useless and dark.

Alternatively, you can decide to expose for the light inside the building:

img_2514.jpg

But clearly, that's hardly going to do much good either.

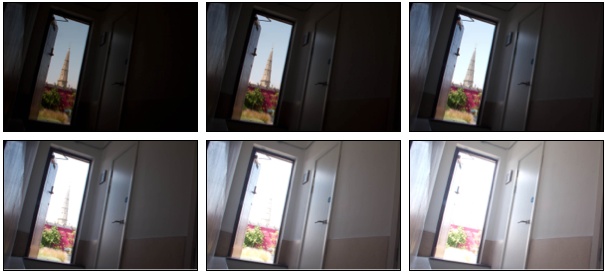
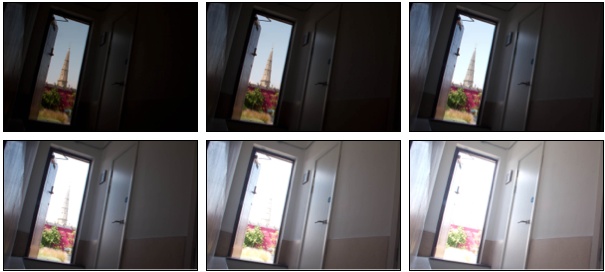
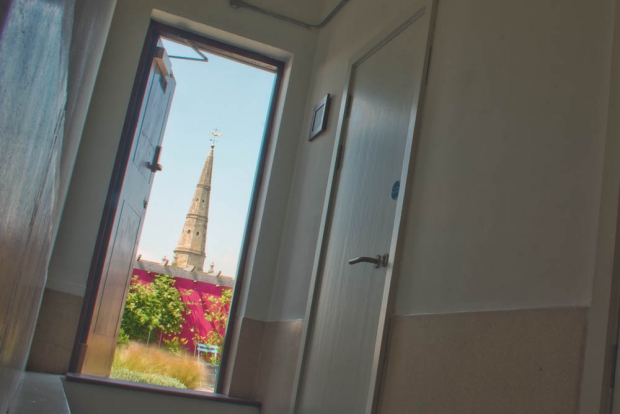
The solution is HDR photography, where you combine a series of exposures:

hdr.jpg

Into one single exposure:

img_2508_hdr.jpg

Okay, so I'm more than happy to admit that this quick example (shot with the Triggertrap Mobile Long Exposure HDR mode using my iPhone to control my Canon EOS 550D - that was what I was testing when I did this one) is hardly the finest example of creative HDR ever created - in fact, it's a distinctly rubbish picture. Nonetheless, it reminded me how powerful HDR can be, and how it completely changes the game for what is possible in photography.

Time for a week-end project?

So, If you've never given it a go before, make it your week-end project: You can easily do a manual HDR set by changing the settings on your camera between each shot; or use the Automatic Bracketing feature built into most cameras to get a 3-shot bracketed set.

And if that isn't enough for you (for example, if you're instead itching to do a 13-exposure HDR for some crazy reason), there are automated solutions that'll do the exposures for you, including Triggertrap Mobile or Promote.

For an in-depth guide on HDR photography, check out the Pixiq Ultimate Guide to HDR Photography!

The 1-second film festival


You've taken hundreds - if not thousands - of photos in your life. Some of them will have had exposures of longer than a second. 10 seconds, perhaps? Maybe even a minute? Telling a story in stills photography is mighty hard, but what if your assignment was different? What if your mission was to create a short film, that could be a maximum of 1 second in length?

That's the premise of the Seconds of Beauty photography contest:


Seconds Of Beauty - 1st round compilation from The Beauty Of A Second on Vimeo.

Magnificent, eh? I'm inspired, now where did I leave my Director's hat?

(via the ever-awesome PetaPixel)

Your favourite rules of photography


There are many ways to learn photography - one of the easiest ways is to learn a set of 'rules' that work like a shortcut toward getting awesome photos. You'll have heard of a lot of them before; there's the Rule of Thirds, for example, the golden mean, or simpler rules, too: Such as "get your photos in focus" and all the rules-of-thumb to do with equivalent exposures etc.

Do you know of any other “rules” for photography? Which rules to you stick to most of the times, and what rules do you love to break for best effect? Leave a comment below!

News in brief: The most incredible night-time sky

The Photopic Sky Survey is a 5,000 megapixel photograph of the entire night sky stitched together from 37,440 exposures. Large in size and scope, it portrays a world far beyond the one beneath our feet and reveals our familiar Milky Way with unfamiliar clarity. When we look upon this image, we are in fact peering back in time, as much of the light—having traveled such vast distances—predates civilization itself.

Seen at a depth thousands of times more faint than the dimmest visible star, tens of millions of other suns appear, still perhaps only a hundredth of one percent thought to exist in our galaxy alone.

Incredibly!

Our Milky Way galaxy is the dominant feature, its dusty arms sweeping through the frame, punctuated by red clouds of glowing hydrogen. To the lower right are our nearest neighbors, each small galaxies themselves with their own hundreds of millions of stars.

Check out Sky Survey for the full story!

What is this? - In our NewsFlash section, we share interesting tidbits of news. Think of it as our extended twitter feed: When we find something that get our little hearts racing, we'll share it with you right here! Loving it? Great, we've got lots more News Flash articles - and, of course, we're still on Twitter as well, for even shorter news tidbits.

Our October Photo Competition!

IMG_1952

Hello Lovely People. We’ve a little treat for you. We thought that you might like to have a go at a monthly photo competition. We’ll set a theme or technique, you submit a picture to our Flickr pool, we choose a winner. If you’re really lucky, we might even try to rustle up some prizes. What do you say? Interested?

Thought you might be.

Cos it isn’t autumn all over the world, we thought that we’d avoid the cliched ‘Autumn’ theme and instead go for a technique this month. I’ve been obsessing over long exposures recently, so I’d like to see what you guys can come up with using a slow shutter speed that can dazzle and impress me.

You’ve between today and Wednesday 27 October 2010 (that gives you three weeks) to submit your, what will doubtless be stunning, entries here.

We’ll try to decide on a winner before Wednesday 3 November. If you’re the lucky person with the super-groovy winning entry, we’ll show it off here on Small Aperture and send you a copy of 365 Photography Days, which has some gorgeous inspirational shots in it.

Any questions? Ask away.

Being a competition, we have had to draw up The Rules. Sorry. I know it’s not that exciting, but it’s got to be done.

  • If you decide to enter, you agree to The Rules.
  • You can’t have written for Small Aperture or be related to either me or Haje to enter.
  • One entry per person – so choose your best!
  • Entries need to be submitted to the right place, which is the Small Aperture Flickr group.
  • There’s a closing date for entries, so make sure you’ve submitted before then.
  • You have to own the copyright to your entry and be at liberty to submit it to a competition. Using other people’s photos is most uncool.
  • It probably goes without saying, but entries do need to be photographs. It’d be a bit of strange photo competition otherwise.
  • Don’t do anything icky – you know, be obscene or defame someone or sell your granny to get the photo.
  • We (that being me and Haje) get to choose the winner and we’ll do our best to do so within a week of the competition closing.
  • You get to keep all the rights to your images. We just want to be able to show off the winners (and maybe some honourable mentions) here on Small Aperture.
  • Entry is at your own risk. I can’t see us eating you or anything, but we can’t be responsible for anything that happens to you because you submit a photo to our competition.
  • We are allowed to change The Rules, or even suspend or end the competition, if we want or need to. Obviously we’ll try not to, but just so that you know.

10 of the best: iPhone apps

Feet at the station

Did you know that since Apple launched the iPhone, over 200,000 apps of all kinds have been released? Just a few, then. From navigation to games, sports scores to language lessons, there aren’t many applications you can’t find in the AppStore.

However, photography apps have taken the market by storm and there are currently over 2,700 available for iPhoneographers across the globe. David here has installed fifteen of them. With so many to choose from, finding the right apps can get a little tricky. Let us save you some time and with David Smith’s help, show you a few of the best ones we’ve come across.

Photo-editing and camera apps

Hipstamatic

£1.19/$1.99

Hipstamatic is one of the better toy camera apps available in the AppStore. The developers really tried to make this app feel like you are holding a camera in your hands instead of a phone. The design is sleek with a simple but unique UI, complete with virtual shutter and flash buttons. Users are also given the option to swap virtual lenses, films, and flashes to provide numerous possible combinations, giving Hipstamatic exposures a very distinct look.

There are, though, some downsides. First of all, you can’t edit photos that are already in your camera roll. Second, the small virtual viewfinder makes it difficult to know exactly what’s fitting into the frame of your shot.

Lo-Mob

£1.19/$1.99

A solid film simulation and experimentation app, Lo-Mob has 39 preset ‘filters’ to choose from. While not necessarily the most options to play with, the filters that are provided are very clean and high quality. Lo-Mob is a good app to have when you don’t want to waste too much time fumbling through countless filters and films to edit your shot.

Take a photo (or import one from your camera roll), select one of the preset filters, save the new photo back to your camera roll, and you’re off and running.

Film Lab

£0.59/$0.99

Just as the name might suggest, this app’s emphasis is on film simulation. Film Lab provides users with 13 popular film brands, such as Kodak and Ilford, along with several types of film under each make. A simple toolbox allows you to adjust brightness, contrast, sharpness, hue, and saturation through the use of sliders.

Best Camera

£1.79/$2.99

Best Camera may not have the greatest variety of effects and filters to apply to your photos, but where the app shines is through its online sharing community. Like most photo apps, users are able to share their work via Twitter, Facebook, and Flickr, but Best Camera brings their app to a new level by displaying a live-stream of images on their website, TheBestCamera.com.

Users can not only create an online portfolio, but can also browse and rate other photos taken with the app, as well as see what effects were used to create those photos. The talent seen in Best Camera’s live-stream is brilliant, and if you don’t want to pay the sticky price for the app, at least check out the most popular uploaded images here.

Adobe Photoshop Express

Free!

The world’s most popular photo-editing software has arrived in mobile form. While the original Photoshop app was released some time ago, a completely upgraded version hit the AppStore earlier this month. PS Express gives users a strong selection of editing features to choose from, including crops, color control, contrast, sharpening, borders, and several preset effects. Each adjustment can be made with the use of sliders, a familiar feature to all Photoshop users. An all-around solid app on its own, and the price tag makes it a must-have for all iPhoneographers.

Speciality photography apps

Flickr

Free!

For photographers, one of the greatest things about smartphones is the ability to whip out your portfolio in seconds, right there in the palm of your hand. The Flickr app for iPhone makes this simple to do. Users can browse their own photostreams and view recent activity on their accounts, as well as search for photos within the entire Flickr community. It’s a free app and if you have a Flickr account, there’s no reason to not have it on your iPhone.

Project 365

Free or £0.59/$0.99 for Pro version

The idea of this app is simple: “Take a picture every day of the year, become a better photographer and never forget a day in your life.” Project 365 allows users to attach one image to each day of the year, giving them a colorful calendar of photos to look at. Not only is it good practice for photographers, but it’s also fun to go back and look at the pictures you took six months ago that you’ve already forgotten about.

iTimeLapse Pro

£1.79/$2.99

I’ve always been fascinated with time lapse photography, so when I saw this one in the AppStore, I had to get it. I have to admit that I was a bit sceptical about how well it would work. But it surprisingly worked very smoothly and did exactly what it said it would.

Granted, you’ll need some sort of support method to keep your iPhone perfectly still, as well as a good hour or longer to kill. You’ll also want to make sure you disable the auto-lock feature as it seemed to kill the app when my phone went into sleep mode. Phone calls, text messages, and battery warnings will also stop the time lapse process, so putting your phone in ‘airport mode’ is a must. Minus the few inconveniences, this app makes for a fun project on a boring Sunday afternoon.

Just for fun

FatBooth

£0.59/$0.99

My sister showed me this app a while back by sending me a picture of what looked like me after eating a dozen of these.

While this may not be the most useful photo-editing app out there, it’s still fun to see pictures of your friends weighing 300 pounds and then embarrass them by posting the pics on their Facebook walls. And if you don’t have any friends, you can always spend a few enjoyable minutes fattening up George Clooney a little.

App of the Dead

£1.19/$1.99

If you’re anything like me, you enjoy a nice cappuccino at your neighborhood cafe, taking your two-year old nephew to the zoo, summer trips to the beach, and watching mindless flesh-eating zombies tear the limbs off unaware bystanders during an end-of-the-world zombie apocalypse.

App of the Dead was created in part to help promote famous zombie-flick director George A. Romero’s latest film, Survival of the Dead. Like FatBooth, this app essentially alters a portrait of you and your friends, but instead of adding a hundred pounds to your face, this one adds soulless eyes and rotting flesh, turning you into one of the walking dead. The effects are pretty decent and although a bit pricey for such a one-dimensional app, it’s quite fun for any of you flesh-eater fans out there.

And finally

There is almost an app out there for anything you want. If you’ve come across one that has revolutionised your life, or perhaps gives you a good giggle, please let us know!

Using Shallow depth of field

raincoat.jpg

So, you’ve got your exposures down pat, and your framing is getting better by the day. Excellent. What is next? Well, the lovely Andrew Ferguson, who I know via LiveJournal, submitted a couple of photos for critique that illustrate the next logical step forward: Using shallow depth of field in a creative context. 


The first hurdle for many photographers is to get stuff in focus in the first place. The next hurdle is to get the things you want to be out of focus, err, out of focus. Awesome. So how do you go about doing that? Well, let’s learn from Andrew:

Andrew-Ferguson-2.jpg

This photo, which he asked me to take from his overall rather nifty Flickr stream, serves as an excellent example of how you can use DOF to create a multi-layered image.

The eye is automatically drawn to the parts of the photo that are correctly exposed and in focus, whereas the over-exposed background, which is blurry to boot, gets less attention. If this image had been pin-prick sharp all the way, it would not have had any impact whatsoever: The messyness of the people in the background would have seriously detracted from the overall impression of the photograph.

As it stands, I have no idea what the item of jewelry is, or if it means anything. Quite apart from that, the choker the person in the foreground is wearing is vicious-looking, and her black dreaded hair strengthens the impression of a person who has embraced the ‘goth’ lifestyle.

The foreground is rather strongly contrasted with the background, in that it is a very unusual portrait, which can in fact be interpreted in several ways. The two that sprang to mind:

1) The phrase ‘show me your friends and I’ll tell you who you are’ springs to mind with this photo: Instead of showing a full-on portrait of the person who is in focus, the photographer chooses to express her personality through that of her friends, despite the fact that the friends are out of focus.

2) This person is ostracised from her group, and her alternative clothing style, her going-against-the-grain type personality and what comes across as a strong personality is rebelling, but she is paying the prize in the form of loneliness.

If the people in the background had been in school uniforms, or otherwise ‘conformist’ clothing, I would have leaned towards option 2. I believe that this would have made a stronger photograph on an emotional level, too. However, one of the people in the background has blue hair, and the guy standing up seems to have blond dread-locks, which leads me to conclude the 1st explanation.

Obviously, this photograph has a lot going for it in terms of ‘showing a little, hiding a lot’, with multiple possible explanations. It is one of the things I quite like about it, but what really makes this image is how it goes about creating this illusion: By using a very large aperture (f/5.6 at ISO 200 and 24mm focal length, in the case of this photograph), there is only very little of the image that is actually in focus: The foreground model’s jewelry and the far-most locks of hair.

In the beginning of this critique, I explained how this image could easily have been completely rubbish, but I hope that the long-ish monologue (which really wasn’t meant to be quite that long, honest) serves to illustrate how the limited DOF has helped pull this image up. It isn’t perfect — If it were, I would have been able to come up with a more consistent story as to what is going on in this image, and why the people in the background are relevant — but it’s a very fine photograph because it allows the viewer to spend some time thinking, making up his/her mind.

If I were to come up with any ways to improve this image, it would be to use different people in the background, perhaps dressed as jocks, nazis, or even as circus clowns. The point is that they need to serve as either a connection or a contrast, and at present they are too similar, yet too different to offer an unified message in the photo.

Bokeh
bokeh.jpgShallow DOF and bokeh go hand-in-hand as two rather important concepts in photography, and it is something that is worth keeping in mind when you are working with limited depth of field: The type and quality of the lens you are working with has impact on how the out-of-focus parts of your image look. In Andrew’s photo above, the out-of-focus elements of the image are works of impressionistic art in themselves (See the crop to the left, for example).

Because of the beautiful out-of-focus qualities, this image works well. If you experiment with the same, but discover that your out-of-focus backgrounds don’t look as expected, try it with one of your other lenses. If you have any cheap lenses, try with them as well – I have a couple of no-brand, cheap-as-chips lenses that are nigh-on useless for any quality photography, but I keep them around beccause they have tremendous qualities for shallow depth of field photography.

The only real way to find out which lenses work and which ones don’t is to experiment, so have a go!

Andrew’s second photograph is this one, of an old motorbike:

Andrew-Ferguson-1.jpg

… Which I’m not going to say a lot about, other than the fact that it is – yet again – an excellent example of careful use of depth of field.

The photo was taken with a Canon Digital Rebel XT and a moody old 24-105 EF lens at 50mm, 1/250 sec, f/4.0 at ISO 400, and I really enjoy what the increased grain at ISO 400 brings to the photograph. With these kind of lighting conditions, you could easily have shot it at 1/125 ISO 200, or 1/60 ISO 100, but the trade-off of faster shutter time and increased grain works very well, perhaps especially because it’s such a gritty topic of photography.

As a personal preference type thing (i.e lots of people would disagree with me), I think the photograph is too bottom-heavy. The sticker on the fork of the bike is disturbing, and while the dirty, oily rag over the bike, combined with the indicator and the reflector of similar, yet different shades of orange really lift the photo, I think there’s too much going on, and too little of a focal point. I like how you’ve used the rule of thirds in the composition of this photo, and it is fine just the way it is.

Because this is my photo critique, however, and because I can’t let a photo stand without a few suggestions for improvement, I’ll go in line with my usual demands: I would have loved this photo to be a lot tighter, and higher impact.

A humble re-crop suggests the following, for example:

raincoat.jpg

This version uses a different approach to the rule of thirds: it breaks the image by using diagonals. The rain-cover is the only things that stands out in the image because it is teh only thing that is straight down. Everything else is at a diagonal: The rain grid in the background, the boke itself, the outline of the rain cover on the left side, etc. As I say, it’s very much a taste thing, and I would most certainly not insist on an approach such as this one, but I feel that the re-crop also highlights the strength of the original photo – the tack-sharp focus on the bike itself, and the out-of focus-ness of the background.

Finally, the out-of-focus areas on the last photo here shows how much of a difference a different lens can have: The small stones in the asphalt and the slats in the rain grid in the background are not particularly aesthetically pleasing in their own right. Everything else being equal, this photo would have looked rather differently if you had taken it with the same lens as the one you used for the first image.

So, what’s the lesson to take home from this critique? Use a limited DOF to offset your foregrounds effectively, but beware of how different lenses can make the background highlights (‘Bokeh’) look very different from each other. Finally, remember that expensive lenses don’t necessarily have a more pleasing out-of-focus experience.

Andrew, thanks for sharing your photos, and good luck with your future photography!


Do you enjoy a smattering of random photography links? Well, squire, I welcome thee to join me on Twitter -

© Kamps Consulting Ltd. This article is licenced for use on Pixiq only. Please do not reproduce wholly or in part without a license. More info.