slr camera

EISA 2013-2014: who won what

In 1982, the editors of 20 European publications met to dole out a 'Camera of the Year' award. It went to the Minolta X700. From that meeting, EISA—the European Imaging and Sound Association—was formed and since then, the group comprising representatives from 50 magazines across 20 European countries has been doling out awards that recognise excellence in consumer electronics every June. The awards have grown considerably since 1982 and now encompass audio, home theatre, in-car electronics, video, mobile, and green categories as well as the original 'Camera of the Year' prize. And yes, the photo category is far more extensive than just 'Camera of the Year' now. Looking at the winners, its a broad reflection of where manufacturers are deploying their resources and focusing their efforts. Nothing is especially surprising in the camera categories, but perhaps the lens classes are of more note?

Here's the run-down:

Cameras

Camera 2013-2014: Nikon D7100

Advanced Camera: Sony Alpha SLT-A99

SLR Camera: Canon EOS 100D

Advanced SLR Camera: Canon EOS 6D

Compact System Camera: Samsung NX300

Advanced Compact System Camera: Olympus PEN E-P5

Compact Camera: Sony Cyber-shot DSC-HX50/HX50V

Advanced Compact Camera: Fujifilm X100S

Travel Camera: Olympus TOUGH TG-2

Lenses

Lens 2013-2014: Tamron SP 90 mm ƒ/2.8 Di VC USD Macro 1:1

Zoom Lens: Tamron SP 70-200 mm ƒ/2.8 Di VC USD

Professional lens: Canon EF 200-400mm ƒ/4L IS USM Extender 1.4x

Compact System Lens: ZEISS Touit 2.8/12

Compact System Zoom Lens: Panasonic LUMIX G Vario 14-140 mm ƒ/3.5-5.6

Photo-Video cameras

Photo-Video Camera 2013-2014: Panasonic Lumix DMC-GH3

Photo-Video Accessory: Manfrotto MVH500AH

Action Cam: GoPro HERO3 Black Edition

Software

Photo Software: DxO Optics Pro 8

Innovation of the Year

Photo Innovation 2013-2014: Samsung Galaxy NX

Video on SLR cameras? Not for me.

I'm all for hacking your camera and computer equipment, but if you have to go to these lengths to make the equipment usable, I cannot help but think that there must be a better solution. And if there is none, there will be soon.

There has been a huge craze storming through the tech world for a while now: The ability of shooting high-end, high-definition video with a dSLR camera.

At first, it was a bit of a novelty, and people didn’t really know what the hell to do with it. Then, some photographers realised that it’s actually sort of nifty, and that you can achieve incredible results on a tidy budget. Then, finally it went all a bit silly, and a lot of videographers leapt on the bandwagon.

Personally, I think it’s a waste of time and a complete fad. I’ll tell you why.

What’s good about video with a dSLR?
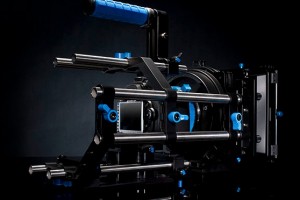
There is a SLR camera in there, somewhere, but if you have to add several lengths worth of metal tubing to your camera to adapt it to be useful as a video camera, it is probably not a good sign.

Videographers have for many years been using dedicated video cameras, whether they are ones with high-quality lenses built in, or the high-end, interchangeable lens, 3CCD jobbies.

There are lots of reasons for using a high-end camera: The bigger sensor sizes make a huge difference to the quality of video you can record; multiple CCD makes sense to get better colour reproduction; and interchangeable lenses means that your camera body is perfect for any job.

The biggest problem with interchangeable-lens video cameras, however, is one of production volumes: By its nature, fewer people own video cameras (especially high-end video cameras) – and the kind of people who are willing to part with vast amounts of cash for the privilege of shooting with a top-of-the-line video camera are probably professionals who get paid for their work. Canon and Sony (who manufacture many of the high-end video cameras) know this, and price their products accordingly.

As such, the bodies are expensive, and the additional lenses you can buy for these lenses are obscenely expensive.

So, when the dSLR manufacturers started including video on their SLR bodies – first almost as an afterthought, later with some more planning and better integration – a lot of people perked up. SLR lenses can be had cheaply (a consumer SLR lens is often vastly superior to a much more expensive fixed-lens video camera lens, for a variety of reasons), and the expensive SLR lenses are on par with – if not superior to – their video counterparts, whilst being a lot cheaper.

Consequently, videographers creamed their proverbial pants, and ran out to buy camera bodies, whether full frame (Canon EOS 5D mk2 et al) or crop-frame (7D et al), and a whole load of different lenses.

Cinema-quality video output with home-video price tag? What could possibly be wrong about that?

The case against SLR video

In the hands of talented people – including the man who has become a bit of an icon of the SLR-as-video-camera movement, Philip Bloom, a lot of deeply impressive video content has been created. In the case of Bloom, however, we’re talking about an experienced videographer who understands better than most the advantages and downfalls of this sparkly new format; Whether through design or instinctively, he has found ways around the downsides.
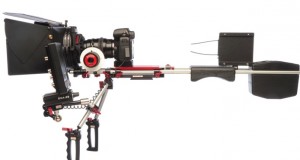
I'm all for hacking your camera and computer equipment, but if you have to go to these lengths to make the equipment usable, I cannot help but think that there must be a better solution. And if there is none, there will be soon.

The biggest problem with moving images vs. still images is that you handle the camera in a fundamentally different way. Imagine, for a moment, that you are holding a camera. You’re probably holding your hands out in front of you, with your right hand supporting the camera body, your index finger poised over the shutter button. When you take a photo, you have to hold this pose, completely quietly, for 1/60th of a second. Click. Flash. Job done.

When you’re filming video, you’re essentially doing the same thing, but 30 (or 25 or 24, depending on what format you are video’ing in) times per second. Suddenly, the device which has evolved from being a photography creation device is no longer as comfortable.

Of course, crafty aftermarket equipment manufacturers came up with loads of solutions. There are geared wheels for pulling zoom and focus. There are eye-cups, grip straps, etc. And then it all got a little bit silly: You can buy an elaborate ‘DSLR-Marksman shoulder support’ rig, at the same price as you originally paid for your DSLR body; cages for your dSLR so you can strap lights and microphone rigs to it, etc.

To me, the fact that you have to buy a camera body and then have to invest the same (or more) amount of money again can mean one of two things: 1) it’s a very flexible and modular system; the best thing ever to have come to the world of digital videography. Or 2) the whole SLR form factor is simply not fit for purpose, and is a stop-gap until something better comes along.

I know that a lot of the SLR-Video crowd feel passionately that option #1, above, is correct, but I’m willing to bet that a lot of them know, in their heart of hearts, that what’s going on in the DSLR-video world is weird and not all that helpful: Your viewfinders suck. Sound recording is haphazard at best. The video files are inflexible.

So, what’s going to happen?
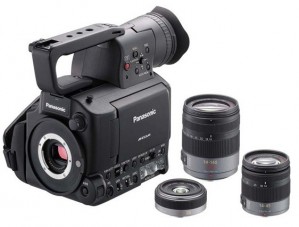
Panasonic recently launched this hideous-looking beast. It has one saving grace: it uses four-thirds camera lenses, which means there are lots of lenses available, from many different manufacturers.

To me, it seems that dSLR video has two advantages over other way of shooting video.

1) SLR cameras use SLR lens mounts. That means you can buy awesome lenses for not-a-lot-of-money.

2) SLR cameras have huge sensors, compared to their typical video equivalents, which gives a ‘look’ which is much closer to Hollywood than America’s Funniest Home Videos.

Don’t get me wrong: Both these points are golddust, and great reasons for shooting with SLR cameras. But it’s not going to last. Why?

The camera manufacturers are watching closely; I know that many of the prominent members of the SLR-video world have been approached by camera manufacturers, who want to talk to them about exciting new developments.
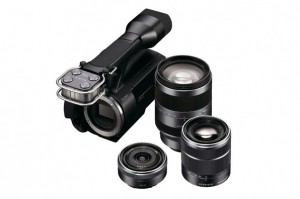
Sony is catching on too, with more affordable camcorders using consumer-grade (and potentially more exotic) lenses.

It’s only a question of time before Canon, Nikon and the rest of the gang cotton on, and start releasing proper video cameras – with a form factor that makes sense, proper audio capabilities, better file formats, decent viewfinders, and controls more finely attuned to the task at hand – whilst keeping the things we’ve grown to love about DSLR cameras: The lens mount and the sensor size.

I’m impressed by what people have been able to do with SLR cameras, and I admire the willingness to ‘hack’ the camera systems to be more suitable. As far as I’m concerned, it’s unfinished technology, poorly implemented, and not fit for purpose… But I’m willing to bet that’s going to change in the next 12 months.

When not to use your flash

It always amazes me how often people just leave their flashes turned on all the time – or, more accurately, how great people’s faith is in the camera’s ‘automatic’ setting. To wit: I recently had the pleasure of dragging myself out at bed before dawn to photograph the sunrise at the legendary Angkor Wat temple in Cambodia. Now, this temple is famous for being beautiful and facing west, which makes it great for sunrises. Multiply that with the fact that Angkor Wat is a tourist trap of epic proportions at the quietest of days, and you might imagine that the place attracts a fair few people.

20110506_img_5760_5184_x_3456.jpg

I got to the location by the light of my flashlight – and slowly the sky started changing colors, as the sun was climbing its slow ascent past the horizon. Unsurprisingly, lots of my fellow tourists were taking photos of the sunset. Surprisingly, a huge proportion of them were taking photos with a flash.

When is a flash useful?

All flashes have a ‘guide number’. This is a number given in feet and meters, and gives a good indication for how far away you can expect the flash to reach. Typically, for a compact camera, the flash range will be 5-7 meters (16-23 ft). The pop-up flash built into an SLR camera can have a range of 10-15 meters (32-49 ft) at the most, and EVIL cameras tend to fall in between the compact cameras.

20110328_img_1481_3648_x_2736.jpg

A flash having to be fully charged and fired at full power isn’t great for your camera’s battery life, and it takes a relatively long time to cycle the power (i.e. from taking a photo, until your camera is ready to take another shot), which isn’t all that helpful when you’re standing around waiting for your camera so you can take another picture.

In general, it’s recommended to try to keep your flash at around 50-70% of its output – this tends to be a nice balance between flash charge time, and battery usage. This means that on a compact camera, you should only expect about 3 meters (10 ft) of useable flash range. That’s perfect for indoor snapshot portraits when it’s dark, and not for a lot else.

If you want a flash that charges faster and has significantly more power, start looking for an accessory flash.

ch2_fl_50r.jpeg

When’s the flash not useful?

The built-in flash isn’t very powerful – so unless you are taking a photo of someone that’s close enough that you can throw a stuffed animal at them, turn off your flash.

Whatever you do, don’t be one of the hundreds and hundreds people at a famous landmark after sunset, taking photos with your compact camera with the built-in flash turned on: There’s no way your flash is going to reach that building 600 yards away, so you may as well save your battery…


Do you enjoy a smattering of random photography links? Well, squire, I welcome thee to join me on Twitter -

© Kamps Consulting Ltd. This article is licenced for use on Pixiq only. Please do not reproduce wholly or in part without a license. More info.

High speed flash sync: Photo-geekery at its finest


This photo was taken at broad daylight. Because I used flash and a fast shutter speed, it comes out looking like this...

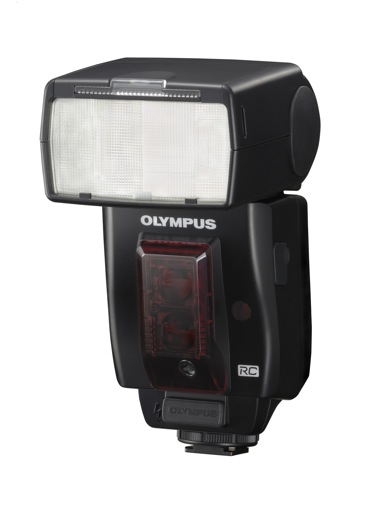
I am a photo geek. I admit it. I love photography technology - especially the crazy high-tech stuff the camera manufacturers come up with. One of the most incredible pieces of electronic engineering you can buy in the photography world today is a humble flash. I'll tell you why...

In most circumstances, your flash can sync with your camera up to a certain shutter speed. back in the dawn of photography, this 'sync speed' used to be 1/60 second on most cameras. When you buy a SLR camera and a flashgun today these days, standard flash sync is 1/200th or 1/250th of a second for almost all makes and models of camera equipment.

But then, the camera boffins came up with something deeply awesome: High-speed flash sync. To understand why you need it, and to explain how and why it works we need to take a look at how flashes work normally.

How a flash works

shutters_1.jpg

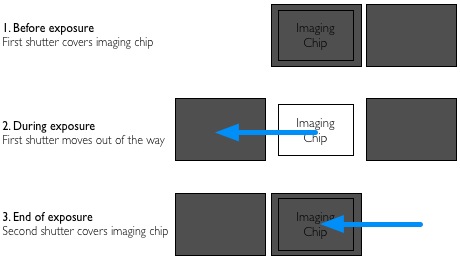
Inside your camera, there are two pieces of black fabric (known as 'curtains' - this is also where the expression 'second curtain flash' comes from) that move across the sensor at very high speed. Think of this whole set-up as a window that has two curtains that go all the way across the window. When you press the button, one curtain is pulled from left to right, and at the end of the exposure, the second curtain is pulled across to cover the window again. Once the exposure is complete, both curtains are returned to their original position on the left, ready for the next exposure.

Only a few years ago, when we were shooting on film cameras that had a manual advance lever, these curtains were on springs. When you were pulling the thumb lever to forward to the next frame on your roll of film, you would also pulling the two curtains back in preparation for the next exposure.

When your flash is in normal flash mode, the following happens: You press the shutter. The first curtain of the shutter opens fully, and the camera sends a signal to the flashes, and the flashes fire. At the end of the exposure (whether the exposure is short or long), the second curtain is pulled across to finish the exposure. If you had your camera set to 'second curtain' sync, the flash would trigger just before the closing curtain gets pulled back to cover the sensor.

Flash at higher speeds

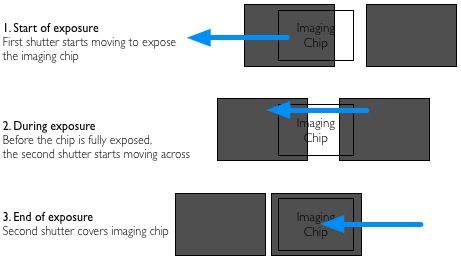
When you start talking about very fast exposures - like the 1/8000 second exposure offered by cutting-edge SLR cameras - but basically at any speed faster than the camera's flash sync speed, something interesting happens.

shutters_2.jpg

The shutter curtains themselves move incredibly fast, but when you're talking about extremely fast shutter speeds, the speed of the shutters starts to become a factor: As the shutter has to be open for such a brief period of time, the closing shutter actually starts moving before the opening shutter has finished moving. The effect is that the whole imaging chip does get the same amount of light, but the imaging sensor is never exposed all at the same time.

If you're shooting in natural light, this isn't a problem at all, but if you want to add a flash to the mix, it becomes tricky: If the shutter is never fully open, when do you fire the flashes?

The ingenious solution

Flash manufacturers realised that people still wanted to use flash even at high shutter speeds, came up with an ingenious solution: High speed sync mode, which changes the way your flash works, enabling you to take photos at much higher shutter speeds.

When the flash is set to high-speed mode, instead of a single flash once the shutter opens, the flash actually sends lots of tiny flash pulses for the duration of the exposure. This ensures that the subject is evenly lit as the shutter curtains move across the sensor: Perfect exposures even though the sensor is never open all at once!

So, is there a downside? Well, in High Speed sync mode, your flashes do take significantly more power, so you drain the batteries much faster. On the other hand, if you need it, use it: The effects can be incredible, and it gives you a lot more flexibility in your flash photography!

Now in video form!

I did a video for Gizmodo UK about high speed flash sync; in all its poorly-animated glory here:

So what can you use it for?

You can use high speed flash sync for lots of things - but start by having a look at Darkening a Room by Adding Light - that should bring you a few ideas!


Do you enjoy a smattering of random photography links? Well, squire, I welcome thee to join me on Twitter -

© Kamps Consulting Ltd. This article is licenced for use on Pixiq only. Please do not reproduce wholly or in part without a license. More info.

The best camera is one you actually use

blurry-haje

Those of you who are following @photocritic on Twitter (or, in fact, if you were paying attention to the RSS feed), can’t have failed to notice that I was out on the road. If you’re making a particularly good job of stalking me, you’ll also have noted a load of photos posted to my Flickr stream, most of which were taken with my iPhone, and some of ‘em were taken with my little Canon Digital Ixus camera.

Yes, that’s right, I was out globetrotting – on a motorcycle, to be precise. Due to the extremely limited space I had available to me, I didn’t bring my full assortment of lenses with me. In fact, I only brought a single lens; My mighty fine Canon 50mm f/1.4 prime lens (I know I keep banging on about it, but you need a prime lens). Then, as I was traveling around, something very, very interesting happened; I didn’t use my SLR camera at all.  


What? No SLR?! You call yourself a photographer?!

I know, it surprised me, too; I brought my little Canon digital IXUS camera with me as a back-up camera, in case something happened with my big camera. And in case I was planning on going out drinking, in which case I consider the IXUS to be as close to you get as a disposable digital camera (have you noticed that you never lose anything you don’t really worry about losing, and always lose or drop your expensive stuff? Exactly…)

So anyway, I was riding along, and the first 1,500 miles, it was raining, and I had my Canon EOS 450D in the top box of my motorcycle. Which means that in order to actually get to it, I would have to:

  • Spot something awesome
  • Get on the brakes, nearly causing an accident with the car driving behind me
  • Park the bike
  • Put the bike on its side-stand
  • Take the key out of the ignition
  • Unlock and open the back box
  • Take the camera out of the back-box
  • Take off my gloves and helmet (can’t use the SLR with my helmet on)
  • Point the camera, take the photo
  • Put the camera back in the back-box
  • Close and lock the back-box
  • Get back on the bike
  • Start the bike
  • Ride off into the sunset

By comparison, taking pictures with my Digital Ixus was much easier; I was less worried about it getting wet, so I just carried it in the inside pocket of my leather motorcycle jacket. That means it’s protected from the rain by my outter rain layer and the jacket itself. As it turned out, this was more than a-plenty: The camera came out perfectly dry every time. Because of this, it was a lot easier to take photos:

  • Spot something awesome
  • Get on the brakes, still nearly getting myself killed because cage-drivers never pay attention, and because my motorcycle brakes are an order of magnitude better than any car brakes
  • Find somewhere safe to stop, and hold the bike upright with my thighs
  • Reach in my inner pocket
  • Point the camera, take the photo
  • Put camera back in inner pocket
  • Ride off into the sunset

All about the opportunism and impulsivity

Now, the fact that I was able to stop on a whim, fish out a camera without having to stop the motorcycle’s engine, without having to lock and unlock the suitcase strapped to the back of the bike, and without having to take my gloves and helmet off, meant that I started the trip taking photos with the Ixus…

… And then never stopped. Sure, at one point (after it stopped raining, of course) I moved the 450D into the tank bag, so it would be easily accessible, but even then, the hassle of taking my helmet off (you’d be surprised: I have to take my gloves off, take my glasses off, then undo the buckle, pull it off of my head, put it somewhere safe so it doesn’t fall off. Then when I want to put it back on, I have to put my ear-plugs (or headphones, if I’m in a music-kind-of-mood) back in, because they invariably get unsettled by taking my helmet off) seemed like too much of an obstacle to bother.

So, despite riding 3500 miles through some of the most amazing landscapes known to man (Seriously, if you’ve never been to Norway, I highly recommend riding or driving from Oslo to Bergen via the Hardangervidda road over the mountain pass, and then follow the coast around all the way to Kristiansand. You’ll be awestruck in the original sense of the word), I never really felt inclined to dig out my SLR camera. In fact, of all the things I brought with me in my (admittedly very limited-spaced) luggage, there were only three things I didn’t use: My long underwear (It never got cold enough to warrant putting them on), my Tyreweld kit (because I didn’t have any punctures) and my Canon EOS 450D.

Needless to say, when you’re on the road for 3 weeks, it gives you a lot of time to think. In the last week, I spent a lot of time wondering if perhaps I should dig out my SLR camera and try taking some photos. And yet, I never did. Which made me think; am I really so lazy that I’m willing to pass up the opportunity for some awesome photos, just because I can’t be arsed digging out a proper camera?

But… Why?!

Part of the reason, I think, is that this tour was never really meant to be a photo tour – if it were, I think I would have taken the time. This trip was meant to act as punctuation between my previous job (which I hated with the passion of an iberian street argument), and my my new job as a writer. But ultimately, I’m still a photographer at heart… So why?

Then it dawned on me; the very same argument for not being bothered to dig out a proper camera is the precise reason why the Apple iPhone is topping the lists for most uploaded photos on Flickr, and why camera phones are so incredibly popular: Phones, by their very nature, have to be very accessible: It’s no good having a telephone which needs to be locked out of a case, taken out of a protective pouch, and pampered into life before you can answer a call. It rings, you fish it out of your hand-bag or pocket, you answer it. This accessibility – and expectation of accessibility – is what makes camera phones such great photography tools; reaching for your mobile phone has become a well-trained movement, whereas most of us are more careful with our cameras. When going out on the lash for a night, you do bring your phone, but you might not bring a camera, for example.

I know I have been slightly schizophrenic in my reaction to camera phones; my hatred of their poor quality optics and results is stemmed by their accessibility (‘everyone’ has a mobile phone, and I defy you to find a mobile phone which doesn’t have a camera on it these days) and ubiquitous presence. Formally, and officially: Camera phones are a good thing. I’ll tell you why:

On this trip, I discovered that having a compact camera which I use is infinitely better than a SLR camera that I don’t use, even if the latter has has the potential for much better photos than the former.

The best camera you own is the one you actually end up using… and that’s worth keeping in mind when you pack for a trip, I think…


Do you enjoy a smattering of random photography links? Well, squire, I welcome thee to join me on Twitter -

© Kamps Consulting Ltd. This article is licenced for use on Pixiq only. Please do not reproduce wholly or in part without a license. More info.

Removing the IR filter from an SLR camera

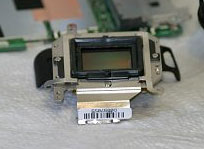
Picture-2.jpgThis one falls in the “if you are planning to do this, you have to hate your SLR” category. If you enjoyed our earlier tip about IR photography, you will probably have noticed that many cameras – especially DSLR cameras – have IR filters built into the body. Obviously, that means that you can’t use it for IR photography. Unless you remove the filter, that is… I wouldn’t dare do it to my own camera, but if you have a destructive streak (or very steady hands), you could follow the instructions posted on this page. It concerns the Canon EOS 350d, but the procedure should be similar for most camera brands:

1) Take the whole thing apart 2) Locate the IR filter 3) Remove the IR filter 4) Put the whole thing back together again

Hey, we never said it was going to be easy!