depth of field

Depth-of-field in greater detail

We're probably all familiar with the notion of aperture controlling the depth-of-field in our photos. By using a faster aperture, you create a shallower depth-of-field. To keep more of your image in focus, you need to use a smaller aperture. But there's a whole lot more to depth-of-field than adjusting your aperture to get more or less of the scene in focus.

'Acceptably sharp'

Let's start with setting out what we mean by depth-of-field. It's the range of distance in a photo that is considered to be 'acceptably sharp', or what we would regard as 'in focus'. Only the actual point of focus in a photograph is definitively sharp and 'in focus'; depth-of-field describes the zone of acceptable sharpness either side of it. A wider band of 'acceptable sharpness' running through an image equates to a greater depth-of-field. To introduce more blur into your photos you would want a shallower depth-of-field with a narrower band that's 'acceptably sharp'.

A shallow depth-of-field with a gradual fall-off

It's worth remembering that there's no sudden transtition from 'sharp' to 'unsharp': focus falls off gently on either side of the plane of focus, regardless of the aperture you use. It is fair to say, though, that larger apertures have a more rapid transition from in- to out-of-focus than larger apertures.

[gallery ids="6855,6856,6857"]

Controlling the depth-of-field in an image is achieved primarily by adjusting your aperture—a smaller aperture for a greater depth-of-field; a larger aperture for a shallower depth-of-field—however, there are other factors that affect it, too.

Focal length

You'll often hear people say that telephoto lenses have a shallower depth-of-field than wider angled lenses. This isn’t strictly true. It’s more accurate to say that because telephoto lenses are mostly used to magnify subjects, and the subject will then fill more of the frame relative to the background, the depth-of-field appears to be shallower.

200mm; ƒ/3.2

All the same, it's worth capitalising on the magnifying effect from telephoto lenses to pick out your subjects and surround them with blurred foregounds and backgrounds.

Subject-to-lens proximity

If you've ever practised macro photography, you'll appreciate how getting closer to your subject makes it harder to get it all sharp. The closer that you position your subject to your lens, the shallower your depth-of-field will be. Choose a subject further into the background and you'll find that the depth-of-field surrounding it is larger.

Crazy-shallow depth-of-field with a macro lens

Distribution of acceptable sharpness

Depending on the focal length you use, you will find that the depth-of-field isn't divided equally in front of and behind the plane of focus. Instead, the area of acceptable sharpness behind the point of focus is generally larger than that extending in front of the focal plane. As focal length increases, so too does the distribution of the depth-of-field in front of the subject.

When you shoot with a focal length of 15mm about two thirds of the depth-of-field will be behind the subject and one third in front of it. When you get to 400mm it's closer to a fifty-fifty divide.

Depth-of-field: not just about aperture.

What is aperture?

Learning anything new comes with a whole spectrum of principles, terminology, and practices that have the potential to boil your brain, leave you mildly confused, or anywhere in between whilst you're getting to grips with them. Photography definitely comes with its own theories, vocabulary, and conventions and not knowing what people are talking about when they refer to 'noise' or 'speed' can make you feel about a pixel tall. To try to ease people's paths in photography and prevent eye-swivelling, mind-frying, and either mild or acute embarrassment, we're running a series on photography fundamentals, throwing a bit more light on the things you need to know. I could say that we're starting with aperture because it begins with a, but I'd be lying. We're starting with aperture because it was the first thing that sprang to mind.

Aperture: it might be basic, but it can also be a bit of a stumbling block for people who are just beginning in photography. For a start, altering aperture doesn't have a single effect on your images, but a dual one. As if that isn't enough to confound people, its scale isn't exactly intuitive. Still, understanding aperture is critical for both exposure and composition—the bedrock of photography—so we'd best crack on.

Aperture and light

Aperture means ‘hole’ or ‘opening’. In a photography sense, the aperture is the gap that allows light to pass through the lens. The bigger the opening, or the aperture, the more light passes through. That’s pretty intuitive. When you’re taking pictures in low-light settings, a bigger aperture will help you to take a photo where you can see something.

In order to get enough light onto my sensor, I used an aperture of ƒ/1.8 here

If you’re taking pictures in bright sunlight, using a smaller aperture will help to prevent the image being one mass of white.

Aperture and depth of field

The second effect that aperture has on photographs concerns depth of field, or how much of an image is in focus. If you use a small aperture, you will notice that the depth of field in your photos will increase: more things in the background and foreground will be in focus. Landscapes often benefit from small apertures. In this case, ƒ/11 was used to photograph Mount Etna

Conversely, by increasing the size of your aperture (and allowing more light to reach your sensor), you will decrease the depth of field in an image. That means that less of the scene will be in focus.

Sanguinello

An aperture of ƒ/1.8 meant only a sliver of this blood orange was in sharp focus

Measuring aperture

When you hear people throwing around numbers such as ƒ/1.8, or ƒ/22, they are referring to aperture. Aperture is measured in ƒ-stops, with ƒ/1.4 being a very big aperture and ƒ/22 a very small aperture.

That the large number represents a small aperture and the small number indicates a large aperture can be more than a bit confusing. It will probably help to think of the ƒ-stop scale like this: those numbers correspond to fractions; the fraction being how big the aperture—or the opening—is. Thus ƒ/4 corresponds to a quarter and ƒ/8 to an eighth. An eighth is obviously smaller than a quarter; this means that it is a smaller aperture, it lets in less light and it gives a greater depth of field.

Finally, perhaps you're wondering what those fractions are fractions of? They’re fractions of the length of the lens you’re using. The aperture of a 28mm lens at ƒ/1 will be 28mm. Similarly, the aperture of a 50mm lens at ƒ/4 will be 12.5mm. The bigger the ƒ-stop, the smaller the aperture.

TL;DR

  • Aperture means hole, gap, or opening
  • A smaller aperture lets in less light, good for shooting on sunny days; a larger aperture lets in more light, good for shooting when it's dim
  • A smaller aperture gives a greater depth of field, bringing more of the background into focus; a larger aperture gives a shallower depth of field with less in focus
  • Aperture is measured in ƒ-stops
  • F-stops correspond to fractions
  • The higher the ƒ-stop number, the smaller the fraction, and the smaller the aperture

You know what, go out and take some photos altering the aperture value on your camera. Then you’ll see what we mean!


Photography Fundamentals >> Contrast

So, you have a new SLR camera… Now what?

If you’ve been extra super special good over the past year, you might have woken up to Christmas Day with a brand spanking new SLR camera under the Christmas tree.

I don’t want to ruin your sparkly-new-camera buzz, but may I please just take this opportunity to remind you that your shiny new dSLR is still just a tool: Sure, it’s a bloody good tool with lots of new buttons and levers and settings… It doesn’t matter whether you’ve just graduated from a compact camera or perhaps from an older, film-based SLR camera: It’s still all down to you: Your camera might be more powerful than the computers they used to put a man on the moon, but it will still only do what you tell it to. Think of it this way: switching from a 28 year old Datsun to a brand new Maserati won’t make you a better driver, and trading in your battered old Olympus Trip with a shiny new megapixel monster isn’t going to make you a better photographer.

What you have gained, however, is a tremendous amount of new potential. Your new tool will have a ton of new features. Buried somewhere deep behind all those new wheels and buttons is the doorway to life as a better photographer.

Here are the 10 next things you should do to become a better snapper:

screen_shot_2012_01_02_at_124552.jpg1) Read your camera’s manual. I know, you’d be hard-pushed for thinking of anything more boring to do than read a camera manual, but I’ve made a habit of reading every manual of every camera I’ve ever had: It’s the only way to fully understand all the features of your camera and where to find them. Except the A-DEP feature (Automatic Depth of Field), of course. Nobody understands the point of that.

2) Start paying attention to what your camera is doing. Even if you decide to start gently and turn your camera to ‘P’ for Program Mode, it’s a good idea to start keeping an eye on the aperture / shutter combinations your camera is choosing for you. It may take you a while, but slowly and with some practice, you’ll be able to start guessing what your camera’s exposure choices are

3) Try Manual Mode. As soon as you dare, try turning your camera to Manual Exposure mode for a week. You don’t have to keep it there - most photographers use a range of different photography modes - but getting used to your camera controls goes a lot quicker when you have to change all the settings yourself. One top tip: Even in manual mode, you’re not on your own; your camera will still tell you whether it thinks you are about to over- or under-expose your photographs. Feel free to ignore it and expose however you like; it won’t mind. You’re the boss

4) Learn how to use the histogram on your camera. The LCD display on the back of your camera is great for checking colours and composition, but don’t trust it to show you what your exposures are like: Use your histogram for the scientific approach to getting your exposures right!

5) Don’t worry about wasting film. Yeah; I said it: New SLR users are often shy about taking photos, but there’s absolutely no reason to be. Look at it this way: if 1% of your photos come out as masterpieces, it’s better to take 5,000 photos than 50; if you take five thousand shots, you’ll have 50 great shots. If you only take 50, you may not have any. Best of all, the more photos you take, the more comfortable you get with your camera, and the better that percentage gets. Take tons of pictures, you can always delete the rubbish ones later.

6) Don’t be tempted to buy more kit. A SLR with a kit lens is an incredibly powerful combination. Sure, there are tripods, flashes, more lenses, and other gadgets you can buy, but until you are comfortable with… We had you going for a while there, didn’t we?  Ignore us: Buy all the awesome accessories you can lay your hands on, photography is a hell of a lot more fun with gadgets, and it’s a good way to learn as well!

7) Shoot in raw. No, seriously. Shoot in RAW. Stop reading this article right now, switch your camera to RAW mode, and don’t look back.

8) Get some good software. Personally, I’m addicted to Adobe Lightroom, but Aperture is pretty decent, too. You’ll want a solid piece of software to help you deal with those raw files, to make adjustments to your shots, and to help keep track of all your photos.

9) Sign up for Flickr. Flickr is a great way to show off your photos, and it’s great fun to track your own progress as you get better. The first 200 photos are free, and after that, you can get a Pro account for less than a week’s supply of lattes. Then, spam all your photography mates with your Flickr profile, and bribe, beg, or threaten them into giving you feed-back on your photos. Some sobering comments and constructive criticism is the fastest short-cut to better photographs.

10) Imitate your favourites. The quickest way to become a great photographer is to plagiarise the hell out of photographers you admire. Pick 10 photos you really admire, and go about recreating them: Learn the techniques you need, jump through all the hoops they did, and try to get your photo to be as close to identical as possible. Done? Great, you’ve committed copyright infringement. Ssh, don’t tell anyone. On the bright side, you’ve learned a load in the process, haven’t you? So now take the photo you just took, and add your own twist to it; replace, improve, or change something. Let it become the first step of an evolution of your photographic style - pick the bits you love from photographers you admire, and mash them together to create your own style.

Enjoy your new piece of equipment, but never forget that the bottleneck in this creative process is you: your shiny new toy is going to help you, but without you, it’s nothing. Show it who’s boss, and get out there and snap some fantastic shots.

Good luck!

This article was originally posted on the Usual Shutter Specs, an awesome photography gadgets site based in the UK.


Equivalent exposures

Changing, say, the aperture on your camera changes things beyond the amount of light that gets into your camera. As such, you might decide that you want a smaller aperture, in order to get a greater depth of field. A smaller aperture means that less light comes in to the camera. How do we solve this?

Your camera has three different adjustments for exposure: Shutter speed, aperture, and ISO. If you adjust one so the exposure would be brighter, you can adjust another one to compensate for the additional light captured.

For example: Let’s start with an exposure taken at 1/100 second, f/4.0 and ISO 200. Now, you can change your camera settings to 1/200 second. That would let half the amount of light into your camera compared to 1/100 second, because the shutter is only open for half the duration. Your photo will now be darker. If you change your ISO to 400, the sensitivity of the sensor is doubled, and the photo will come out looking more or less the same, from a brightness point of view, as with your original exposure.

You can change any of the settings to compensate for any of the other settings: A smaller aperture can make up for a higher ISO, a faster shutter speed can make up for a larger aperture, and a lower ISO can make up for a slower shutter speed.

Other effects of exposure changes

Of course, ISO, Aperture and shutter speed don't just affect the brightness of the image... Here's a handy reminder for what else they affect:

brighter_darker_600_v2.jpg


Easy peasy!

Two steps closer to the perfect photo


Breaking the rule of thirds works well often - especially in scenes like this

Few things confuse me more than someone asking me what camera I use. I understand the question, but I can't help but wonder why the answer would tell them anything about me as a photographer. After all - a painter is rarely asked about what brand of brushes she uses, nor do people care much about which word processor a novelist used.

Great photographs aren't made by a camera-and-lens combination; the equipment you hold in your hands and the tools you use to take the image from RAW file to final JPEG are completely irrelevant to most discussions about photography as an art form. Why? Because none of these things are the wall that stands between you and your yet-to-be-taken masterpieces.

A great photograph needs two things: It needs a creative vision, backed up by a solid set of technical skills. A photo that has one of these two things nailed can be good - but it won't be great.

Step 1: The technical side

The technical side of photography has myriad different elements to it, and a good photographer has to juggle all of them to create the perfect photograph. Getting a photograph is an equation of lighting, shutter speed, aperture, ISO, focal length, depth of field, focus, blurring (or the absence thereof), and a whole boatload of other variables. As a photographer, you are akin to a scientist using a sophisticated optical instrument, measuring the world around you, one fraction of a second at the time.

Photographers who are just starting out tend to have the biggest problems with the technical side of photography: Over- or under-exposure were the arch-nemeses of many a fledgling snapper. The challenges of avoiding focus blur, camera blur, and subject motion blur... You name it, we've all been there.

Most photography classes (forgive the pun) focus on photography as a technical challenge. In a way, that makes sense: It's the first hurdle that causes many to stumble out of the starting blocks. Sadly, by making photography into science, many new photographers are turned off - there are only so many diatribes about f-stops a right-minded human being can take before they wander off and reach for the Playstation controller.

More depressingly, many photography teachers stop when their students have finally figured out how to get a classroom printer to vomit up a reasonably well-exposed, moderately in-focus image, forgetting what photography was meant to be all about. But I'm getting ahead of myself...

Over time, people learn their tools and what can be done with them. They'll pick up rules, tips and tricks that help them compose well-exposed, correctly white-balanced images that are tack-sharp, well lit, and generally attractive-looking, realistic and accurate depictions of the world.

As you become a more experienced photographer, it's likely that the technical side of photography becomes second nature. Your camera and lens become extensions of your brain, your fingers glide effortlessly over the buttons, and you find yourself tickling the settings to perfection every time. When the time comes to buy a new camera body, you feel that sinking, forlorn feeling of having to re-adjust after the manufacturer moved the buttons around by a fraction of a centimetre on the new version of the camera.

Whilst being able to take technically perfect photos is a surprisingly rare skill, a technically proficient photographer is still merely a technician. Granted, there are places where photographic technicians have a place (archeology, to pick an example at random), but in most cases, merely getting a photo in focus and correctly exposed is not enough.

Step 2: The creative side

Personally, I got started in photography because the technical side of it was interesting to me. Freezing motion with fast shutter speeds - or the exact opposite - was a thrill. Gradually, as I started getting better at the science side of things, I started realising there was more to photography. I started looking at masterpieces by well-known photographers, and after an embarrassingly long time, it dawned on me why their photography was so much better than mine: They had a story to tell.

You've probably been at a party where someone is telling a story and it seems as if everybody is clinging on to the storyteller's every word. The onlookers are practically cheering the narrator on to continue with the incredible tale. I'm willing to bet that this particular raconteur could make any mundane, trivial topic come to life.

If the technical side of photography is the 'how', then the creative side is the 'why'. A great photograph isn't the absence of blur or the perfect exposure: It is telling a visual story, and telling it in such a way that the viewer can't tear themselves away.

Whereas the technical discipline of photography has shutter speeds and ISO choices in its war chest, the creative camp has an impressive array of weapons tucked away, too. The crop of an image, angle, choice of colours, taking the photograph at the decisive moment, being in the right place at the right time, patience, persistence, and the ability to pre-visualise the perfect shot are all aspects of capturing the perfect creative shot.

If a technically proficient photographer without creative insight is a technician, the opposite - a creative snapper without technical skills - would be a whiney art student. You know the type: They'll have an extensive portfolio of 'artfully out of focus' shots that have been photoshopped, textured and filtered to within an inch of their miserable photographic lives.

Don't get me wrong - I don't have a problem with people who bend the 'rules' of photography for creative effect. Quite the opposite, in fact. I do, however, encourage people to understand the photographic principles they are flaunting. Break all the rules you like, but as a creative photographer, you have to know why and how you are throwing convention to the wind.

When I am teaching, I am secretly more excited about students who come brimming with ideas but no photography skills, than the ones who know a lot about photography but haven't had an original thought in their skulls: The challenge with the creative perspective of the photographic quandary is that creativity is bone-cursingly difficult to teach. Which is a shame, because whilst most photographers eventually become proficient with their equipment, only a few go on to use those technical skills with amazing outcome - and all of that is down to creativity. 

Putting it all together: Becoming a better photographer.

Picasso, it is said, once drew a sketch on a piece of paper for someone, and then charged them a lot of money for it. "Hey, that only took you 10 minutes", the potential buyer reportedly said. "No, that drawing took me 30 years", was the retort. If we assume for a moment that this anecdote is true, I'm completely with Picasso on this one: A photo can less than a thousandth of a second to make, but nobody learns photography in a day.

To improve your photography, the key is to know where your weakness lies. Easier said than done, but I found that adding an extra step to my photographic workflow has been of immense value: For every photo (even if I'm about to bin it for any reason), I make a mental note of two things: A technical, and a creative thing I could do to improve that particular photograph. If, at the end of the photo editing session, it turns out I have made a lot of mental notes about focus, then perhaps the time is ripe to pencil in a practice session. If I seem to forget to leverage the angles of my photography to the best effect, then - guess what - perhaps that's what needs to be worked on.

The great thing about self-evaluation is that this technique works well to improve both your creative process and the technical side of your photography. For every shot you're looking at, the question is simple: What could I have done to make this better? Especially for the photos you are most happy with, the answers are going to be valuable additions to your mental checklist the next time you're out and about with your photography kit. Baby-step by baby-step, you'll get closer to that ever-elusive Perfect Photo.

Using Shallow depth of field

raincoat.jpg

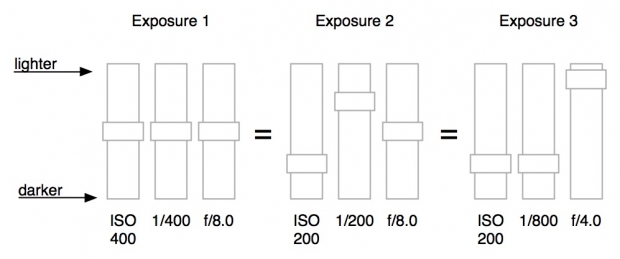
So, you’ve got your exposures down pat, and your framing is getting better by the day. Excellent. What is next? Well, the lovely Andrew Ferguson, who I know via LiveJournal, submitted a couple of photos for critique that illustrate the next logical step forward: Using shallow depth of field in a creative context. 


The first hurdle for many photographers is to get stuff in focus in the first place. The next hurdle is to get the things you want to be out of focus, err, out of focus. Awesome. So how do you go about doing that? Well, let’s learn from Andrew:

Andrew-Ferguson-2.jpg

This photo, which he asked me to take from his overall rather nifty Flickr stream, serves as an excellent example of how you can use DOF to create a multi-layered image.

The eye is automatically drawn to the parts of the photo that are correctly exposed and in focus, whereas the over-exposed background, which is blurry to boot, gets less attention. If this image had been pin-prick sharp all the way, it would not have had any impact whatsoever: The messyness of the people in the background would have seriously detracted from the overall impression of the photograph.

As it stands, I have no idea what the item of jewelry is, or if it means anything. Quite apart from that, the choker the person in the foreground is wearing is vicious-looking, and her black dreaded hair strengthens the impression of a person who has embraced the ‘goth’ lifestyle.

The foreground is rather strongly contrasted with the background, in that it is a very unusual portrait, which can in fact be interpreted in several ways. The two that sprang to mind:

1) The phrase ‘show me your friends and I’ll tell you who you are’ springs to mind with this photo: Instead of showing a full-on portrait of the person who is in focus, the photographer chooses to express her personality through that of her friends, despite the fact that the friends are out of focus.

2) This person is ostracised from her group, and her alternative clothing style, her going-against-the-grain type personality and what comes across as a strong personality is rebelling, but she is paying the prize in the form of loneliness.

If the people in the background had been in school uniforms, or otherwise ‘conformist’ clothing, I would have leaned towards option 2. I believe that this would have made a stronger photograph on an emotional level, too. However, one of the people in the background has blue hair, and the guy standing up seems to have blond dread-locks, which leads me to conclude the 1st explanation.

Obviously, this photograph has a lot going for it in terms of ‘showing a little, hiding a lot’, with multiple possible explanations. It is one of the things I quite like about it, but what really makes this image is how it goes about creating this illusion: By using a very large aperture (f/5.6 at ISO 200 and 24mm focal length, in the case of this photograph), there is only very little of the image that is actually in focus: The foreground model’s jewelry and the far-most locks of hair.

In the beginning of this critique, I explained how this image could easily have been completely rubbish, but I hope that the long-ish monologue (which really wasn’t meant to be quite that long, honest) serves to illustrate how the limited DOF has helped pull this image up. It isn’t perfect — If it were, I would have been able to come up with a more consistent story as to what is going on in this image, and why the people in the background are relevant — but it’s a very fine photograph because it allows the viewer to spend some time thinking, making up his/her mind.

If I were to come up with any ways to improve this image, it would be to use different people in the background, perhaps dressed as jocks, nazis, or even as circus clowns. The point is that they need to serve as either a connection or a contrast, and at present they are too similar, yet too different to offer an unified message in the photo.

Bokeh

bokeh.jpgShallow DOF and bokeh go hand-in-hand as two rather important concepts in photography, and it is something that is worth keeping in mind when you are working with limited depth of field: The type and quality of the lens you are working with has impact on how the out-of-focus parts of your image look. In Andrew’s photo above, the out-of-focus elements of the image are works of impressionistic art in themselves (See the crop to the left, for example).

Because of the beautiful out-of-focus qualities, this image works well. If you experiment with the same, but discover that your out-of-focus backgrounds don’t look as expected, try it with one of your other lenses. If you have any cheap lenses, try with them as well – I have a couple of no-brand, cheap-as-chips lenses that are nigh-on useless for any quality photography, but I keep them around beccause they have tremendous qualities for shallow depth of field photography.

The only real way to find out which lenses work and which ones don’t is to experiment, so have a go!

Andrew’s second photograph is this one, of an old motorbike:

Andrew-Ferguson-1.jpg

… Which I’m not going to say a lot about, other than the fact that it is – yet again – an excellent example of careful use of depth of field.

The photo was taken with a Canon Digital Rebel XT and a moody old 24-105 EF lens at 50mm, 1/250 sec, f/4.0 at ISO 400, and I really enjoy what the increased grain at ISO 400 brings to the photograph. With these kind of lighting conditions, you could easily have shot it at 1/125 ISO 200, or 1/60 ISO 100, but the trade-off of faster shutter time and increased grain works very well, perhaps especially because it’s such a gritty topic of photography.

As a personal preference type thing (i.e lots of people would disagree with me), I think the photograph is too bottom-heavy. The sticker on the fork of the bike is disturbing, and while the dirty, oily rag over the bike, combined with the indicator and the reflector of similar, yet different shades of orange really lift the photo, I think there’s too much going on, and too little of a focal point. I like how you’ve used the rule of thirds in the composition of this photo, and it is fine just the way it is.

Because this is my photo critique, however, and because I can’t let a photo stand without a few suggestions for improvement, I’ll go in line with my usual demands: I would have loved this photo to be a lot tighter, and higher impact.

A humble re-crop suggests the following, for example:

raincoat.jpg

This version uses a different approach to the rule of thirds: it breaks the image by using diagonals. The rain-cover is the only things that stands out in the image because it is teh only thing that is straight down. Everything else is at a diagonal: The rain grid in the background, the boke itself, the outline of the rain cover on the left side, etc. As I say, it’s very much a taste thing, and I would most certainly not insist on an approach such as this one, but I feel that the re-crop also highlights the strength of the original photo – the tack-sharp focus on the bike itself, and the out-of focus-ness of the background.

Finally, the out-of-focus areas on the last photo here shows how much of a difference a different lens can have: The small stones in the asphalt and the slats in the rain grid in the background are not particularly aesthetically pleasing in their own right. Everything else being equal, this photo would have looked rather differently if you had taken it with the same lens as the one you used for the first image.

So, what’s the lesson to take home from this critique? Use a limited DOF to offset your foregrounds effectively, but beware of how different lenses can make the background highlights (‘Bokeh’) look very different from each other. Finally, remember that expensive lenses don’t necessarily have a more pleasing out-of-focus experience.

Andrew, thanks for sharing your photos, and good luck with your future photography!


Do you enjoy a smattering of random photography links? Well, squire, I welcome thee to join me on Twitter -

© Kamps Consulting Ltd. This article is licenced for use on Pixiq only. Please do not reproduce wholly or in part without a license. More info.