good friend

Hardware hacking: Fixing your X100 charger


Without the easy-to-lose piece of plastic, your FujiFilm charger is useless. Let's go DIY on its ass...

I've had a FujiFilm X100 for a while now, and I still don't completely know how I am getting on with it. Sure, I have taken some rather fabulous photos with it, like these ones:

20120215_dscf0564_600px.jpg

20120205_dscf0501_600px.jpg

20111009_dscf8681_600px.jpg

20110930_dscf8142_600px.jpg

The FujiFilm X100 battery charger problem

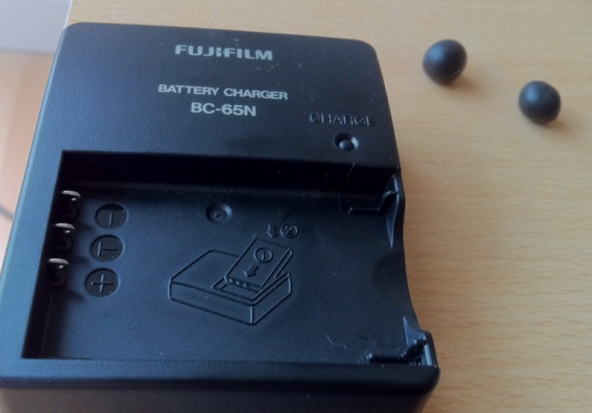
But it is not without its niggles. One of the small but incredibly annoying problems with the X100 is that the battery doesn't fit in the battery charger that comes with it. I know, it sounds completely inane, but it's true: To use the X100's battery in the charger, you have to use a tiny piece of plastic in the charger. Without it, the battery fails to make a connection, and won't charge properly. FujiFilm, if you're reading this: That was a complete bonehead move, and you really ought to be ashamed of yourself.

However, as a DIY photographer, I figured this was my chance to make my own life better. I lost the little piece of plastic nearly immediately, and was using toothpicks to hold the battery in place, but when my good friend Sarah told me about Sugru (by the way, Sugru, if you are reading this you should totally hire Sarah. She is awesome. Also, if you aren't reading this, then you obviously need a new community manager. Which brings me back to my original point: Hire Sarah.), I immediately saw a great use for it: Finally, a way of fixing my X100 charger, permanently and once and for all.

Let's get busy!

So here, offered as a deliciously simply to follow step by step guide: How to fix your FujiFilm x100 charger, by the power of Sugru:

1) Make sure you clean your charger properly; The Sugru is pretty hardy stuff, but if it's dusty or greasy, you're going to get less of a bond:

screen_shot_2012_06_26_at_190128.jpg

2) Take two small balls of Sugru (this was about 1/8th of a 5g packet of Sugru - or a grand total of £0.17 / $0.26 worth), and shape them into, er, balls.

3) Insert the battery into the charger, to make an imprint into the Sugru. Push it into the Sugru ever so slightly, and then remove the battery. The material will keep the shape you've just made, and harden over the next 24 hours.

screen_shot_2012_06_26_at_190142.jpg

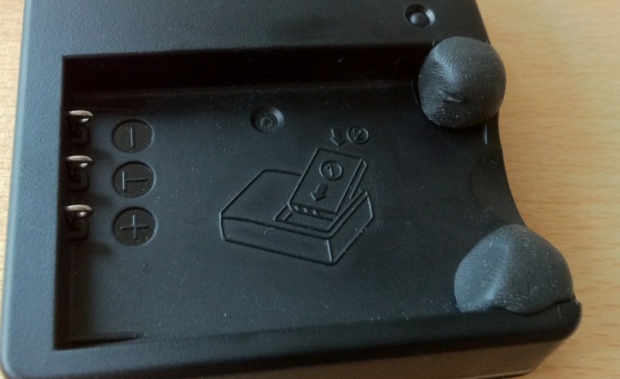
4) Use a wet finger to gently brush off any excess material. Sure, this is an optional step, but if you're going to hack your own camera equipment, you may as well make it look reasonably good.

5) re-insert the battery to make sure it still fits properly, then remove it again

screen_shot_2012_06_26_at_190135.jpg

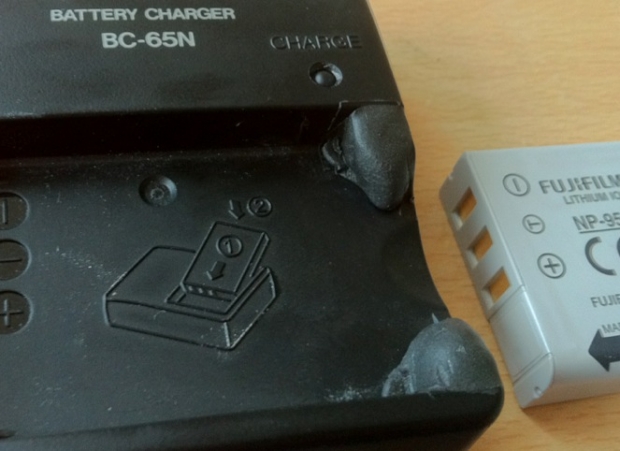
6) Leave it to harden for 24 hours

Congratulations! You've spent pennies on fixing a problem that FujiFilm really should have done right in the first place. More importantly, you can now use your well-earned bragging rights down in the pub, telling everyone that you've improved a piece of your own photography gear!

Painting with light

sculpture_by_sea

You’ve probably seen the effect of camera blur (moving your camera, giving a fuzzy, streaky effect), zoom blur (by zooming during an exposure, I have a modest example here), and motion blur (something moving on camera). But what do you reckon would happen if your scene isn’t moving, your camera is firmly locked down on a tripod, but your light-source moves?

Well, if you can imagine such a thing, you’ve just imagined the bright art of painting with light. I’ve spoken to my good friend Brent Pearson who is ‘a bit good’ at this light painting malarkey, in the same way that Pele is a bit handy with a Football, and Antonio Lucio Vivaldi knew a thing or two about chord progressions.  


“I have enjoyed landscape photography for almost 30 years”, Pearson told me in a recent interview. “However over the past few years my landscape photography has evolved and I’ve started doing more and more long-exposure photography.”

sculpture_by_sea

It was as part of this long-exposure work that I first ‘discovered’ Pearson – he has an amazing way of combining the zen-like peace of landscapes with the chaos of motion and light.

Getting into light painting

“I enjoyed capturing the movement in landscapes and the abstraction that long exposures introduced to my images allowing me to simplify my compositions.”, Pearson explains. Night-time landscape photography was the natural extension of that work

middle_head_bunker

Of course, landscapes are tricky enough when they’re done during the day – take away the sunlight, and you’re up against a whole new set of challenges. “Composing and focusing when you can’t see through the viewfinder is tricky”, Pearson laughs, but obviously there are issues beyond merely not being able to see what the hell you’re doing, like the challenge of calculating your exposure at night without the aid of a light meter, and managing noise of long exposures with a digital SLR.

“With a reasonable amount of experimentation and trial and error I started understanding the techniques that would give me consistent results at night and wanted to continue exploring and experimenting with night photography.”, Pearson explains “… And that is how I was introduced into the world of light painting.”

Light painting is a term that often associated with the creation of light trails in an image, however there is a totally different type of light painting that offers the landscape photographer unprecedented levels of creativity – the painting of landscape images using light sources that are not visible to the camera.

malabar_bunker

“By photographic standards, this is the Wild West!”, Pearson claims, “There are new frontiers to explore and new trails to blaze. There aren’t many photographers doing this type of photography… perhaps because of the technical challenges associated with photographing at night, or perhaps because there are not a lot of comprehensive guides or manuals to help photographers climb the learning curve without becoming frustrated. ”

The Benefits of Landscape Lightpainting

By having control over the light, light painting is like unleashing the control and creativity of studio photography into the outdoors. With the long exposures that are associated with night photography, you are not limited to lights being statically positioned; “free to wander around a scene with various light sources literally painting landscape features with light means you get a completely different level of creative control.”, Pearson says, and lists off some of the extra control you’re granted by taking the camera outside in the dead of night:

You get the chance to control the direction and intensity of light, the quality (by changing your light sources) of the light, and the focus and colour as well, by using light painting techniques, coloured gels, ‘barn doors’, etc

In post-production you also have incredible control to blend your light painted images together with the control of a lighting director using a light mixer.

forrester_rocks

Getting started with light painting

Probably the most important component of light painting is the light source(s) that you use.

“Over the past 12 months I have been trialling a variety of light sources from the humble house torch through to home-built high powered light sources that emit a very even high-quality light”, Pearson says. “My light painting kit now includes three light painting tools: My workhorse light which is a high powered fluorescent light, my camera flash unit, which is great for lighting interiors with colour, and my high-powered head torch LED that can light objects up to 80m away.”

Learn from the master

Pearson has been noticed, and is often approached by people who want to learn the tricks of the trade. “I’ve had numerous photographers ask me how they can learn how to light paint landscapes.”, Pearson says. Like any good teacher, he decided to seize the opportunity and run with it: “I have finally put together a comprehensive step-by-step guide to night photography and landscape light painting” – which is available on his Night Photography Guide website.

caught_in_act

“If you feel like your ready for the next photographic challenge”, Pearson concludes, “then I urge you to get out at night and start discovering a new photographic world!” – and I couldn’t agree with him more! Get over to Brent Pearson’s site and grab a copy of his eBook – it’s well worth the cash, I reckon!

If you’ve taken any light-painted landscapes (or any other style of photography for that matter), do post a comment with the URL in the comments below – I’d love to have a look!


Do you enjoy a smattering of random photography links? Well, squire, I welcome thee to join me on Twitter -

© Kamps Consulting Ltd. This article is licenced for use on Pixiq only. Please do not reproduce wholly or in part without a license. More info.

Dealing with negative critique

It is relatively self-explanatory that doing a photo critique is quite difficult. What few people stop to think about, however, is that receiving a photo critique can be as difficult – if not more difficult: When you move beyond mere snapshots and start putting more of yourself into your photographs, you are a lot more intimately involved with the work you are putting out there.

Putting your photos up for criticism – whether it is at your local photography club, via a site such as DeviantArt, or even when asking a good friend to give some feed-back – is like putting your own head in the guillotine and taking a chance.

Nonetheless, it’s one of the best ways to improve as a photographer, and one of the best lessons you’ll learn is to discover how to deal with negative photo critiques…  

Hayley in the 1950s
Hayley in the 1950s by Photocritic.org, on Flickr

1) It may come across as crass, rude, or wrong, but there may be a kernel of truth in it.

If someone tells you “LOL learn how 2 autofocus, you dweeb”, you need to do 2 things: Live in the happy knowledge that whilst your camera might have had an off day, at least you know how to string a grammatically correct sentence together.

And perhaps that picture is a little bit blurry, now that you look at it closely…

Take a step back, and take commentary on face value. If you honestly can’t say you agree with a piece of criticism, that’s perfectly fine, as long as you are objective enough to be able to try and see it from their viewpoint.

2) They might disagree, but they are your audience.

Ultimately, you are the photographer, and what you decide is how the final result gets done. Nobody can tell you what to do, and if you like your photo, then you’ve won one of the huge battles.

At the same time, it’s quite possible that the people ripping your photos to shreds are the people you were trying to target: whether you’re thinking about selling them as microstock, as art works, or just to give your mum a present is irrelevant.

Your photos are out there for interpretation, and if you care about the message you are sending, you’ll have to go the extra mile to make sure that they aren’t getting misinterpreted.

3) As soon as you let ‘em go, you no longer own ‘em.

It’s the curse of all writers and poets: They spend months – years, even – crafting their masterpiece, and then nobody ‘gets’ it. They all ‘get it’ wrong. Tell you what though, that’s where part of the beauty comes from: If you are taking a photo which you meant to symbolise the innocence of youth, and your first 10 commenters feel it’s a strong commentary on, say, child abuse, then they are per definition right.

It is not your job to interpret your own photographs, it is your job to take them. This is a good thing: if people can make up their own story to go with the photograph – their own connotations and bias, as it were – they are much more likely to connect emotionally with the photograph. If this is achieved; if someone is caused to feel something because of your photo; your mission is complete.

4) They talk. You shut up.

Remember that, just like you are not there to interpret your work, you’re not there to defend it either.

In a way, the best thing you can do is to never respond to any criticism. Let’s be honest – you will never be able to re-create the EXACT same image ever again anyway. Take the criticisms on board as points of reference for future photographs.

Learn from your mistakes, learn about what makes your audience buzz, and learn from your own opinions of your work.

5) Remember that the best works might be universally hated: Be thick-skinned.

Technical aspects of your photographs might be objective: A photo can be accidentally over-exposed, blurry, or have some rubbish in the background which makes your photograph less-than-perfect. Once you start killing the technical foibles of your photographic work one by one (don’t go too perfectionist on it though, it’s not useful to end up deleting all of your photos because of every little detail), the actual creative work starts shining through, and this is where the worst potential for getting hurt comes from.

You can kick yourself for small technical mistakes in your photographs (and you’ll continue making them for the rest of your photographic career), but if people start critiquing your artistic choices, it’s a different thing altogether.

The important thing here is to believe in your own work 100%: If you feel you’ve done it right, and if the image is an accurate representation of what you were trying to do, then all you can do is to shrug off their comments and move on.

Just think about it: Pink Floyd, The Decemberists, Pendulum, Metallica, Billy Joel, Leonard Cohen, Zero 7 – they’ve all been called ‘the best band ever’ by reviewers at one point or another, and yet it is never difficult to find someone who doesn’t care about – or even actively dislikes – them.


Do you enjoy a smattering of random photography links? Well, squire, I welcome thee to join me on Twitter -

© Kamps Consulting Ltd. This article is licenced for use on Pixiq only. Please do not reproduce wholly or in part without a license. More info.