Tips & tricks

Found: Tips for aspiring food snappers

food-om-nom

Great photography makes you hungry. You want to tear into the food like a bear tears into, er, food.

Not all food photographers have the most tasteful of practices, as witnessed in my Dirty Tricks of Food Photographers post over on Photocritic. Of course, there are still plenty of delicious ways of photographing food without resorting to motor oil and nail polish. I’d hope that my food photography portfolio (all of natural foods!) stands testament to that.

Anyway, I just found some awesome tips for food photographers over on the Digital Photography School: 7 Tips for aspiring food pornographers. Yum indeed. Check it out, be inspired, and get snapping.

Found: 5 Landscape Photography Tips

arizona-landscape

Ah, landscape photography, why do you taunt us so? There’s something beautiful about capturing the world around you, but it’s bloody frustrating.

After all, you can see all the beauty around you, but why won’t your bloody camera capture it all?

There’s a lot to think about when doing landscapes. What lens should you use? How do you make it all come together? Is my horizon straight? Why won’t that cursed tree stop swaying in the wind?

Beyond Megapixels has five great tips on how to make your landscapes come to life, along with some dishy examples of gorgeous landscapes. G’won, give it a shot.

The 10 Second Pre-Shoot Camera Check

settings

I’ve been there many times – half way through a photo shoot you suddenly stop and think. “Oh… no.. I did a photo shoot in the dark yesterday. Please don’t tell me my ISO is still set to 800″… And some times, it turns out that yes, I really am that stupid.

A pre-shoot camera check makes a lot of sense, but what should you check before you run off to do a shoot? Myself, I’ve gotten in the habit of taking a single photo. If the camera shows me the photo afterwards, it means that I’ve remembered to put a memory card in the camera, I’ve got my battery, and there’s a lens attached (No, I don’t forget attaching a lens very often. But, to my gravest of shame, it has happened once that I rocked up at a shoot without a lens. Luckily, I did have one in my camera bag. That could’ve gotten very very embarrassing.)

Anyway, there’s a small list of stuff worth checking before you get all snapper-happy, and my good mate Brian Auer is more than happy to run us through it..

Read the full 10-second camera check over on Epic Edits!

Models: Preparing for a photo shoot

The modelling industry is very competitive. Every photo-shoot is a chance for a model to show herself at her best, and any model is only as good as their last shoot – so there’s a strong incentive to make each photo-shoot count towards

This article highlights some recommendations that a model may want to review in order to prepare him or herself for a photo-shoot. While digital photo processing software such as Photoshop can work miracles, neither a model nor a photographer will take as much pride in highly photoshopped pictures. If you take the time to prepare well in advance of your photo-shoot, you will feel more confident and as a result, look better. 


Part 1: Show your body and skin at its best!

1. If you work out, you may want to vary your routine to show off the muscles you’re most proud of. Or, a week before the shoot, you may want to increase the intensity of your workout. For example, if you usually do aerobics or body shaping, switch to working with gym equipment for a couple days. You will notice how well your muscles will respond. In no way does this mean you need to have a stereotypical fashion model’s body. Exercise can be great for any body and can boost confidence – and confidence is really what makes you attractive.

2. Moisturize: Hopefully you moisturize your skin regularly. If not, certainly apply moisturizer on the days before and morning of the shoot. To make your skin look smooth, supple and glowing, consider using with a hydrating cream containing exfoliators such as hyularonic or glycolic acid.

3. Remove: If you shave, do so 2 days before the shoot, in order to give your skin a chance to recover. If you do it yourself, follow the main rules of depilation to avoid irritation and ingrown hair:

- cleanse your skin and exfoliate before depilation
- do not stretch your skin when depilating
- do not apply too much pressure when shaving or using hair depilation cream
- do not run the shaver over one and the same spot several times or you can create irritated spots. If you have to, reapply shaving cream.

4. Color: Instead of using a solarium and prematurely aging your skin due to UV damage, consider using self-tanning creams and bronzing products. Choose a light type that gives you a chance to regulate intensity with each application and to avoid disasters like uneven color, lines and spots. Experiment with these products well in advance of your shoot, so you know that the color will look right for you. Try to avoid tan lines.

5. Watch it: Avoid too much salt and iodine in your diet. Salt can lead to water retention in the skin and the skin surface does not look smooth and tight but tired and bumpy. Iodine, for example in sushi and marine dishes, can trigger break-outs. Include more fiber into your diet it will help your body to get rid of toxins, and drink plenty of water.

6. Spots: If you do get a pimple the day of the shoot, do not touch it, as you will make it redder and harder to cover. Most photographers have no problem with one or two pimples as these can be easily covered with makeup or digitally removed by photoshop. If you have serious acne problems, be sure that your photographer knows this in advance.

Caution: Do not experiment with new skin treatments the night before the shoot. Any new treatment can cause skin irritations or allergic reactions. Test out the treatments well in advance of the shoot in order to know how your skin will react and how long your skin needs to recover.

Part 2:

Okay, your skin and body look great! What else you can do to prepare for a photoshoot?

1. Hair: If you dye your hair, make sure that you have had your roots recently treated. Studio lighting can exaggerate dark roots.

2. Nails: Make sure your finger and toe nails look clean and manicured. Use a clear nail polish which will go with any color clothing. If you must color your nails use a neutral white or cream. Red nails will look strange if your outfit is blue.

3. Makeup: If there will be a makeup artist at the shoot, arrive with no makeup on. Otherwise, you will loose time and potentially irritate your skin (and your photographer) when the makeup comes off. If you will be doing your own makeup, remember that photography lighting and the heat from the lights tend to make the skin look shinier than usual. Do not use any shiny or bright make-up that might cause reflection or glare during the photoshoot. Apply a base to smooth your skin and make it look consistent. Use mascara to bring out your eyes. Bring several colors of lipstick that you can apply depending on the color of clothing.

4. Wear antiperspirant. Avoid using any deodorant which may stain clothing.

5. Tattoos: If you have tattoos, experiment to see what make up will cover them naturally. If you are interested in being a traditional fashion model, don’t get tattooed, as many photographers don’t like them. On the other hand, tattoos can make a portrait more interesting – just make sure the photographer knows about them ahead of time.

6. Posing: Practice your poses before the shoot. This is especially advisable if you are a beginning model. Flip through some magazines and find the poses you like. Practice your facial expressions and poses in front of a mirror so you can see how you look at your best. Often exaggerated or unusual poses look most interesting. Wild and disheveled hair may be better for you than the well-groomed look. Do not be afraid to experiment and try new things. It will be much better than standing like a stick in front of the camera.

7. What to wear to the shoot: If your shoot is glamour, swimwear or lingerie, wear loose fitting gym clothes which have no elastic bands. Do not wear underwear. Underwear leaves lines on the skin, which can require 30-60 minutes to disappear.

8. Get plenty of rest: Have a good night’s sleep the night before the shoot. Avoid partying the night before a photoshoot. Alcohol and cigarette smoke, even smoke in the air, can make your eyes red and puffy. Also, if you are a smoker bring down the number of cigarettes your smoke or stop completely before the shoot. Smoking deprives skin of oxygen and nutrients and makes it look gray.

Invest the time to make yourself look the best you can be so you can feel confident during the shoot. If you feel great about yourself, you will exude confidence. Confidence shows and will help to make your photos the best they can be.

This article was written by Eden Fenrick for Photocritic. If you fancy writing a guest article, get in touch!


Do you enjoy a smattering of random photography links? Well, squire, I welcome thee to join me on Twitter -

© Kamps Consulting Ltd. This article is licenced for use on Pixiq only. Please do not reproduce wholly or in part without a license. More info.

When less is more

grzesiek

It can often be incredibly tempting to try and fit more information into a photograph. Understandably so – wherever you turn, you find a barrage of information. Minimalism truly is a lost art in photography, and you’d be surprised to find that it’s actually quite difficult to get right.

In this photo critique, I am doing things in a slightly new way, and I’m cherrypicking some of the best photos that have been submitted to me over the past couple of months. Together, we’ll explore photographic minimalism, and how you can make hellastrong photos with less.  


Showing emotions

sondra-evans-01.jpgMinimalism is one of those concepts that’s difficult to wrap your head around – In one way, it can be described as just keeping it simple, but there’s a lot more to taking a good minimalist photograph.

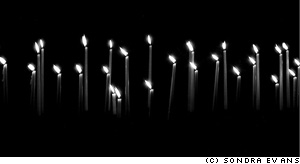
Take this photo taken by Sondra Evans, for example: On the surface, it is just a photo of a series of cake candles on a black background, but look closer: despite of its deceptive simplicity, the image is telling a story… Some of the candles are burned down further. Why? Also, all the flames are pointing to the left, which gives me, personally, a feeling of longing. I read from left to right (as do you, I would hope, esnes yna ekam dluow siht fo enon ,esiwrehto), so the fact that the candles are left-oriented makes me feel as if they are pining for the past. I associate candles with romance, birthdays and love, but given the blackness and the sombre settings, I’m thinking candles of mourning: Are the candles on a grave? Or on a coffin? Is the photographer mourning the loss of a loved one?

So many ideas, thoughts and feelings, invoked by such a simple photograph. I love it.

Surrealism

grzesiek.jpgThe minimalist movement started in the late 1960s, which sort of makes sense: I’m all for the music of the era, but tie-dye would do my fucking nut – no wonder people were striving for simplicity. As a stepping stone to post-modernism, minimalism works very well when combined with surrealism – and that’s where Grzesiek’s photograph comes in…

Photographing a light-bulb upside-down, combined with the strong patterns created by the walls around it is a stroke of genius – and I love how the image causes you to re-think perspective, lighting, and photography itself. It has often been said (by myself, but more importantly, by people who actually know a lot about photography) that photography is all about light (hell, the word itself means ‘drawing with light’). Photographing a light source, then, becomes a documentation both of the method and the result of a photograph at once – that goes both for the photo of the candles, and this photo of the lightbulb.

This is a particularly good example of how you can use clean, simple lines, and a philosophy of ‘less is more’ to great effect. I’d be proud to have this hanging on my wall – wouldn’t you?

Playing with light

rachel-01.jpgTo me, minimalism is all about doing creative things with lighting: by being selective about what you light and how you have a fantastic opportunity to pick out details from a scene.

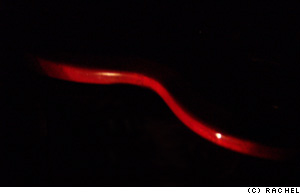
Rachel’s photo to the left, for example, illuminates the side of a coffee table (is it? or is it a chair? A cane? An electric guitar?). This particular photo has quite a bit of noise in it, sadly, and I would have cropped it entirely differently, for effect.

If you light something to make something disappear, or to allude that there is something more to the image, I always feel it is more useful to actually include the blank space in the image.

haje-rachel.jpgRather than making what you’ve carefully lit the center of the focus of the image, you’re essentially drawing the onlooker’s attention on what isn’t there – check out the image to the right.

What you are looking at is the same basic photograph as the one Rachel sent me, but re-coloured, and re-cropped in Photoshop. The large area of nothingness adds to the interest of the photo, because it’s practically jumping up and down, screaming ‘look at me! I’m mysterious! I’m an enigma! Try and solve me!’. Dunno ’bout you, but I find that strongly appealing.

haje2.jpg

The photo above is a simple egg in an egg-cup. Lit from the right and behind the photo, I’m particularly fond of this image (but then I would be – I took it), because around 96% of the frame is pure black – yet the 4% that aren’t give enough ‘feel’ that it’s perfectly possible not only to know what, exactly, you are looking at, but also add a sense of mystery and very strong visual lines.

fernando-adame-monkeysensei02a.jpgThe egg-in-eggcup is an odd one as well, because it conforms quite strongly to the rule of thirds, but the elements that fall on the dividing lines are not actually visible in the image. In effect, your eyes are ‘filling in’ the bits of the photo that are missing, and creates a pleasing visual image out of something that ain’t there. Call me a geek, but stuff like that makes me smile on the inside.

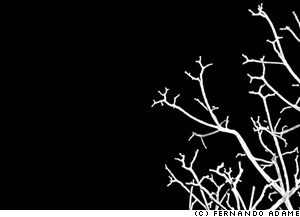
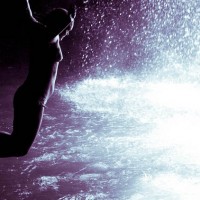
While we’re in the mood for crazy lighting schemes, do realise that side-lit subtlety is but one way of getting powerful images. The photo on the left, taken by Fernando (you might know him as MonkeySensei if you hang out on DeviantArt much), is a cheeky little example of how to do things differently. This image is almost Sin City-esque in its simplicity, but I love it.

The technique applied for taking this photo is so easy it’s almost embarrassing: Go outside on a dark night, find a tree, blast it with your flashgun on full pelt, et voila – a perfect photo. The composition in this image is what really gets me though – it’s almost as if the branches create a gradient feel to the image, as if they are cracks in an ice surface, propagating throughout the photograph. Especially amazing is that this photo barely has any grays in it: Everything is either pure white or pure black – you can’t get much plainer than that. Fantastic.

jasondeehr.jpgColour in minimalism

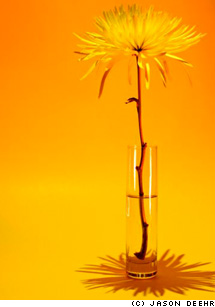
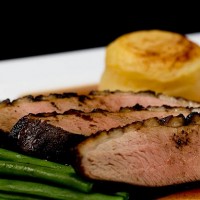
Of course, if you’re trying to keep things simple, going black-and-white is the easy way, but you can get some really stunning results by using colour, too. Jason Deehr, for example, sent me a photo which was minimalism with a twist: By using a background and a subject that are of very similar colour, suddenly the photograph becomes a celebration of colour, life, and warmth.

The tonality of ochre, light orange and yellow plays a careful, intricate game, turning what would be a rather sombre black-and-white image into a vibrant ode to life. There isn’t much of a story in this photograph, no pretenses, no deeper meaning, but it all just doesn’t matter – it’s gorgeous, simple, and full of optimism and innocence.

Of course, by varying the colours, you can create a whole series of moods – a yellow, an orange and a red panel in a triptych, anyone? It would make a great way to greet visitors to your house – hang three next to each other in the hallway!

While strong colours are a good option, a larger degree of subtlety can also have desirable effects – take this photo by Paul Mongan, of an unusual building, for example:

paulmongan.jpg

roof-haje.jpgI was torn as to whether the photo can be labelled as ‘minimalist’ or not – but similarly, it’s easy to see how the very same scene could be photographed at a different time of day, for a much stronger impact.

The high contrast between a clearer sky (or, perhaps, just overexpose the sky so it becomes much paler) and the distinctive shape of the building roof, could be a strongly striking, and visually appealing, impactful image. Of course, in my mock-up (to the right) you do lose much of the colour, but you do re-gain a lot of the oomph that I feel an image like this should have: washed-out colours and low contrast don’t cut it when you have source material which is crying out for drama.

People, but less

rachel-02.jpgObviously, there’s nothing to stop you from including people in your adventures in minimalism either – It’s just far more difficult.

One of the main reasons is that people are complicated shapes – faces are anything but minimalist, and there’s hair, ears, legs, arms – by the time you’ve taken a shot, you’ve got enough clutter in there that it’s difficult to fill an image with the tranquility and simplicity that minimalism is characterised by.

yorgos-haje.jpg
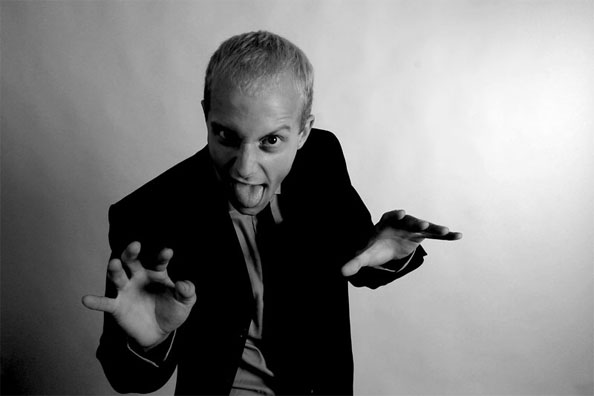
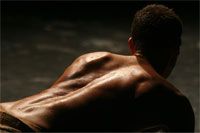
Rachel’s experiments in keeping portraiture simple, however are particularly effective. The style of the image on the right remind me of the work of the amazing Katie Cooke (who runs the Slowlight pinhole photography website), and is a good example how slight motion blur can actually smooth out an image quite a bit – certainly something worth further experimentation.

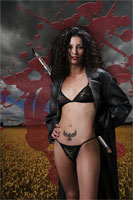
One way of simplifying portraiture is to go the high-contrast, slightly surrealist route (like my photo to on the right), but none but the nuttiest among us would concede that the picture is minimalist as such.

Challenge

So, it’s challenge ‘o’ clock, folks – can you take a portrait of a person that leaps off the screen, which is simple – even minimalist – yet captures a characteristic of the person you are photographing? If so, post it on DA, Flickr, or similar, and post a comment to this post with the link – I’d love to see it!


Do you enjoy a smattering of random photography links? Well, squire, I welcome thee to join me on Twitter -

© Kamps Consulting Ltd. This article is licenced for use on Pixiq only. Please do not reproduce wholly or in part without a license. More info.

Keep the dust off your lens

ixus.jpg

If you’ve got a compact camera, you know how bloody annoying it is to have to clean your lens. It’s tiny, and it seems to attract dust as if it was a lamp, and the dust were moths, confused by the lovely, bright source of light. Right? Right? Right.

There’s a ridiculously simple solution worth trying: When you know you’re going to be in a particularly vulnerable situation (a desert, a dusty place, or a night on the lash*, for example), you could do some pre-emptive maintenance: Just cover up your lens with a piece of high-quality scotch tape!

Important: Obviously, only use the following tip if your front lens element (that’s the glass bit) doesn’t actually stick out further than the lens barrel. Otherwise, you’ll make your lens sticky and dirty and the whole point is gone! 


Sounds simple? Well, that’s because all the greatest solutions usually are. The better quality your tape is (i.e. the more translucent it is), the better. The best thing, obviously, is that the scotch tape is a hell of a lot easier to clean off than the crinkly, unreachable crevices of your digital compact camera!

Bonza.

*) on the lash is a Britishism for being pished as a newt. Hammered. Whacked. Smashed. Pissed. Fucked. Or, in the parlance of our times: ‘drunk beyond reason’.

Extra special thanks to CalebVaughn for this ridiculously simple, yet incredibly effective tip!


Do you enjoy a smattering of random photography links? Well, squire, I welcome thee to join me on Twitter -

© Kamps Consulting Ltd. This article is licenced for use on Pixiq only. Please do not reproduce wholly or in part without a license. More info.

Your photos, 300-style!

300-03.jpg

Movie audiences of the world are vastly and completely amazed by the beauty of the new movie 300. With its extremely distinctive style, quick-moving plot and — like Sin City, another of my favourites — relatively closely based on one of Frank Miller’s graphical novels, it’s got it goin’ on.

If you’ve seen the film, you can’t have failed to notice the amazing quality of the artwork involved: The CGI is amazing, of course, but even the live-action bits of the film is nothing short of stunning. So, how, exactly, can you recreate the effects? We interviewed graphic artist Jason Niedle to find out more… 


300-02.jpg300 was shot entirely using blue- and green-screen, which is a technology which allows you to create the backgrounds digitally. Of course, the actors use props etc, but the fact remains that nearly 90% of all the footage used in the film involves various types of visual effects. The film was in post production for nearly a year — ages, in film industry terms.

Oh, so you’re a tech geek, are you? Well, let’s find out what IMDB tells us about the technology used:

300-03.jpgThe film was edited on an Avid, with an HD cut also maintained in Final Cut Pro The 3D was made using Maya, XSI, and Lightwave The 2D composites were made with Shake, Inferno, Fusion, and Combustion. The film makers prefer Macintosh, but large portions of the movie were made under Linux. Asset management was handled by custom software written in the Panorama development environment, made by Provue. Color management was handled by Truelight software. The film was scanned on a northlight scanner and was recorded on the arrilaser. Most of the film was shot at high speed, between 50 and 150fps. Normal film is at 24fps. The film was transferred to HD SR tape and quicktime, and HD quicktimes were the basis for the HD preview cuts. The working resolution for the film was 2K, at a working aspect ratio of 2.11 and a projected aspect ratio of 2.35.

Err, right. If anyone fancies translating that into English, feel free to post a comment. That’s totally not why we’re here, though, and I’ve let my mind wander way off track (it does that a lot recently, I blame the fact that I’ll soon be visited by my lovely girlfriend, who I haven’t seen in more than two weeks. It does weird things to my mind. Oh, I’m waffling again. But then again, as a regular reader, I’m sure you’re used to that from me by now… Right?)

How did they achieve the special look of the film? As it turns out, the directors and film editors decided to do a ‘crush’ technique. This means that you extend the blacks (‘crush’) to up the contrast and make a scene look eerie.

Let’s illustrate. Starting with a straight-up photo of the lovely Christine, where she’s looking ever-so-slightly devious:

crush-01.jpg

crush-02.jpg
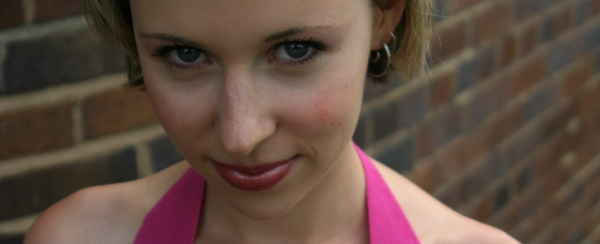
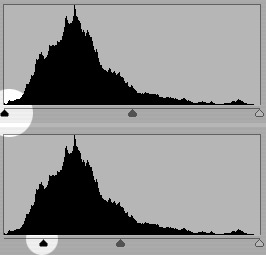
Now, to apply the ‘crush’ technique, you need to adjust the levels on your image so the black comes out stronger. Obviously, you need to do these changes only to a selection of your image, otherwise, it’ll come out way too dark.

Now, with some careful selections and some drastic image editing, you can turn this photo into something that has far higher impact and offers up a lot more contrast to work with. This is important, especially because the contrasty style of 300 would be impossible to recreate without, err, contrast.

crush-03.jpg

ip-01-1.jpg
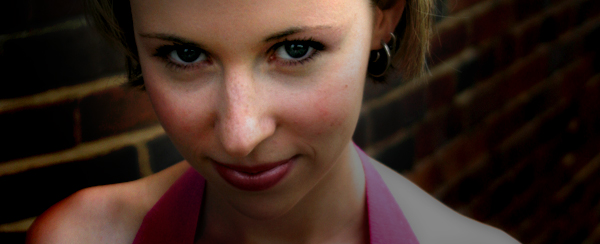
When you’ve got the contrast right, you’ve got to start playing with the colour — it’s got to be right, after all.

When Jason saw the movie, he explains, he wanted to re-create the effect. Re-visiting a photo he took a while ago, he combined the photograph with some stock stuff, and came up with the image to the right.

“I spent a little time balancing the brightness of the images”, he recalls, such as darkening the background and making the model stand out properly. Subsequently, he added a Sepia tone to the image:

ip-02.jpg

… Which brings the photograph in line with the colour feel of 300, apart from the whole ’300 being in colour’ bit. What next? “Well, I liked the effect quite a lot, but it didn’t quite cut it. For one, it wasn’t nearly colourful enough”, Jason explains, “so I took the base image, made a copy of the layer and put it right back on top”. By using the ‘multiply’ channel layer and fine-adjusting the opacity of the new layer in Photoshop, it adds some of the colour back into the image, and amicably imitates the ‘crush’ feel of 300.


ip-03.jpg

We’re getting close now, but the lighting- and director of photography of 300 had shot the film with rather dramatic lighting. In addition, a lot of the scenes in 300 has the models oiled up (or, at the very least, sweating like pigs. Wouldn’t you, in the heat of battle?), so the powerful lighting reflects off the models in a wicked way. “Basically, I added a motion blur to the background, and added it as a separate layer to the Photoshop file”, Jason explains.

The final result? Judge for yourself:

ip-04.jpg

Jason suggests that the original photo could have done with more powerful, side-on lighting, but the basic feel of the 300 movie posters is there… Wouldn’t you agree?

Jason is a graphic designer and photographer based in Orange County, California. Read more of his stuff on Jasontopia. The first three images in this article are used courtesy of Warner Brothers under Fair Use / Fair Dealing, for illustrative purposes. For full-res versions and more info about the movie, check out the official 300 website.

Emergency tripod? Piece of string!

picture-24_165x140.jpg

The main problem of taking photos free-hand is that your hands aren’t particularly sturdy. Myself, I find using a heavier camera makes it a lot easier (the inertia of the camera means it is reluctant to move, so up to a point, a heavy camera is easier to hold still for the duration of a photographic exposure than a very light camera), but what about lighter cameras?

The obvious answer is a tripod or a monopod, but these devices can be terribly heavy, and they are not particularly portable. One solution is to hold the camera against a surface (a tree, a building, or a signpost), but that doesn’t always work either, and none of these items offer an awful lot of flexibility.

How do you stabilise your camera most often?

  • Quadrapod
  • Tripod
  • Monopod
  • Mini Tripod or similar
  • Gorillapod or similar
  • String tripod ('chainpod')
  • A rock / table / whatever
  • Freehand with a fast lens
  • Freehand with an IS lens
  • Freehand
  • Stabilise my camera? But why?
  • I don't take photos

View Results

How?

I often find myself thinking 'Damn, if there was only a way to anchor the camera to the ground…', and I recently found a solution that works: A String Tripod (also known as a Chainpod)!

It is a laughably simple device: You get a wing nut bolt (or anything that screws in) that fits into the tripod hole of your camera (you are looking for a bolt with 3.5×8″ threads), and drill a small hole into the bolt. Then, you attach a length of string to it, with a loop at the end. If you use the shearing lines available for tents, you can vary the length of the loop, and, as such, the height of the camera.

To use one of these string tripods, put your foot (or feet) through the loop, and pull the string taut against your foot. Now, out of nowhere, your camera will be a lot more stable, as it has an axis against which it cannot move (up/down). This means that you can hold the camera a lot calmer – you would be surprised how much of a difference this can make!

But… But…

Sure, it will never replace a proper tripod or monopod, but I wouldn’t be surprised if you gain a couple of stops on your shutter time by using this system. And the best thing? Making one of these is going to cost you less than a bottle of milk and a loaf of bread!

Clean your imaging sensor!

DSLR sensor chips collect dust. That is a Photoshop-time-consuming fact of digital life. At The Sun, whenever we send in our DSLRs to be otherwise repaired, one nice little bonus is that (along with the obscene repair bill) they come back with a freshly cleaned CCD.

Which, of course, lasts for about a week. Two if you are lucky. 


You may not even notice that you have dust at all, until you stop down and shoot with a wide lens or macro. Then, all of a sudden it looks like you are looking through an electron microscope or something. Eww.

Heck, I used to even keep a little sticker on one of my bodies to denote which one had the “cleaner” (and I use the term in the relative sense) CCD. That was so I would know which one to use if I needed to shoot something at f/11 or higher.

Read the rest of David’s article over on the Strobist blog!


Do you enjoy a smattering of random photography links? Well, squire, I welcome thee to join me on Twitter -

© Kamps Consulting Ltd. This article is licenced for use on Pixiq only. Please do not reproduce wholly or in part without a license. More info.

Don't buy camera gear via Froogle etc

It’s old advice, but it certainly hits the spot…

Since the dawn of the commercial web we have been warned to not be suckered by “too good to be true” online deals. Keep your friends close and your credit card closer. Over and over scummy retailers are exposed but a quick name-change are back online trading their crap, fake or purely imaginary goods. 


Still forum posters continue to be burned by dodgy online traders. The problem comes down to customers shopping on price alone. Like the apocryphal lemmings over a cliff they are drawn to the low bidding merchants in shopping search engines. When the item doesn’t turn up, or unexpected (and unexplained) costs appear on the credit card statement or when they get zero (or abusive) customer service they look around for help and sympathy. But there is only one person to blame in the end; the customer. Emptors and caveats, etc.

When you understand how these businesses operate you can see why there are so many problems and how little is in your power to avoid being taken. When I started this blog one of the ex-members here had his own online camera store. I learned a lot about how the business worked and the more I learned the more sure I was my policy of sticking to the high street was the right one, even though it meant paying a premium.

… Thus begins the fantastic article by Chris over on the dSLR blog. He explains how some of the scams work, and also tells you how to avoid them.

I’ve been bitten by one of these scams myself, ages ago when I was buying my first article, so take heed, folks, there’s nothing quite as horrible as the feeling of being parted with your hard-earned cash, and seeing none


Do you enjoy a smattering of random photography links? Well, squire, I welcome thee to join me on Twitter -

© Kamps Consulting Ltd. This article is licenced for use on Pixiq only. Please do not reproduce wholly or in part without a license. More info.

Portraiture: Loosen up!

Jonathan_Monster.jpg

I’ve spent a lot of time looking at portraits over the last couple of days for various reasons I shan’t get into in details, but there’s one pet peeve I’m afraid I’m going to have to share with you…

Why are people always so damn serious when they are being taken photos of? Does nobody understand the art of portraiture anymore? 


back.jpg
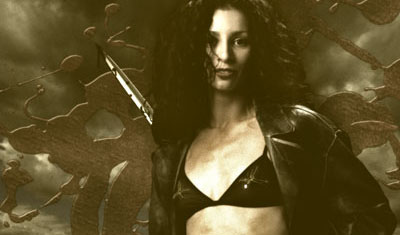
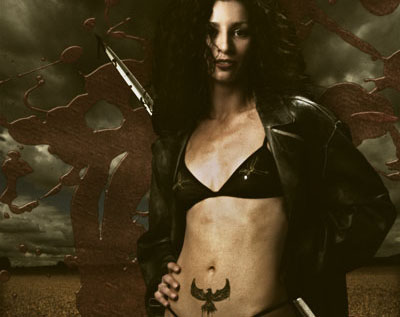
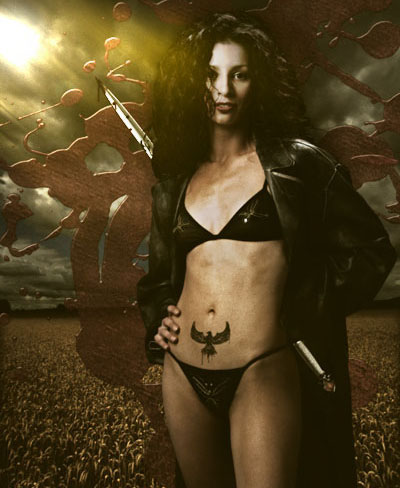
To me, a portrait doesn’t have to be a flat-on head-and-shoulders photo. Hell, I’ve seen excellent portraits that don’t even have faces in them. The point I’m trying to make is that there are too many people why are just straight-up trying too hard with their portraiture.

It all depends on what you are trying to do with your photos of course, but are you really the dude who wants to get known for taking plain, boring heads-and-shoulders shots? Granted, I do believe that all good photographers should have a go at classic portraiture, but ultimately, what is portraiture all about?

To me, portraiture is about capturing something that is typical about somebody, in such a way that people who know the subject instantly recognise them, and in a way that people who don’t know them get enough data to make up some sort of opinion about them.

This style of portraiture presupposes that you aren’t taking photos in a lame-ass conveyor-belt-style (yes, Venture, I’m looking at you), but actually have the time to get to know your subjects, and it might just work best with people you know quite well to begin with.

But… Isn’t experimentation and an attempt at capturing the unique what photography is all about? So why aren’t people playing around more?

Jonathan_Monster.jpg

If you’ve got some stunning portraits that break the rules – why not post a link in the comments? I’d love to see some photos that defy the monotony, before I go spare and lose all faith in the photographers of the world…


Do you enjoy a smattering of random photography links? Well, squire, I welcome thee to join me on Twitter -

© Kamps Consulting Ltd. This article is licenced for use on Pixiq only. Please do not reproduce wholly or in part without a license. More info.

Try before you buy: Rent glass!

rentglass.jpg

rentglass.jpgA good way to get to grips with camera equipment is to go out and rent some. Here in the UK, I’ve found Calumet Photo to be an invaluable source of expensive glass on a temporary basis (they also have a presence in Germany, Holland, and the US), but I just stumbled across a brand new concept: On-line lens rental! 


It is such an obvious thing to do, but I guess it’s like Columbus’ egg – you have to think about it first. Of course, you can’t keep a good idea to yourself for very long, so when I started to look for it, I actually found two companies that do on-line camera equipment rental – One of them is Ziplens, and the other is the unimaginatively named RentGlass.

As far as I can tell, they both only cater for the US market, but hey – it’s a brilliant idea, and I bet it’s only a matter of time before the concept goes around the planet.


Do you enjoy a smattering of random photography links? Well, squire, I welcome thee to join me on Twitter -

© Kamps Consulting Ltd. This article is licenced for use on Pixiq only. Please do not reproduce wholly or in part without a license. More info.